background image

Assembly Instructions 


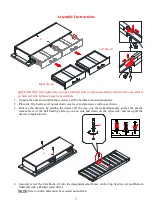
NOTE: DO NOT fully tighten all cam locks and bolts until you finish assembling all parts. Once assembled, 
go back and fully tighten all cam locks and bolts.


1.


Unpack the unit and confirm that you have all the hardware and required parts. 

2.


Place the Top Section (A) upside down on a level and protective surface as shown. 

3.


Remove  the  drawers  by  pulling  the  drawer  all  the  way  out,  then  simultaneously  pushes  the  plastic 
release  lever  of the  ball  bearing  slide  up  on  one  side  and  down  on  the  other side,  and  then  pull the 
drawer completely out. 


4.


Securely screw the Cam Bolts (2) into the designated small holes on the Top Section (A) and Bottom 
Shelf (B) with a Phillips screwdriver.  

NOTE:

 Screw-in cam bolts must be screwed down flush.

A

2

A

B

Left drawer 

Right drawer 

Summary of Contents for BJKC

Page 1: ...T return this item to the store where it was purchased Please call our toll free customer service number and have your instructions and parts list ready to provide the model name part name or factory number 1 866 942 5362 Pacific Standard Time 8 30 a m 4 30 p m Monday to Friday Or visit our website 24 hours a day 7 days a week for product assistance at www whalenfurniture com Or e mail your reques...

Page 2: ...all tipover restraint provided NEVER put a TV on this product NEVER allow children to stand climb or hang on drawers doors or shelves NEVER open more than one drawer at a time Place heaviest items in the lowest drawers Use of tip over restraints may only reduce but not eliminate the risk of tip over WARNING THIS UNIT IS INTENDED ONLY FOR USE WITHIN THE MAXIMUM WEIGHTS INDICATED USE WITH LOAD HEAVI...

Page 3: ...OCK DOWN KD ASSEMBLY SYSTEM WORKS 1 Screw the Cam Bolt into the pre drilled small holes on the panel Connect both panels together making sure the Cam Bolt goes into the pre drilled hole at the end of the panel with the Cam Lock 2 Insert the Cam Lock into the pre drilled large hole in the panel Make sure the arrow on the Cam Lock is pointed towards the Cam Bolt 3 Once the Cam Bolt is connected insi...

Page 4: ... Qty 4 Qty 2 Qty 4 1 extra Qty 4 1 extra 3 M8 x 30 mm Wood Dowel 4 1 4 x 25 mm Bolt 5 1 4 x 32 mm Bolt 6 1 4 x 38 mm Bolt Qty 8 1 extra Qty 8 1 extra Qty 4 1 extra Qty 12 1 extra 7 Lock Washer 8 Flat Washer 9 Shelf Pin 10 Cam Lock Cover Qty 24 1 extra Qty 24 1 extra Qty 8 1 extra Qty 4 1 extra Hex Wench Glue Touch up Pen Tipping Restraint Hardware Kit Qty 2 Qty 1 Qty 1 Qty 1 Included in plastic ba...

Page 5: ...ide down on a level and protective surface as shown 3 Remove the drawers by pulling the drawer all the way out then simultaneously pushes the plastic release lever of the ball bearing slide up on one side and down on the other side and then pull the drawer completely out 4 Securely screw the Cam Bolts 2 into the designated small holes on the Top Section A and Bottom Shelf B with a Phillips screwdr...

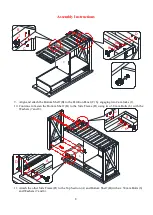
Page 6: ...Dowels 3 into the inner holes on the Bottom Shelf B and Partition Panel C as shown 6 Attach the Side Handles G to the Side Frames D using four 32 mm Bolts 5 with the Lock Washers 7 and Flat Washers 8 B 3 3 3 3 3 3 3 3 C 3 3 D D G G 5 7 8 D G ...

Page 7: ...h four 38 mm Bolts 6 and eight Washers 7 and 8 8 Attach the Partition Panel C to the Top Section A by engaging two Cam Locks 1 Make sure that the cam locks point towards the right side of the unit Refer to page 3 on Cam Lock system operation supplement D A 8 7 6 A D A C C A 1 ...

Page 8: ...aging two Cam locks 1 10 Continue to fasten the Bottom Shelf B to the Side Frame D using two 38 mm Bolts 6 with the Washers 7 and 8 11 Attach the other Side Frame D to the Top Section A and Bottom Shelf B with six 38 mm Bolts 6 and Washers 7 and 8 C B 6 7 8 B D D B 1 C D A B 6 8 7 B D 6 D A 7 8 ...

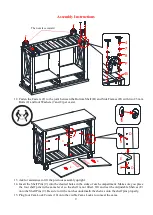
Page 9: ...pright 14 Insert the Shelf Pins 9 into the desired holes in the sides of each compartment Make sure you place the four shelf pins in the same level so the shelf is not tilted Tilt and rest the Adjustable Shelves E onto the Shelf Pins 9 Be sure to fit the notches underneath the shelves onto the shelf pins properly 15 Plug four Cam Lock Covers 10 onto the visible Cams Locks to conceal the cams The n...

Page 10: ...he way to the end of the slides in both sides and align the slide runners on the drawer with the slide tracks on the unit and push it carefully inside until it stops If the drawer does not go in smoothly please take it out and repeat the step CAUTION Lock the casters at all times when not rolling the unit and particularly when opening the drawers FRONT FRONT Ball bearing cart Ball bearing cart Lef...

Page 11: ... wall construction different anchor hardware maybe required Please contact your local hardware store for assistance Young children can be seriously injured by tipping furniture You must install the Tipping Restraint Hardware with the unit to prevent the unit from tipping causing any accidents or damage The tipping restraints are intended only as a deterrent they are not a substitute for proper adu...

Page 12: ...ges can cause fading warping shrinking and splitting of wood It is advised to keep furniture away from direct sunlight as sun may damage the finish Proper care and cleaning at home will extend the life of your purchase Following these important and helpful tips will enhance your furniture as it ages A touch up pen has been provided to minimize the small nicks or scratches that may occur during ass...

Reviews: