background image

Model # BRA7PD-E 

Please call for replacement parts or assistance: 

1-866-942-5362


Whalen Furniture Mfg., Inc.   


              Page 7 


               Factory No. 16650 

Assembly Instructions 


6.


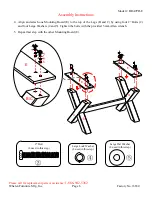
Position the Table Top (A) upside down on a level and protective surface, as shown below. 


7.


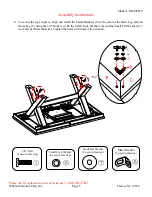
Ask for assistance to flip the assembled base upside down and align the pre-drilled holes on the 
Mounting Boards (E) with the threaded inserts on the slides supports of the Table Top (A). Securely 
screw eight 2” Bolts (2) with the Large Washers (4 and 5) through the pre-drilled holes on the Mounting 
Boards (E) and then into the slides supports, using the provided 5 mm Allen wrench.  


2”

 Bolt 

(8 used in this step) 


Large Lock Washer

(8 used in this step) 

Large Flat Washer 

(8 used in this step) 

E

E

A

Summary of Contents for BRA7PD-E

Page 1: ...regarding assembly or if parts are missing DO NOT return this item to the store where it was purchased Please call our toll free customer service number and have your instructions and parts list ready...

Page 2: ...to state Customer Service 1 866 942 5362 8 30 a m 4 30 p m PST Monday to Friday www whalenfurniture com 1 Maximum load weight 181 4 kg 400 pounds 1 Please read the Assembly Instructions prior to asse...

Page 3: ...parts and hardware are present before beginning assembly A Table Top 1 B Inner Leg 2 C Outer Leg 2 D Stretcher 1 E Mounting Board 2 1 1 4 x 3 4 Bolt 2 5 16 x 2 Bolt 3 5 16 x 3 Bolt 4 1 extra 16 1 ext...

Page 4: ...ough the Large Lock Washers 4 and Large Flat Washers 5 through the countersunk holes on the cutout of the Legs and screw into the Stretcher as shown in the illustration below Tighten the bolts with th...

Page 5: ...66 942 5362 Whalen Furniture Mfg Inc Page 5 Factory No 16650 Assembly Instructions 3 Attach the Outer Legs C to the Inner Legs B by snugly fitting the cutouts together Make sure that the threaded inse...

Page 6: ...s 4 Align and attach one Mounting Board E to the top of the Legs B and C by using four 2 Bolts 2 and four Large Washers 4 and 5 Tighten the bolts with the provided 5 mm Allen wrench 5 Repeat last step...

Page 7: ...o flip the assembled base upside down and align the pre drilled holes on the Mounting Boards E with the threaded inserts on the slides supports of the Table Top A Securely screw eight 2 Bolts 2 with t...

Page 8: ...ign and attach the Metal Brackets 8 to the joint of the Inner Leg B and Outer Leg C using the 3 4 Bolts 1 with the Small Lock Washers 6 and the Small Flat Washers 7 two bolts per Metal Bracket Tighten...

Page 9: ...and release the slide locks on both slide mechanisms to allow the slide to operate then pull the Table Top wide open equally from both ends 11 Lift the Butterfly Leaf from the compartment of the Table...

Page 10: ...and release the slide locks on both slide mechanisms to allow the slide to operate then pull the Table Top wide open equally from both ends 14 Flip down the leaf aprons and fold the butterfly leaf to...

Page 11: ...in the furniture finish Stains or marks from crayons or ink markers will be difficult to remove In the event that your furniture is stained or otherwise damaged during use we recommend that you call a...

Page 12: ...SFW Small Flat Washer BRA7PD E CHC Complete Hardware for Chair BRA7PD E 26 3 4B 1 4 x 3 4 Bolt BRA7PD E 8 TTWS Table Top w Slides BRA7PD E 27 1 3 4B 5 16 x 1 3 4 Bolt BRA7PD E 8A MSM Metal Slide Mecha...

Reviews: