background image


Assembly Instructions 


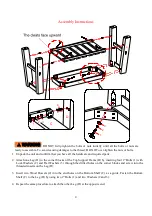
1.


Unpack the unit and confirm that you have all the hardware and required parts. 


2.


Attach one Leg (D) to the corner blocks of the Top Support Frame (B) by inserting four 2'' Bolts (1) with 
Lock Washers (2) and Flat Washers (3) through the drilled holes on the corner blocks and screw into the 
threaded inserts on the Leg (D). 


3.


Insert  two  Wood Dowels (4) into the end holes on the Bottom Shelf  (C) as a  guide.  Fasten  the Bottom 
Shelf (C) to the Leg (D) by using two 2'' Bolts (1) and two Washers (2 and 3).  
 

4.


Repeat the same procedure to attach the other Leg (D) at the opposite end. 


1

2 3

4

D

C

1

2

3

D

D

B

C

DO  NOT  fully-tighten  the  bolts  or  nuts  initially  until  all  the  bolts  or  nuts  are 

ready to assemble. To avoid causing damages to the thread, DO NOT over-tighten the nuts or bolts.


Summary of Contents for BSKY-368036

Page 1: ...rts are missing DO NOT return this item to the store where it was purchased Please call our customer service number and have your instructions and parts list ready to provide the model name part name...

Page 2: ...steps are completed before fully tightening bolts 5 Make sure all bolts and screws are tightly fastened before the unit is used 6 Check that all bolts screws and knobs are tight at least every 3 month...

Page 3: ...e beginning assembly A Table Top Qty 1 B Top Support Frame Qty 1 C Bottom Shelf Qty 1 D Leg Qty 2 E Mounting Board Qty 2 1 5 16 18 UNC 2A x 2 lg Bolt 2 Lock Washer 3 Flat Washer Qty 28 1 extra Qty 28...

Page 4: ...d screw into the threaded inserts on the Leg D 3 Insert two Wood Dowels 4 into the end holes on the Bottom Shelf C as a guide Fasten the Bottom Shelf C to the Leg D by using two 2 Bolts 1 and two Wash...

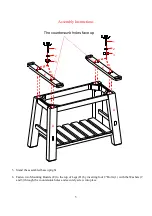
Page 5: ...s 5 Stand the assembled base upright 6 Fasten two Mounting Boards E to the top of Legs D by inserting four 2 Bolts 1 with the Washers 2 and 3 through the countersunk holes and securely screw into plac...

Page 6: ...n a level and protective surface as shown 8 Flip around the assembled base and attach the Mounting Boards E to the slide supports with eight 2 Bolts 1 and eight Washers 2 and 3 Securely tighten all th...

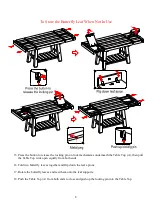
Page 7: ...lease the locking pin on lock mechanisms underneath the Table Top A then pull the Table Top wide open equally from both ends 11 Lift both butterfly leaves from the compartment of Table Top A 12 Rest t...

Page 8: ...derneath the Table Top A then pull the Table Top wide open equally from both ends 16 Fold two butterfly leaves together and flip down the leaf aprons 17 Rotate the butterfly leaves and rest them onto...

Page 9: ...Extreme temperature and humidity changes can cause fading warping shrinking and splitting of wood It is advised to keep furniture away from direct sunlight as sun may damage the finish Proper care an...

Reviews: