background image


THIS INSTRUCTION BOOKLET CONTAINS IMPORTANT SAFETY INFORMATION. 

PLEASE READ AND KEEP FOR FUTURE REFERENCE. 

Date 2017-10-10 Rev. 0001-A Factory: JIYIFO 


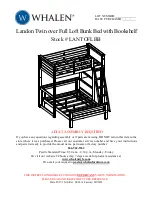
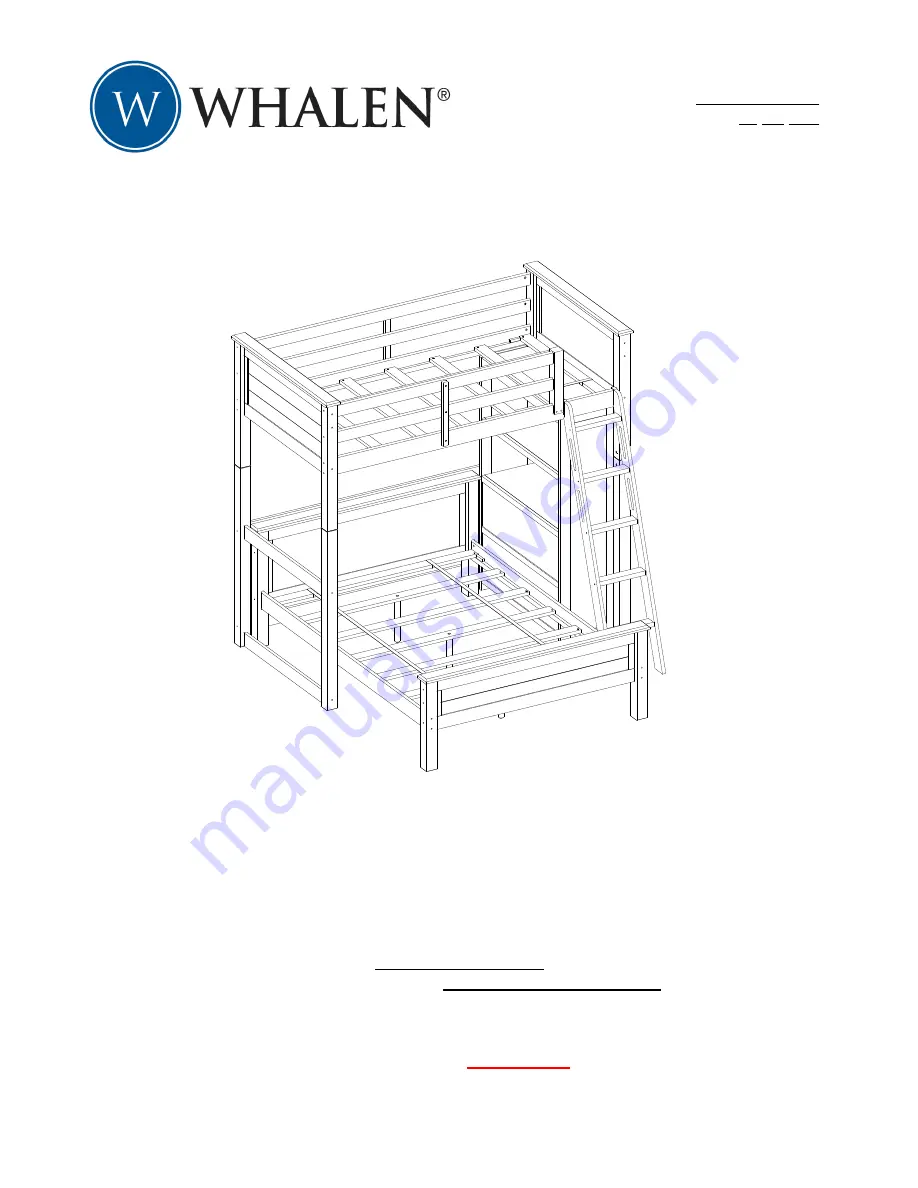
 Landon Twin over Full Loft Bunk Bed with Bookshelf 

Stock # LANTOFLBB 


ADULT ASSEMBLY REQUIRED 


If you have any questions regarding assembly or if parts are missing, DO NOT return this item to the 
store  where  it  was  purchased.  Please  call  our  customer  service  number  and  have  your  instructions 
and parts list ready to provide the model name, part name or factory number: 

866-942-5362 

Pacific Standard Time: 8:30 a.m. - 4:30 p.m., Monday - Friday 

Or visit our web site 24 hours a day, 7 days a week for product assistance at  

www.whalenstyle.com 

Or e-mail your request to parts@whalenfurniture.com


LOT NUMBER:       


DATE PURCHASED:    /     /   


Summary of Contents for LANTOFLBB

Page 1: ...assembly or if parts are missing DO NOT return this item to the store where it was purchased Please call our customer service number and have your instructions and parts list ready to provide the model name part name or factory number 866 942 5362 Pacific Standard Time 8 30 a m 4 30 p m Monday Friday Or visit our web site 24 hours a day 7 days a week for product assistance at www whalenstyle com O...

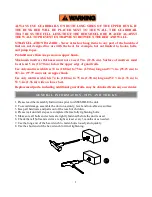
Page 2: ...n 95 25 cm to 38 in 97 79 cm wide on upper bunk Use only mattress which is 74 in 1 88 m to 75 in 1 90 m long and 52 in 1 33 m to 53 in 1 36 m wide on lower bed Replacement parts including additional guardrails may be obtained from any our dealer 1 Please read the Assembly Instructions prior to ASSEMBLE the unit 2 To avoid damage assemble the unit on a sturdy level and non abrasive surface 3 Keep a...

Page 3: ...ed and prohibit jumping on the bed Always use the ladder for entering and leaving the upper bunk Do not use substitute parts Contact the manufacturer or dealer for replacement parts Use of a night light may provide added safety precaution for a child using the upper bunk Always use guardrails on both long sides of the upper bunk If the bunk bed will be placed next to the wall the guardrail that ru...

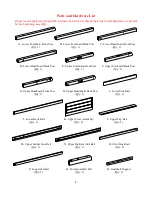
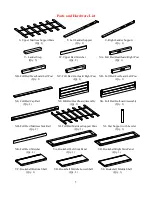
Page 4: ... Qty 1 Qty 1 D Lower Headboard Back Post E Upper Footboard Front Post F Upper Footboard Back Post Qty 1 Qty 1 Qty 1 G Upper Headboard Front Post H Upper Headboard Back Post I Lower Side Rail Qty 1 Qty 1 Qty 2 J Lower Back Rail K Upper Cross Assembly L Upper Cap Rail Qty 2 Qty 2 Qty 2 M Upper Ladder Side Rail N Upper Mattress Side Rail O Short Guardrail Qty 1 Qty 1 Qty 2 P Long Guardrail Q Front Gu...

Page 5: ...Post XD Full Bed Footboard Left Post Qty 1 Qty 1 Qty 1 XE Full Bed Cap Rail XF Full Bed Headboard Assembly XG Full Bed Footboard Assembly Qty 2 Qty 1 Qty 1 XH Full Bed Mattress Side Rail XI Full Bed Mattress Support Slats XJ Slat Support with Leveler Qty 2 Qty 1 Qty 3 XK Full Bed Stretcher YA Bookshelf Left Side Panel YB Bookshelf Right Side Panel Qty 2 Qty 1 Qty 1 YC Bookshelf Bottom Shelf YD Boo...

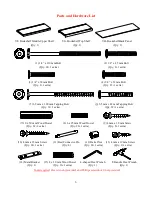
Page 6: ...t 6 6 5 mm x 48 mm Tapping Bolt Qty 32 1 extra Qty 32 1 extra 7 10 x 50 mm Wood Dowel 8 6 x 25 mm Wood Dowel 9 4 mm x 30 mm Screw Qty 62 2 extra Qty 20 1 extra Qty 8 1 extra 10 4 mm x 35 mm Screw 11 Bed Connector Pin 12 Barrel Nut 13 4 mm x 19 mm Screw Qty 28 1 extra Qty 4 Qty 24 1 extra Qty 2 1 extra 14 Metal Bracket 15 8 x 30 mm Wood Dowel L shaped Hex Wrench T Handle Hex Wrench Qty 1 Qty 16 1 e...

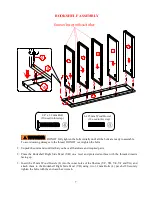
Page 7: ...the inner holes of the Shelves YC YD YE YF and YG and attach them to the Bookshelf Right Side Panel YB using two 32 mm Bolts 4 per shelf Securely tighten the bolts with the enclosed hex wrench YC YD YE YF YG YB 4 YB 8 1 4 x 32 mm Bolt 10 used in this step 6 x 25 mm Wood Dowel 10 used in this step DO NOT fully tighten the bolts initially until all the bolts are ready to assemble To avoid causing da...

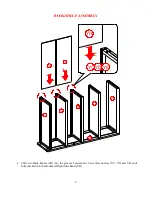
Page 8: ...BOOKSHELF ASSEMBLY 4 Slide two Back Panels YH into the grooves between the lower three shelves YC YD and YE until fully inserted into the Bookshelf Right Side Panel YB YC YD YE YF YG YB YH YH YH YC YD YE ...

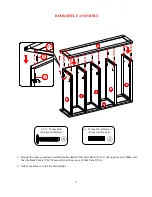
Page 9: ... Left Side Panel YA at the opposite end Make sure that the Back Panels YH fit securely into the groove of Side Panel YA 6 Ask for assistance to lift the unit upright 1 4 x 32 mm Bolt 10 used in this step 6 x 25 mm Wood Dowel 10 used in this step YC YD YE YF YG YB YA YA 4 8 ...

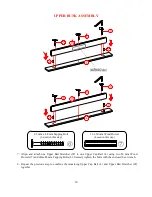
Page 10: ...wels 7 and three 48 mm Tapping Bolts 6 Securely tighten the bolts with the enclosed hex wrench 8 Repeat the previous step to combine the remaining Upper Cap Rail L and Upper Bed Stretcher W together 10 x 50 mm Wood Dowel 4 used in this step 6 5 mm x 48 mm Tapping Bolt 6 used in this step 6 6 6 7 7 L W 6 6 6 L W 7 7 ...

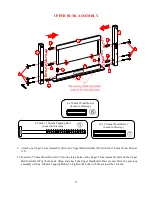
Page 11: ...pper Cross Assembly K and the Upper Bed Stretcher W at both ends Align and attach the Upper Headboard Posts G and H to the previous assembly with six 100 mm Tapping Bolts 5 Tighten the bolts with the enclosed hex wrench 6 5 mm x 100 mm Tapping Bolt 6 used in this step 10 x 50 mm Wood Dowel 6 used in this step 8 x 30 mm Wood Dowel 4 used in this step 15 15 7 7 7 7 7 7 5 5 L W K H G ...

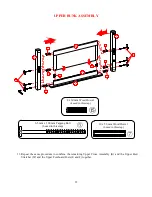
Page 12: ...maining Upper Cross Assembly K and the Upper Bed Stretcher W and the Upper Footboard Posts E and F together 6 5 mm x 100 mm Tapping Bolt 6 used in this step 10 x 50 mm Wood Dowel 6 used in this step 8 x 30 mm Wood Dowel 4 used in this step 7 7 7 7 7 7 L W K 15 15 5 5 F E ...

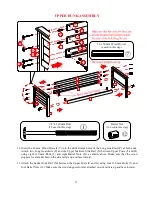
Page 13: ...2 as shown above Make sure that the wood stoppers for slat attached on the side rail are up and face inward 13 Attach the Ladder Side Rail M between the Upper Posts E and G using four 110 mm Bolts 1 and four Barrel Nuts 12 Make sure the wood stoppers for slat attached on side rail are up and face inward M P P E F G H 1 1 12 12 12 N 7 7 H G E F M N P P 1 4 x 110 mm Bolt 12 used in this step 10 x 50...

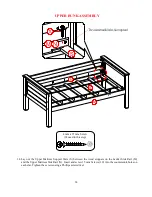
Page 14: ...s S between the wood stoppers on the Ladder Side Rail M and the Upper Mattress Side Rail N Insert and screw 35 mm Screws 10 into the countersunk holes on each slat Tighten the screws using a Phillips screwdriver S M 10 N N M S 4 mm x 35 mm Screw 14 used in this step ...

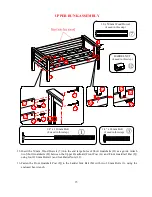
Page 15: ... G and Front Guardrail Post Q using four 110 mm Bolts 1 and four Barrel Nuts 12 16 Fasten the Front Guardrail Post Q to the Ladder Side Rail M with two 38 mm Bolts 3 using the enclosed hex wrench 7 12 G Q 7 12 O O O O M G Q Q M Q M 3 1 1 1 4 x 110 mm Bolt 4 used in this step BARREL NUT 4 used in this step 1 4 x 38 mm Bolt 2 used in this step 10 x 50 mm Wood Dowel 4 used in this step ...

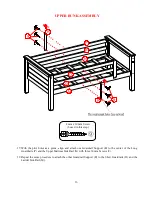
Page 16: ...port R to the center of the Long Guardrails P and the Upper Mattress Side Rail N with three 30 mm Screws 9 18 Repeat the same procedure to attach the other Guardrail Support R to the Short Guardrails O and the Ladder Side Rail M R 9 UP UP R M O O N P P 9 4 mm x 30 mm Screw 6 used in this step ...

Page 17: ...oles of two Lower Side Rails I and attach them between the Lower Posts C and D with four 100 mm Tapping Bolts 5 Tighten the bolts with the enclosed hex wrench 7 5 7 5 7 5 7 5 I I D C 6 5 mm x 100 mm Tapping Bolt 4 used in this step 10 x 50 mm Wood Dowel 4 used in this step ...

Page 18: ...anel YA by inserting three 48 mm Tapping Bolts 6 through the pre drilled holes on the Side Panel YA and screw into the post 21 Attach the Lower Footboard Back Post B to the Bookshelf Right Side Panel YB with three 48 mm Tapping Bolts 6 6 5 mm x 48 mm Tapping Bolt 6 used in this step YA A B YB YB YA 6 A B ...

Page 19: ...two Lower Back Rails J Attach the Back Rails J between the Lower Back Posts B and D by using four 100 mm Tapping Bolts 5 Tighten the bolts with the provided hex wrench 10 x 50 mm Wood Dowel 8 used in this step 6 5 mm x 100 mm Tapping Bolt 4 used in this step B A YB J J D I C I B J 7 7 5 D ...

Page 20: ... Now ask for assistance to stack the Upper Bunk onto the Bed Connector Pins 11 on the Lower Posts and fasten the Upper Posts E F G and H in place with four 45 mm Bolts 2 Proceed to insert two 30 mm Screws 9 through the countersunk holes of Metal Bracket 14 and securely screw into place NOTE Make sure that the Upper Bunk sits completely on top of the posts and the pins go all the way not leaving an...

Page 21: ...n the Bookshelf Side Panels YA and YB to the Upper Footboard Posts E and F by inserting two 48 mm Tapping Bolts 6 through the pre drilled holes and securely screw into the posts 6 5 mm x 48 mm Bolt 2 used in this step YB E YA E YB 6 YA F ...

Page 22: ...Steps V at both ends Attach Left and Right Ladder Supports T and U to the Ladder Steps V using the 48 mm Tapping Bolts 6 Securely tighten all bolts with the enclosed hex wrench 6 5 mm x 48 mm Bolt 10 used in this step 10 x 50 mm Wood Dowel 10 used in this step 6 6 6 6 6 6 7 7 V U T V V V V V ...

Page 23: ...Front Post E and the Front Guardrail Post Q in the opening provided Secure the Ladder Hooks in place by using two 19 mm Screws 13 ONLY USE LADDER IN THIS LOCATION AND SECURE WITH 2 SCREWS PLEASE MAKE SURE YOU INSTALL THE LADDER AGAINST THE FRONT GUARDRAIL POST 4 mm x 19 mm Screw 2 used in this step U T M T U M M T U 13 13 ...

Page 24: ... with the holes facing up Insert two 50 mm Wood Dowels 7 into the large holes of the Full Bed Stretcher XK and attach it to the Cap Rail XE using four 48 mm Tapping Bolts 6 Securely tighten the bolts with the enclosed hex wrench 30 Repeat the previous step to attach the other Full Bed Stretcher XK to the other Full Bed Cap Rail XE 10 x 50 mm Wood Dowel 4 used in this step 6 5 mm x 48 mm Tapping Bo...

Page 25: ...d Headboard Assembly XF and the Full Bed Stretcher XK at both ends Align and attach Full Bed Headboard Posts XA and XB to the previous assembly XF and XK with six 100 mm Tapping Bolts 5 Tighten the bolts with the enclosed hex wrench 6 5 mm x 100 mm Tapping Bolt 6 used in this step 10 x 50 mm Wood Dowel 6 used in this step 8 x 30 mm Wood Dowel 4 used in this step 15 15 7 7 7 XE XK XF XB 5 5 5 5 ...

Page 26: ...Bed Footboard Assembly XG and the Full Bed Stretcher XK at both ends Align and attach Full Bed Footboard Posts XC and XD to the previous assembly XG and XK with six 100 mm Tapping Bolts 5 Tighten the bolts with the enclosed hex wrench 6 5 mm x 100 mm Tapping Bolt 6 used in this step 10 x 50 mm Wood Dowel 6 used in this step 8 x 30 mm Wood Dowel 4 used in this step 15 15 7 5 7 XE XK 5 7 XC XG ...

Page 27: ... two Full Bed Mattress Side Rails XH between the assembled Full bed headboard and footboard by using the 110 mm Bolts 1 through the drilled holes on the posts and screw into the Barrel Nuts 12 in the Full Bed Mattress Side Rails XH Make sure that the wood stoppers attached to the Mattress Side Rail for slats are up and face inward 12 XA XB 1 1 XC XD XH XD XC XA XB XH XH 1 4 x 110 mm Bolt 8 used in...

Page 28: ...ated close to the Lower Posts Attach three Slat Supports XJ to the Mattress Support Slats XI with three 32 mm Bolts 4 38 Insert and screw the 35 mm Screws 10 into the countersunk holes on each slat Tighten the screws using a Phillips screwdriver XJ XI 4 XH XI 10 XH XH XJ XJ XI 1 4 x 32 mm Bolt 3 used in this step 4 mm x 35 mm Screw 14 used in this step ...

Page 29: ...29 ASSEMBLY INSTRUCTIONS 39 Position the assembled Full Bed against the Lower Back Rails J for space saving ...

Page 30: ...re Care It is best to keep your furniture in a climate controlled environment Extreme temperature and humidity changes can cause warping shrinking and splitting of wood It is advised to keep furniture away from direct sunlight as may damage the finish Proper care and cleaning at home will extend the life of your purchase Following these important and helpful tips will enhance your furniture as it ...

Reviews: