background image

13 

Assembly Instructions


Tools required: Phillips screwdriver, stud finder, pencil, tape measure, power drill and 1/8” drill bit. 


22.


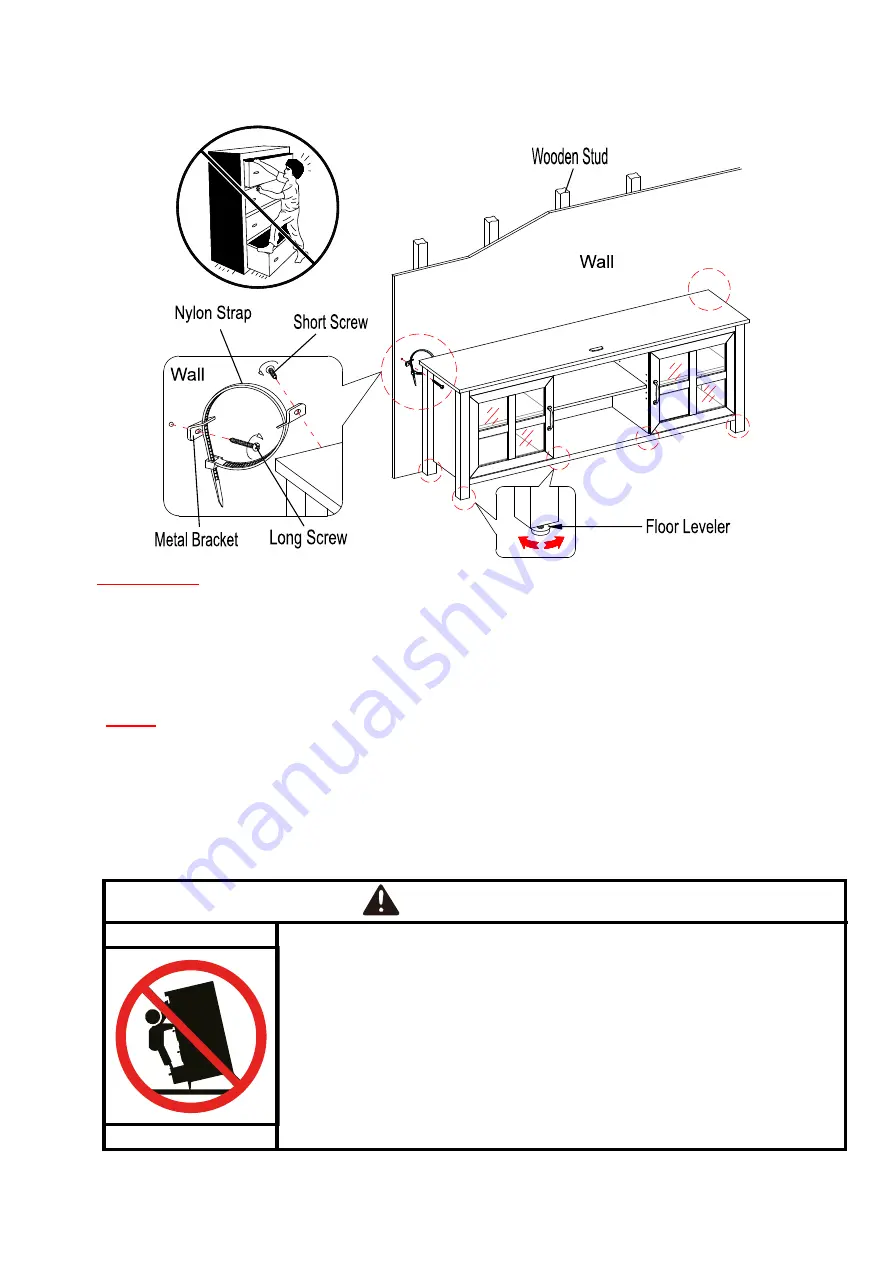
Ask for assistance to position the assemble TV stand at the desired location against a wall. If necessary, 
adjust the pre-attached floor levelers at the bottom of the Side Frames (B and C) and Center Supports 
(H) to correct the tilt and level the doors.  

23.


Follow the instructions printed on the plastic bag containing the Tipping Restraint Hardware to attach 
the tip-over restraints to the unit and the wall. 

NOTE

:  The  tipping  restraint  hardware  included  is  for  wooden  stud  wall  construction.  It  must  be 

attached  to  a  wall  stud.  Depending  upon  your  wall  construction,  different  anchor  hardware  maybe 
required.  Please  contact  your  local  hardware  store  for  assistance.  Young  children  can  be  seriously 
injured  by  tipping  furniture.  You  must  install  the  Tipping  Restraint  Hardware with  the  unit to 
prevent the unit from tipping, causing any accidents or damage. The tipping restraints are intended only 
as  a  deterrent,  they  are  not  a  substitute  for  proper  adult  supervision.  The  tipping  restraints  are  not 
earthquake  restraints.  If  you  wish  to  add  the  extra  security  of  earthquake  restraints,  they  must  be 
purchased and installed separately. 

Children have died from furniture tip-over.  
To reduce the risk of furniture tip-over: 


ALWAYS install tip-over restraint provided. 


FOR use with televisions weighing 100 lbs or less. Use with heavier televisions 
may result in instability causing tip-over resulting in death or serious injury. 


NEVER allow children to stand, climb or hang on drawers, doors, or shelves. 


NEVER open more than one drawer at a time. 


Place heaviest items in the lowest drawers. 

Use of tip-over restraints may only reduce, but not eliminate, the risk of 
tip-over. 

WARNING 

Summary of Contents for Seymour BJAVCLSM-65

Page 1: ...ions and parts list ready to provide the model name part name or factory number 1 866 942 5362 Pacific Standard Time 8 30 a m 4 30 p m Monday to Friday Or visit our website 24 hours a day 7 days a wee...

Page 2: ...THAN RECOMMENDED FLAT PANEL TVS OR EQUIPMENT TO AVOID INSTABILITY PLACE FLAT PANEL TV IN THE CENTER OF THE UNIT THE BASE OF THE TELEVISION MUST BE ABLE TO REST ON THE SUPPORTING SURFACE OF THE UNIT WI...

Page 3: ...W THE KNOCK DOWN KD ASSEMBLY SYSTEM WORKS 1 Screw the Cam Bolt into the pre drilled small holes on the panel Connect both panels together making sure the Cam Bolt goes into the pre drilled hole at the...

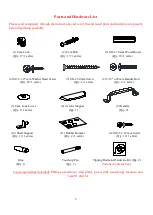
Page 4: ...dware are present before beginning assembly A Top Panel Qty 1 B Left Side Frame Qty 1 C Right Side Frame Qty 1 D Left Partition Panel Qty 1 E Right Partition Panel Qty 1 F Bottom Panel Qty 1 G Top Fro...

Page 5: ...d Screw 5 M4 x 50 mm Screw 6 5 32 x 22 mm Handle Bolt Qty 28 1 extra Qty 4 1 extra Qty 4 1 extra 7 Cam Lock Cover 8 Acrylic Stopper 9 Handle Qty 8 1 extra Qty 1 Qty 2 10 Shelf Support 11 Rubber Bumper...

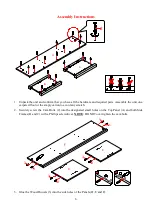
Page 6: ...eted floor or the empty carton to avoid any scratch 2 Securely screw the Cam Bolts 2 into the designated small holes on the Top Panel A and both Side Frames B and C with a Phillips screwdriver NOTE DO...

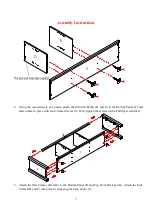
Page 7: ...e Bottom Panel F and fasten them in place with four 50 mm Screws 5 Fully tighten the screws with a Phillips screwdriver 5 Attach the Side Frames B and C to the Bottom Panel F and Top Front Stretcher G...

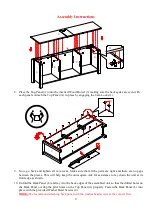
Page 8: ...ght and proceed to fasten the Top Front Stretcher G to both Side Frames B and C by engaging two Cam Locks 1 7 Glue the Wood Dowers 3 into the top inner holes of the unit DO NOT inert the wood dowels i...

Page 9: ...o gaps between the pieces This will help keep the unit square Ask for assistance to lay down the unit at its front edge as shown 10 Unfold the Back Panel L and lay it to the back edges of the assemble...

Page 10: ...pright 13 Insert the Shelf Supports 10 into the desired holes in the sides of each compartment Make sure you place the four Shelf Supports 10 in the same level so the shelf is not tilted Tilt and set...

Page 11: ...h door hinges engage and function properly Tighten the bolt on the hinge base to lock the hinges in place 15 Repeat the same procedure to install the other Door I to the Right Side Frame C 16 Open and...

Page 12: ...w these instructions if you place a TV on top of your console Otherwise skip to Step 21 20 Remove the paper backing from the Acrylic Stopper 8 then properly align the Acrylic Stopper into the cut out...

Page 13: ...ildren can be seriously injured by tipping furniture You must install the Tipping Restraint Hardware with the unit to prevent the unit from tipping causing any accidents or damage The tipping restrain...

Page 14: ...wall anchoring device Relocating audio and or video equipment to furniture not specifically designed to support audio and or video equipment may result in death or serious injury due to furniture coll...

Page 15: ...humidity changes can cause fading warping shrinking and splitting of wood It is advised to keep furniture away from direct sunlight as sun may damage the finish Proper care and cleaning at home will e...

Reviews: