background image

v

v

3

ASSEMBLY INSTRUCTIONS

v

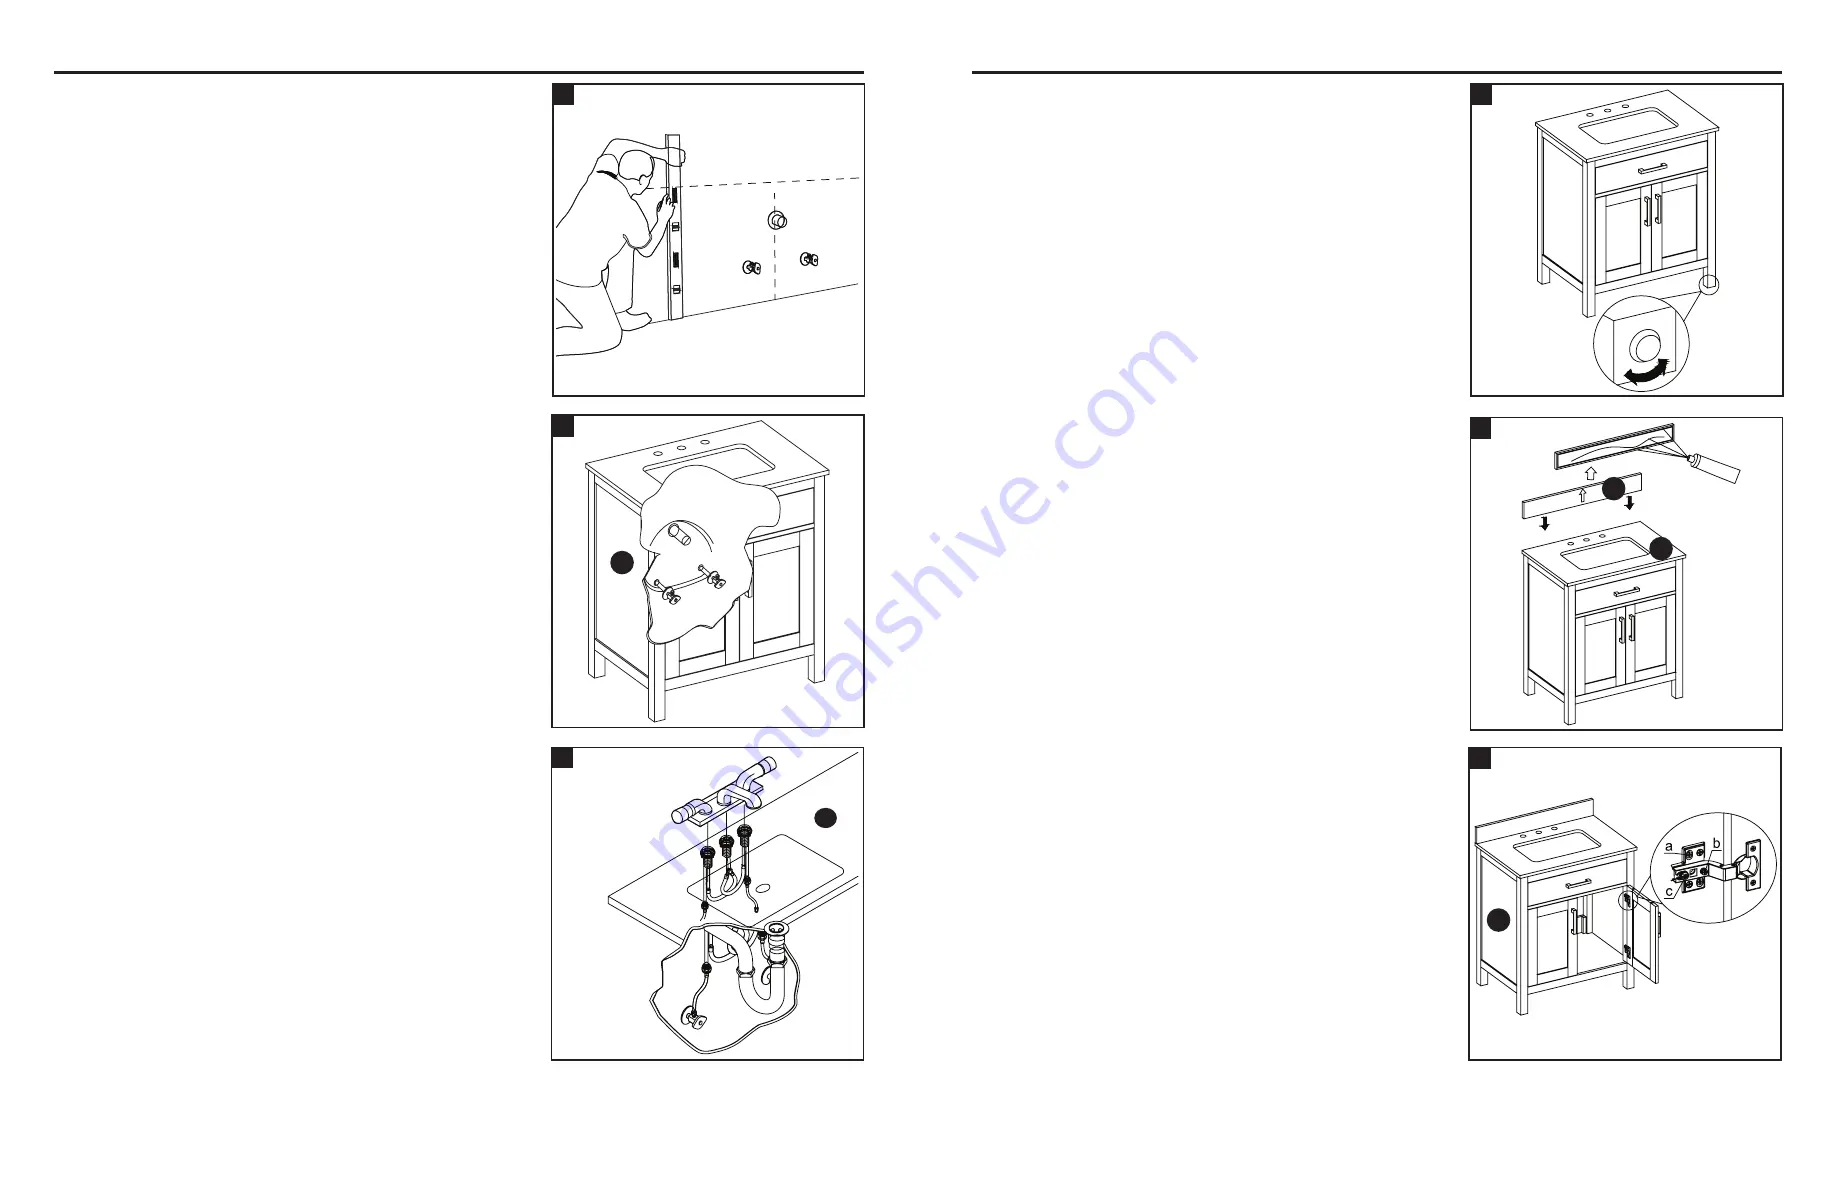
1

Step 1:


Mark wall for vanity placement and note the location of the 

water supply lines and drain on the back panel of vanity.

2

Step 2: 

Move vanity (B) into proper place against the wall.

3

Step 3:

Install faucet, drain and supply lines (none included) to

vanity top (A) according to the instructions supplied with 

those items.

B

4

ASSEMBLY INSTRUCTIONS

v

4

A

v

6

Step 5: 

To mount the backsplash (C) to the wall, apply a thin bead

of silicone compound (not included) to the unpolished 

back side and bottom of the backsplash (C). Position 

backsplash (C) as shown onto vanity top (A) and against 

the wall. Clean any excess silicone compound before 

allowing to dry.

UP

v

5

Step 4:


In case of uneven floors, floor levelers are provided at the 

bottom of the vanity. If necessary, adjust floor levelers by 

hand to correct tilting and/or level doors.

Silicone

Step 6: 

If the door preassembled to vanity base (B) require

adjustment, follow the below options as needed:

To adjust door up or down, loosen screws (a), adjust door

and tighten screws.

To adjust door left and right, turn screw (b) in or out.

To adjust door in and out, loosen screw (c), adjust door

and retighten screw.

C

A

B

Summary of Contents for VANITY WITH TOP WF30CVG

Page 1: ...autions could result in serious injury Do not hang from the vanity Do not taking off the vanity top to avoid damaging the vanity Clean all fluids from the stone surface to prevent stains Wipe off the...

Page 2: ...to the unpolished back side and bottom of the backsplash C Position backsplash C as shown onto vanity top A and against the wall Clean any excess silicone compound before allowing to dry UP v 5 Step 4...

Page 3: ...rights and you may have other rights which vary from state to state Dust the vanity regularly with a soft non lint producing cloth or household dusting product You can clean the vanity with a gentle n...

Page 4: ...r des blessures graves Ne vous suspendez pas au meuble lavabo Ne retirez pas le comptoir de meuble lavabo afin d viter d endommager le meuble lavabo Nettoyer tous les liquides de la surface de la pier...

Page 5: ...du dosseret C Placez le dosseret C sur le comptoir du meuble lavabo A et contre le mur liminez tout exc dent de compos de silicone puis laissez s cher v v 4 6 Silicone HAUT tape 4 Si votre plancher e...

Page 6: ...le surchargeant ou en l alt rant d une quelconque fa on ou a subi des dommages caus s par un accident La pr sente garantie est non transf rable et ne couvre pas les br chures l caillement les gratignu...

Page 7: ...ra para evitar las manchas Limpie el jab n o la pasta de dientes inmediatamente para evitar da os permanentes a la superficie de piedra PIEZA DESCRIPCI N CANTIDAD A Cubierta para tocador preensamblada...

Page 8: ...rior del protector contra salpicaduras C Coloque el protector contra salpicaduras C como se muestra sobre la cubierta de tocador A y pegar a la pared Limpie todo exceso de compuesto de silicona antes...

Page 9: ...reparar a su discreci n este art culo sin cargos La garant a se anula si el producto no se ensambl da os producidos por un accidente Esta garant a no es transferible y no cubre el desportillado La re...

Reviews: