background image

v

v

3

ASSEMBLY INSTRUCTIONS

v

1

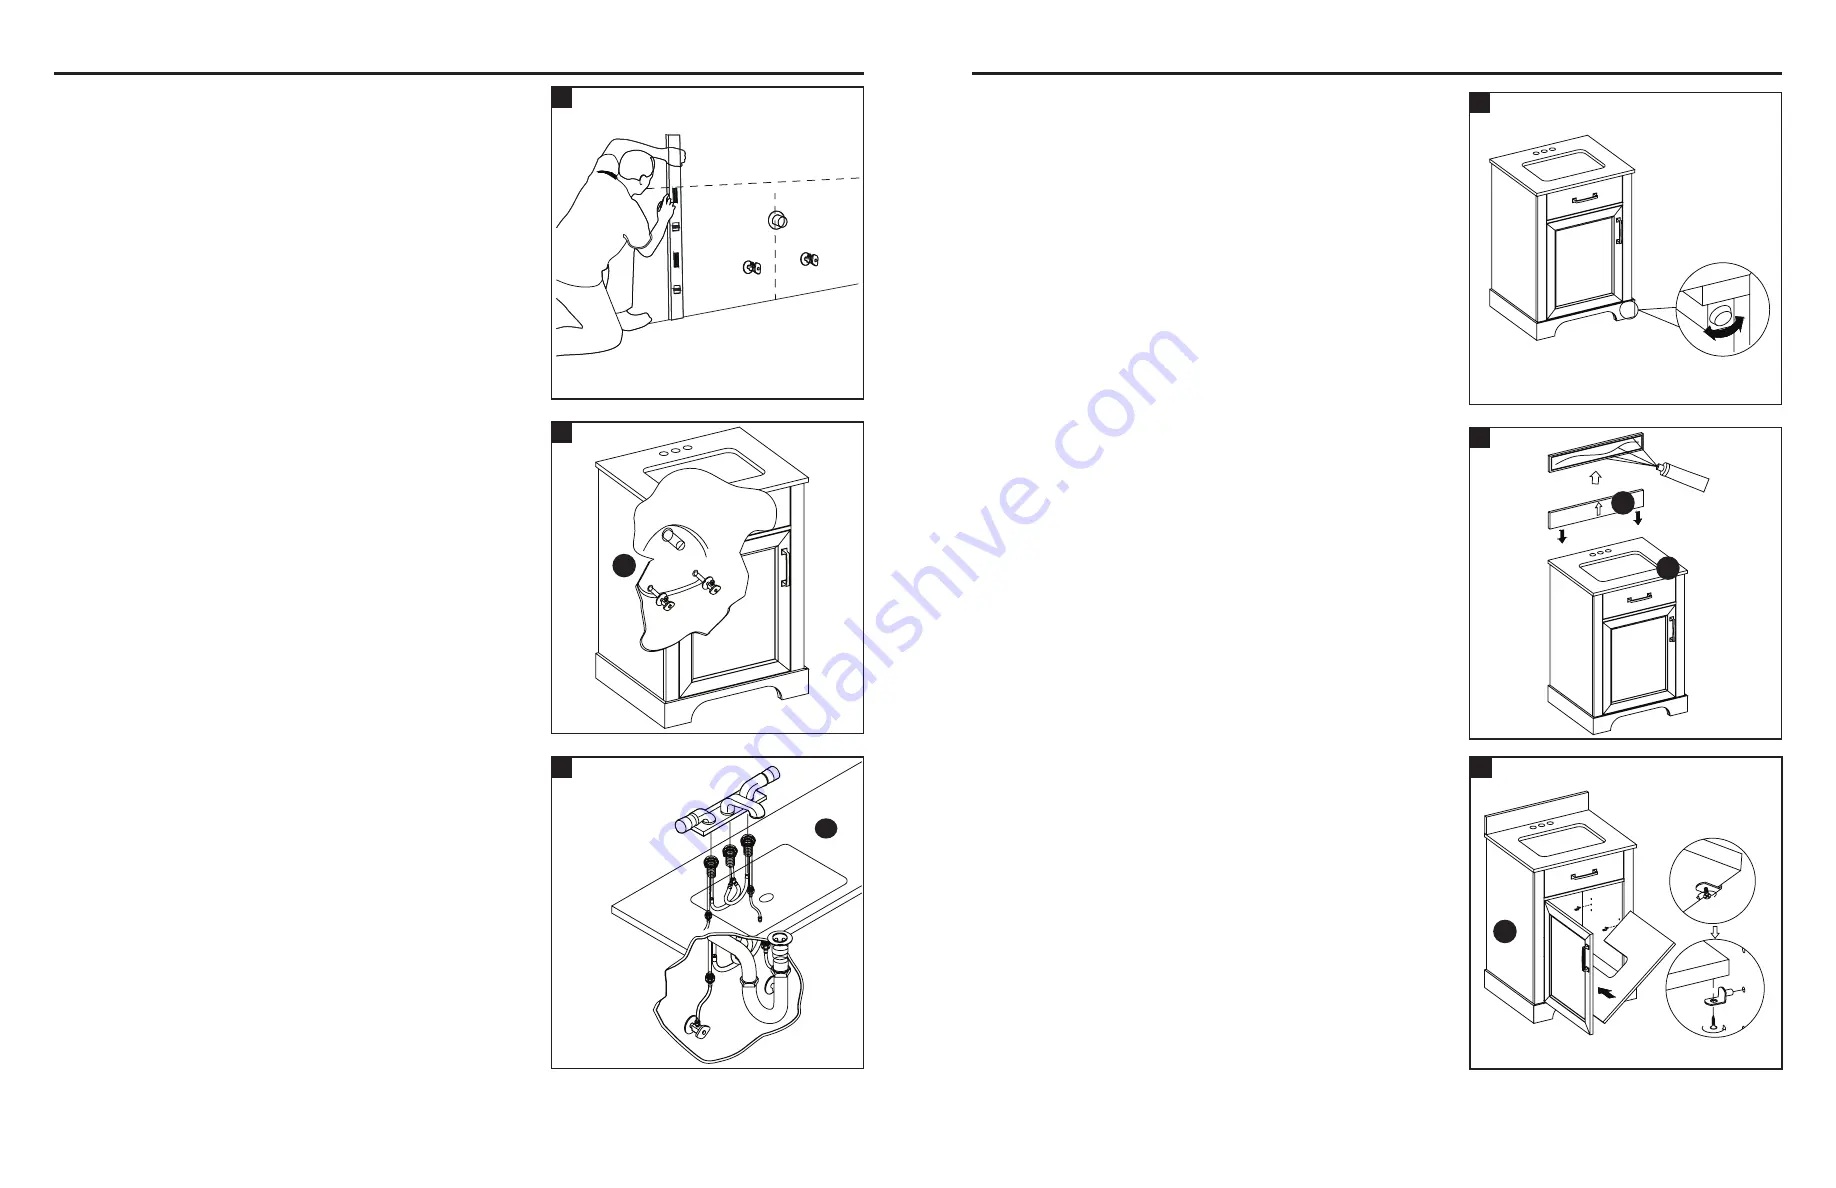
Step 1:


Mark wall for vanity placement and note the location of the 

water supply lines and drain on the back panel of vanity.

2

Step 2: 

Move vanity (B) into proper place against the wall.

3

Step 3:

Install faucet, drain and supply lines (none included) to

vanity top (A) according to the instructions supplied with 

those items.

B

4

ASSEMBLY INSTRUCTIONS

v

5

Step 5: 

To mount the backsplash (C) to the wall, apply a thin bead

of silicone compound (not included) to the unpolished 

back side and bottom of the backsplash (C). Position 

backsplash (C) as shown onto vanity top (A) and against 

the wall. Clean any excess silicone compound before 

allowing to dry.

Silicone

UP

v

4

Step 4:


In case of uneven floors, floor levelers are provided at the 

bottom of the vanity. If necessary, adjust floor levelers by 

hand to correct tilting and/or level doors.

A

C

A

v

6

B

Step 6:

Note: The adjustable shelf is pre-installed for shipping.

If the shelf position is not to your liking, you will need to 

reposition the shelf by following the steps below:

a. 

Look under the shelf, and locate the wood screws 


holding the shelf to the shelf supports.

b. 

Remove the wood screws from each shelf support with 

a Phillips screwdriver (not included).

c. 

Remove the adjustable shelf from the vanity (B).

d.  Remove the shelf supports from the vanity (B) and 


re-position them in the desired location. Make sure you 

place the shelf supports in the same level so the shelf is 

not tilted.

e. 

Place the adjustable shelf back onto the shelf supports.

f. 

Using the Phillips screwdriver, reinstall the wood screws 

through the shelf supports and into the shelf.

Summary of Contents for WF24AVG

Page 1: ...to fail Failure to follow cautions could result in serious injury Do not hang from the vanity Do not taking off the vanity top to avoid damaging the vanity Clean all fluids from the stone surface to prevent stains Wipe off the soap or toothpaste immediately to prevent permanent damage to the stone surface PREPARATION Before beginning assembly of product make sure all parts are present Compare part...

Page 2: ...even floors floor levelers are provided at the bottom of the vanity If necessary adjust floor levelers by hand to correct tilting and or level doors A C A v6 B Step 6 Note The adjustable shelf is pre installed for shipping If the shelf position is not to your liking you will need to reposition the shelf by following the steps below a Look under the shelf and locate the wood screws holding the shel...

Page 3: ...lusion or limitation of incidental or consequential damages so the above limitation may not apply to you This warranty gives you specific legal rights and you may have other rights which vary from state to state Dust the vanity regularly with a soft non lint producing cloth or household dusting product You can clean the vanity with a gentle non abrasive household cleaner Make sure to dry the wood ...

Page 4: ...des blessures graves Ne vous suspendez pas au meuble lavabo Ne retirez pas le comptoir de meuble lavabo afin d éviter d endommager le meuble lavabo Nettoyer tous les liquides de la surface de la pierre pour éviter les tâches Essuyer immédiatement le savon et le dentifrice pour éviter d endommager la surface de la pierre PRÉPARATION Avant de commencer l assemblage de l article assurez vous d avoir ...

Page 5: ... 4 Si votre plancher est inégal utilisez les patins réglables situés au bas du meuble lavabo Au besoin ajustez les patins réglables à la main pour corriger l inclinaison ou pour mettre les portes de niveau v 4 A A B B C B v6 B Étape 6 Remarque La tablette réglable est préinstallée aux fins de livraison Si elle n est pas positionnée à l endroit souhaité vous devrez la déplacer en suivant les étapes...

Page 6: ... ou de fabrication le fabricant choisira à sa seule discrétion de réparer ou de remplacer l article sans frais La garantie sera annulée si l article a été assemblé incorrectement a été utilisé de manière inappropriée ou abusive en le surchargeant ou en l altérant d une quelconque façon ou a subi des dommages causés par un accident La présente garantie est non transférable et ne couvre pas les ébré...

Page 7: ...dra para evitar las manchas Limpie el jabón o la pasta de dientes inmediatamente para evitar daños permanentes a la superficie de piedra PIEZA DESCRIPCIÓN CANTIDAD A Cubierta para tocador preensamblada 1 B Base para tocador 1 C Protector contra salpicaduras 1 CONTENIDO DEL PAQUETE INFORMACIÓN DE SEGURIDAD Lea y comprenda completamente este manual antes de intentar ensamblar o instalar el producto ...

Page 8: ...dejar secar v5 Silicona ARRIBA Paso 4 En caso de pisos desnivelados los niveladores de pisos se proporcionan en la parte inferior del tocador Si es necesario regule los niveladores de piso con la mano para corregir la inclinación y o niveles de las puertas v 4 A C A B Paso 6 Nota La repisas ajustable viene preinstalado para su envío Si la posición no es la adecuada deberá volver a ubicarla siguien...

Page 9: ...la debido a defectos en los materiales o la mano de obra el fabricante reemplazará o reparará a su discreción este artículo sin cargos La garantía se anula si el producto no se ensambló correctamente y debido al mal uso abuso por sobrecarga modificación de cualquier tipo o daños producidos por un accidente Esta garantía no es transferible y no cubre el desportillado desprendimiento rayones oxidaci...

Reviews: