The microphone (transmitter)
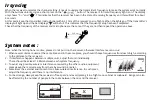
1 - Mesh grille with a protective sponge inside.
2 - Infrared frequency window.
3 - Backlit LCD display. The backlight goes off after about 2 seconds.
4 - Power switch button. (Short press about 0.5 second - power on. Long press for about 2 seconds - power off)
5 - Lower tube body. Unscrew to access the battery compartment.
6 - Antenna. Do not hold the antenna section in your hand as it will affect transmission range.
7 - With 2 x good quality AA batteries, the system can work for around 8 hours. When the battery indicator is low, simply replace the
batteries. First make sure the transmitter is off! Then unscrew the lower tube (5) and replace the batteries.
When replacing batteries make sure the polarities are correct.
Microphone (transmitter) LCD
1 - Battery level indicator. When the battery icon is flashing - it is about to run out !
2 - Shows the working channel. This will be the same as the paired receiver after the
frequency is matched.
3 - Frequency unit: MHz.
7


