


4000x Series Digital Clock
Operating and Installation Instructions
6 - Network Setup
The 4000N and 4000NE series digital clocks are fi ed with a 10/100Base-T Ethernet network interface and
designed to synchronise to a remote NTP (Network Time Protocol) me server across a TCP/IP computer
network.
Upon ini al installa on, the unit IP address, subnet mask, gateway and NTP me server IP address shall be
automa cally assigned by a DHCP server (if available). Alterna vely, the unit IP address, subnet mask,
gateway and NTP me server IP address can be sta cally assigned.
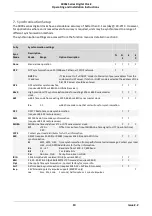
The table below details the available network parameters. Please contact your network administrator for
details of network configura on & addresses that will allow the clocks to be used on your network.
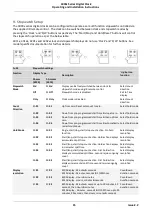
Fu Nt
Network settings
Function
Display Type
Description
'Up' button
function
hh:mm
(4200)
hh:mm:ss
(4010)
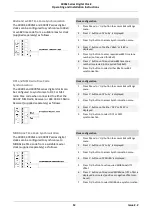
DHCP Setting
dh Fu
dh Full
Full DHCP mode. Automa c assignment of IP, Subnet and
Gateway by customers DHCP server. Automa c
assignment of NTP servers via DHCP op on 42.
Exit to Time
display
dh Ye
dh Yes
DHCP mode. Automa c assignment of IP, Subnet and
Gateway by customers DHCP server. User se ng of NTP
server addresses.
Exit to Time
display
dh No
dh No
Sta c assignment of IP, Subnet and Gateway addresses
by user. User se ng of NTP server addresses.
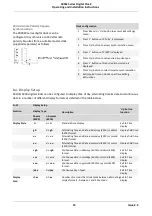
Select IP Byte 1
IP Byte 1
I 010
I 010
IP Address se ng 1st Byte / Octet
Range 0 - 254
Select IP Byte 2
IP Byte 2
I 001
I 001
IP Address se ng 2nd Byte / Octet
Range 0 - 255
Select IP Byte 3
IP Byte 3
I 000
I 000
IP Address se ng 3rd Byte / Octet
Range 0 - 255
Select IP Byte 4
IP Byte 4
I 100
I 100
IP Address se ng 4th Byte / Octet
Range 0 - 255
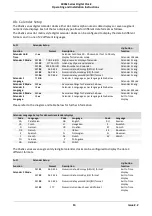
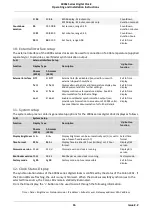
Select Subnet
Byte 1
Subnet
Byte 1
S 255
S 255
Subnet Address se ng 1st Byte / Octet
Range 0 - 255
Select Subnet
Byte 2
Subnet
Byte 2
S 255
S 255
Subnet Address se ng 2nd Byte / Octet
Range 0 - 255
Select Subnet
Byte 3
Subnet
Byte 3
S 000
S 000
Subnet Address se ng 3rd Byte / Octet
Range 0 - 255
Select Subnet
Byte 4
Subnet
Byte 4
S 000
S 000
Subnet Address se ng 1st Byte / Octet
Range 0 - 255
Select Gateway
Byte 1
Gateway
Byte 1
G 010
G 010
Gateway Address se ng 1st Byte / Octet
Range 0 - 254
Select Gateway
Byte 2
Gateway
Byte 2
G 001
G 001
Gateway Address se ng 2nd Byte / Octet
Range 0 - 2555
Select Gateway
Byte 3
Gateway
Byte 3
G 000
G 000
Gateway Address se ng 3rd Byte / Octet
Range 0 - 255
Select Gateway
Byte 4
Gateway
Byte 4
G 001
G 001
Gateway Address se ng 1st Byte / Octet
Range 0 - 255
Exit to Time
display
9
Issue 2.2


