Page 2
Installation:
1.
This installation can be done by going under the front bumper to
access the fog lights. If you have difficulty gaining access to the fog
lights you may have to remove fasteners toward the front of the
wheel well that hold the wheel shroud on and peel the shroud back
(Refer to vehicle tech manual).
2.
Unplug the
existing fog
light from the
wiring harness,
remove the
mounting
hardware and
remove the fog
light from the
vehicle. If the
vehicle is not
equipped with
fog lights
remove the
rubber plug
from this location. The plug is removed by pinching together the
retaining clips protruding from the back to disengage the plug
allowing it to be pushed out towards the front of the vehicle.
3.
Insert the LED fog light into the hole the parking light occupied.
NOTE: Be sure the lighthead is oriented so that the word “TOP”
is located at the top of the lighthead.
4.
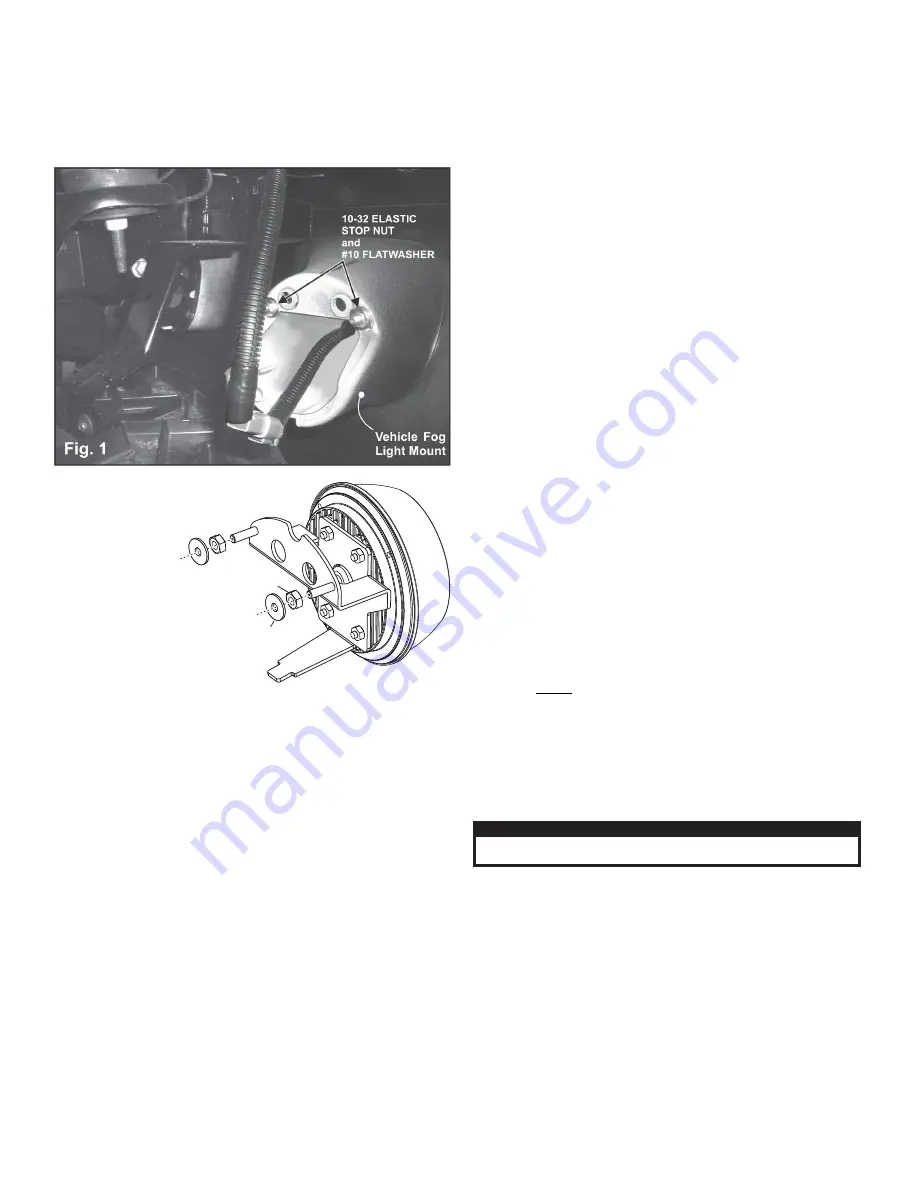
Mount the LED fog light into the 2 slots the existing fog light mounted
to (Fig. 1). Secure the fog light using the supplied mounting
hardware.
5.
Connect the wires to the fog light wiring and replace any fasteners or
screws you removed in step 1.
Connect the wires to the existing fog light wiring. LED wire designations:
RED-WHT, WHT-RED, YEL, ORG, BLU, WHT, GRN or RED
. . . . . . . . . . . . .+VBAT
BLK
. . . . . . . . . . . . . . . . . . . . . . . . . . . . . . . . . . . . . . . . . . . . . . . . . . . . . . .
Ground (-)
WHT/VIO
. . . . . . . . . . . . . . . . . . . . . . . . . . . . . . . . . . . . . . . . . . . . . . . . . Scan-Lock™
GREY
. . . . . . . . . . .SYNC / Must connect to other SYNC wires to run SYNC feature
Operation:
The LED fog light features Scan-Lock™ flash pattern selection
and SYNChronization capabilities. These two functions will operate as follows:
Scan-Lock™
(White/Violet):
TO CHANGE PATTERNS:
To cycle forward to the next available pattern
, apply
+VBAT to the
WHT/VIO
wire for less than 1 second and release.
To cycle back to the
previous pattern
, apply +VBAT to the
WHT/VIO
wire for more than 1 second and
release.
TO CHANGE THE DEFAULT PATTERN:
When the desired pattern is displayed,
allow it to run for more than 5 seconds. The lighthead will now display this pattern
when initially activated.
TO RESTORE THE FACTORY DEFAULT PATTERN:
With the power to the
lighthead off, apply +VBAT to the
WHT/VIO
wire. With the
WHT/VIO
wire still
activated, turn power to the lighthead on. The factory default pattern should now be
displayed.
Use a normally open momentary switch to control Scan-Lock™.
SYNC (Grey):
SYNC lightheads have a special set of flash patterns, with each pattern available in
two modes; Phase 1 and Phase 2. All lightheads configured to display the Phase 1
mode of a given pattern will flash simultaneously. Any lightheads configured to
display the Phase 2 mode of a pattern, will alternate with any Phase 1 lightheads of
the same pattern.
To sync two flashing LED fog lights, configure both lights to display the same Phase
1 pattern. With the power off, connect the GRY wires from each lighthead together.
When the lightheads are activated, their patterns will be synchronized. To configure
the two lightheads to alternate their patterns, advance the pattern of either lighthead
to the Phase 2 mode of the current pattern.
WARNING! All customer supplied wires that connect to the positive terminal of
the battery must be sized to supply at least 125% of the maximum operating
current and FUSED at the battery to carry that load. DO NOT USE CIRCUIT
BREAKERS WITH THIS PRODUCT!
WARNING!It is the responsibility of the installation technician to make sure
that the installation and operation of this product will not interfere with or
compromise the operation or efficiency of any vehicle equipment!
IMPORTANT! Before returning the vehicle to active service, visually confirm
the proper operation of this product, as well as all vehicle components/
equipment.
CAUTION! DO NOT LOOK DIRECTLY AT THESE LED’S WHILE THEY ARE ON.
MOMENTARY BLINDNESS AND/OR EYE DAMAGE COULD RESULT!
I M P O R TA N T W A R N I N G !
Available Patterns:
1. SignalAlert™ 75Phase 1
2. SignalAlert™ 75Phase 2
3. CometFlash® 75Phase 1
4. CometFlash® 75Phase 2
5. DoubleFlash 75 Phase 1
6. DoubleFlash 75 Phase 2
7. SingleFlash 75 . Phase 1
8. SingleFlash 75 . Phase 2
9. ComAlert™75... Phase 1
10.ComAlert™ 75.. Phase 2
11.LongBurst™75 . Phase 1
12.LongBurst™ 75 Phase 2
13.PingPong™75.. Phase 1
14.PingPong™ 75. Phase 2
15.SingleFlash 60
16.SingleFlash 90
17.SingleFlash 120
18.SingleFlash 300
19.DoubleFlash 150
20.ComAlert™150
21.ActionFlash™50
22.ActionFlash™ 150
23.ModuFlash™
24.ActionScan™
25.Steady
#10 FLATWASHER
10-32 ELASTIC
STOP NUT


