background image

WHILL Model C2/Ci2

Operating Guide

This Operating Guide is intended to provide instructions on basic usage of the device. 
To operate the device safely, please ensure to carefully read this guide before use. 
It is recommended to keep this guide on hand at all time for your reference.

Summary of Contents for C2

Page 1: ... Operating Guide is intended to provide instructions on basic usage of the device To operate the device safely please ensure to carefully read this guide before use It is recommended to keep this guide on hand at all time for your reference ...

Page 2: ... find it difficult to use a powered wheelchair should refrain from using the device The maximum load weight for this device is 300 lb approx 136 kg It includes both the occupant and any luggage Ensure the the load weight does not exceed the maximum during use Turn off the device power when getting in and out of the device Keep your feet on the foot rest while driving to avoid feet or clothing gett...

Page 3: ...slowly in the desired direction 4 Stop Release the joystick 5 Turn off the power Press the power button and confirm the display turns off 6 Get out of the device Confirm the display is off and then get out of the device 7 Battery charge level Battery level is displayed from 0 to 100 Speed select buttons Increase the maximum speed Decrease the maximum speed Power button Control pad Sound button Let...

Page 4: ...Adjusting the speed The device speed can be controlled by the tilting degree of movement of the joystick In the beginning ensure to operate the joystick gently and drive slowly Climbing over a step When climbing over a step approach at a right angle to the step Tilting a little slow Stop when the front wheels bump into the step Slow down after the front wheels have climbed over the step Do the sam...

Page 5: ...nly when on a flat surface and in emergencies after turning off the power After moving the device manually with the brakes released be sure to raise the two brake release levers to re engage the brakes Press the smart key lock button The icon indicating the locked status will appear on the controller s display and make a locking sound When attempting to turn on the device when the device is locked...

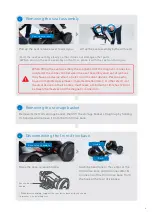
Page 6: ...ing or disassembling the device grab only the handles and parts as described in the instructions and do not hold the device by any other areas 1 Press the battery s lock release button Grasp the handle and pull to remove the battery Removing the battery 5 Seat assembly Front drive base Battery Rear drive base Storage basket Lock release button ...

Page 7: ...with the cushion facing up Removing the seat assembly Pull up the seat release lever toward you Lift up the seat assembly by the arm rests 6 Base release handle Seat release lever Bar B Handle When lifting the seat assembly the magnetism of the magnetic connectors located at the connection between the seat assembly and rear drive base may have an adverse effect on electrical medical devices Person...

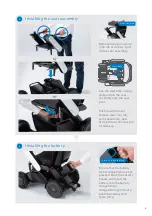
Page 8: ...ont drive base while tilting up the rear drive base Then align Bar B with the hook on the rear drive base Slowly tilt the rear drive base forward and connect it to the front drive base The base release handle of the rear drive base latches onto Bar A of the front drive base A click will be heard when the two parts are connected properly Click Handle Bar A Bar B If the device does not start properl...

Page 9: ...at post Push down the seat release lever into the vertical position and attach the cushion back to a seat base Seat cushion 4 Installing the battery Ensure that the battery lock release button is not pressed Grab the battery handle and insert the battery into the battery compartment If experiencing difficulty push the battery with more force Lock release button View hole ...

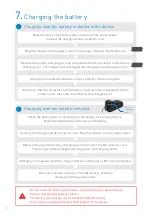
Page 10: ... connector cord Plug the charger into the power outlet Charging is completed when the charger indicator and battery LED turns solid green Remove the cap of the battery charging port and connect the DC connector to it The charger indicator begins flashing green and charging starts Disconnect the DC connector from the battery and then the plug from the power outlet Check the device power is off and ...

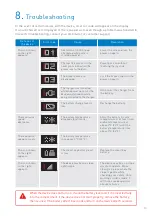
Page 11: ... in an ambient temperature of above 0 C 32 F until the battery temperature rises above 0 C 32 F Replace the smart key battery The device may be on a slope unsafe to operate Move slowly to a place where the slope is gentle while checking your safety Once warning sound is made it will not be made again for about 2 minutes The icon shown on the right appears Operation of control pad attempted while a...

Page 12: ...ent of the seat of the device Note Depending on your region and smartphone type the app may not be offered or some functions may not be available Model C2 1 You need to install the app beforehand To install go to the App Store and search for WHILL Click the blue WHILL logo icon for the WHILL Model C2 Ci2 app The grey logo icon is for WHILL Model C 2 To pair your device launch the WHILL Model C2 ap...

Reviews: