87
Model Ci User Manual
5. Assembly, Adjustment, and Disassembly
7.
Install the ring-shaped cover that was
removed in the previous step onto the inside
of the control assemblies (opposite side).
Align the box “ | ” with the cover “
p
” and
rotate clockwise to fasten in place.
8.
Repeat Steps 2 - 7 and move the ring-
shaped cover on the opposite-side box in
the same way.
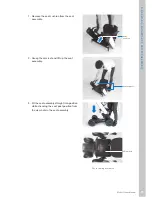
9.
Switch the location of control assemblies.
Insert the connector and rotate the base lock
clockwise to lock it.
Rotate the lock until a click sound is heard.
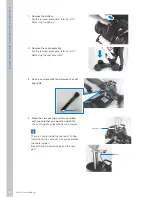
10.
Install the control assemblies onto the arms.
1) Slide the control assemblies onto the
arm.
2) Slide control assemblies downward.
When a click sound is heard and the
white lever rises, the box is fastened in
place.
Move control assemblies up, down, left, and
right, and check that it is locked in place.
Lock
2
1
Summary of Contents for Ci
Page 1: ...WHILL Model Ci User Manual ...
Page 2: ......
Page 8: ...6 ...
Page 30: ...28 Model Ci User Manual 1 Safety Precautions J I D K E F L M N Seat assembly top view ...
Page 102: ...100 Model Ci User Manual 5 Assembly Adjustment and Disassembly ...
Page 114: ...112 Model Ci User Manual 8 Maintenance and Inspection ...
Page 120: ...118 Model Ci User Manual 10 Specifications and Test Results ...


