background image

9

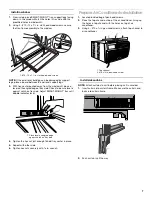
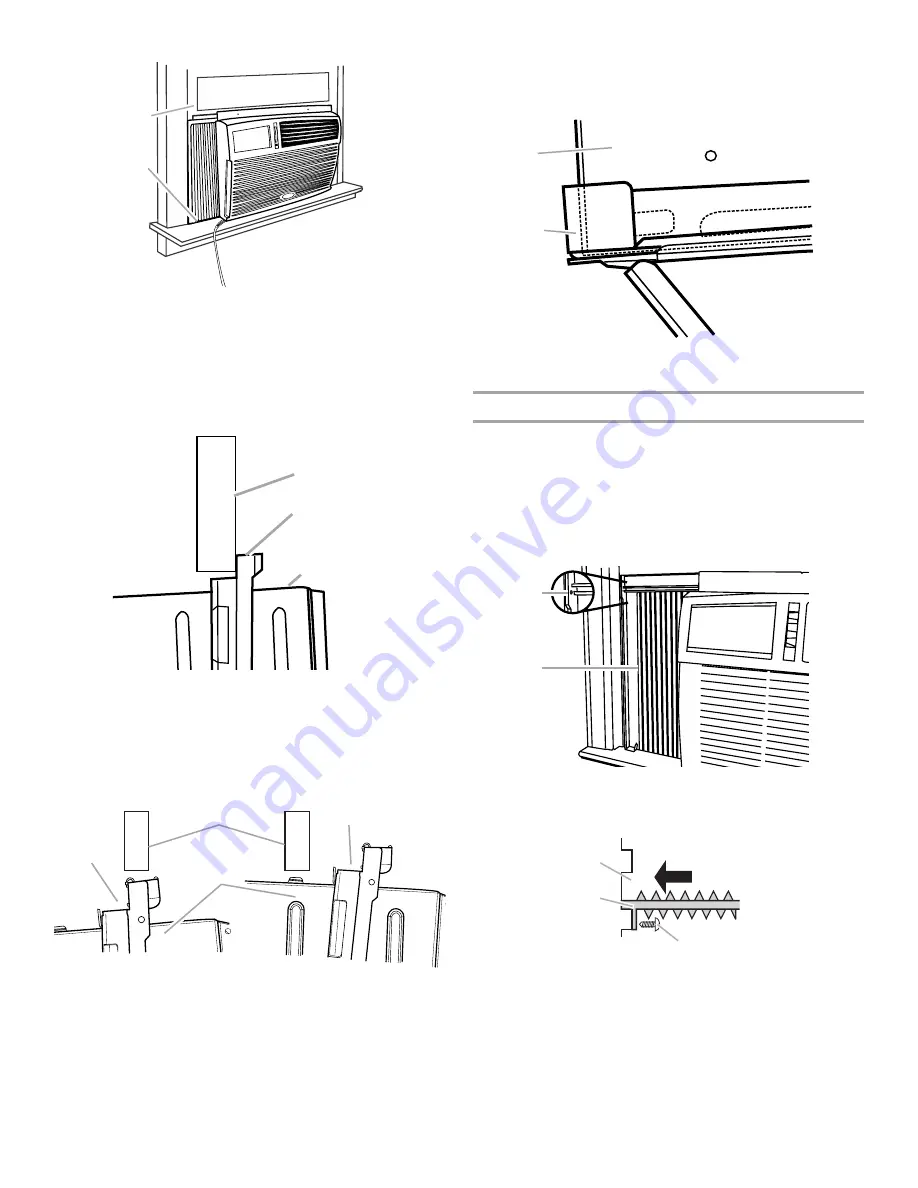
2. If window sash does not close flush against rear surface of 

top channel, remove air conditioner and adjust SMART-
MOUNT

 tray until window sash closes flush against rear 

surface of top channel.

Correct installation

If your air conditioner looks like either of the illustrations in the 
“Incorrect installation” graphic, SMART-MOUNT

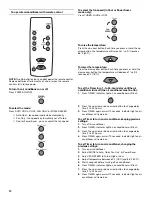
 tray needs 

adjustment.

Incorrect installation

3. If the bottom of the air conditioner does not sit against the 

bottom of the SMART-MOUNT

 tray, remove air conditioner 

and adjust angle of tray until air conditioner sits against the 
bottom of the tray.

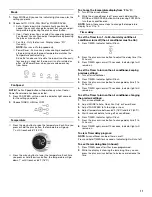
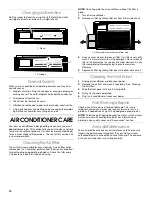
Attach side curtains to window

1. Pull left-hand curtain frame out until it fits into the window 

channel. Repeat with right-hand curtain frame. 

2. Insert one of the #8 x 

³⁄₄

 in. round-head screws through left-

hand curtain frame and into the window channel to fasten the 
curtain frame to the window. 

3. Repeat for right-hand curtain frame.

Front view

Top view

1. Window sash
2. Feet on bottom of air conditioner 

behind back side of windowsill

1. Window sash
2. Top channel
3. Air conditioner

1. Window sash
2. Top channel
3. Air conditioner

1

2

1

2

3

1

2

2

3

1. Air conditioner sitting on SMART-MOUNT

 tray

2. SMART-MOUNT

 tray

1. Hole for #8 x 

³⁄₄

 in. round-head screw

2. Side curtain

1. Side curtain against window channel 
2. Window channel
3. #8 x 

³⁄₄ 

in. round-head screw

1

2

1

2

3

1

2

Summary of Contents for 1187361

Page 1: ...formance parts accessories or service call 1 800 253 1301 ACONDICIONADOR DE AIRE ManualdeUsoyCuidado Si tiene preguntas respecto a las características funcionamiento rendimiento partes accesorios o servicio técnico llame al 1 800 253 1301 Table of Contents Índice 2 1187361 ...

Page 2: ... Complete la instalación 24 CÓMO USAR SU ACONDICIONADOR DE AIRE 25 Cómo poner en marcha su acondicionador de aire Control digital 25 Cómo poner en marcha su acondicionador de aire Control rotativo 28 Cómo cambiar la dirección del aire 29 Sonidos normales 29 CÓMO CUIDAR SU ACONDICIONADOR DE AIRE 29 Limpieza del filtro de aire 29 Limpieza del panel delantero 29 Reparación de la pintura dañada 29 Man...

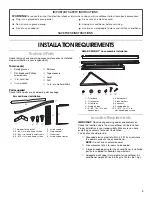
Page 3: ...Adequate wall support for weight of air conditioner Air conditioner weighs 80 lbs 36 3 kg to 125 lbs 56 7 kg IMPORTANT SAFETY INSTRUCTIONS WARNING To reduce the risk of fire electrical shock or injury when using your air conditioner follow these basic precautions SAVE THESE INSTRUCTIONS Unplug air conditioner before servicing Use two or more people to move and install air conditioner Plug into a g...

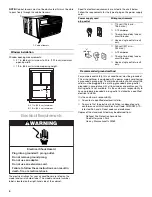
Page 4: ...ting outlet is not available it is the customer s responsibility to have a properly grounded 3 prong outlet installed by a qualified electrical installer It is the customer s responsibility To contact a qualified electrical installer To assure that the electrical installation is adequate and in conformance with National Electrical Code ANSI NFPA 70 latest edition and all local codes and ordinances...

Page 5: ...plate center in windowsill against outside edge of stool 2 Using the 2 inside screw holes in tray back mark screw locations on windowsill for mounting the SMART MOUNT tray 3 Remove tray back Using these marks drill in pilot holes in the windowsill approximately 1 in deep 4 To assemble the tray frame insert tab on tray back into slot on tray side Check to see that the tab is engaged and the 2 piece...

Page 6: ...en place flat washer lock washer and hex nut NOTE Do not tighten The leg must be able to move freely to adjust angle when installed 5 Insert second carriage bolt through tray side and attach other end of support leg NOTE Do not tighten The leg must be able to move freely to adjust angle when installed 6 Install support leg on other side 1 1st and 2nd slots 1 2nd and 3rd slots 1 1 1 Hex nut 2 Lock ...

Page 7: ...cates level 4 Tighten the hex nut just enough to hold tray center in place 5 Repeat with other side 6 Tighten hex nuts securely with in wrench PrepareAirConditionerforInstallation 1 Locate provided bag of pan head screws 2 Place the top channel on top of the air conditioner lining up the holes in top channel with the holes on top of air conditioner 3 Using 3 10 x in pan head screws attach top chan...

Page 8: ... bottom holes in air conditioner cabinet 7 Slide curtain housing into guides as far as it will go 8 Repeat above steps for left hand curtain PositiontheAirConditioner Handle air conditioner with care Be sure your air conditioner does not fall out of the opening during installation or removal The place where the power cord exits the air conditioner should be no more than 4 ft 122 cm from a grounded...

Page 9: ...om of the tray Attach side curtains to window 1 Pull left hand curtain frame out until it fits into the window channel Repeat with right hand curtain frame 2 Insert one of the 8 x in round head screws through left hand curtain frame and into the window channel to fasten the curtain frame to the window 3 Repeat for right hand curtain frame Front view Top view 1 Window sash 2 Feet on bottom of air c...

Page 10: ...when outside temperature is below 65 F 18 C The inside evaporator coil will freeze up and the air conditioner will not operate properly NOTE In the event of a power failure your air conditioner will operate at the previous settings when the power is restored StartingYourAirConditioner Digital Control 1 Remove clear protective film from control panel and front panel badge 2 Press POWER to turn on a...

Page 11: ... 2 While the air conditioner is off press and hold down the MODE and FAN SPEED buttons while pressing POWER to turn the air conditioner on NOTE Follow these same steps to change the temperature display from C to F Timer delay To set the Timer for a 1 to 24 hour delay until the air conditioner turns off the air conditioner must be On 1 Press TIMER Indicator light will flash 2 Press the plus or minu...

Page 12: ...t on air conditioner will flash 2 Press the up arrow or down arrow button to change delay time 1 to 24 hours 3 Press TIMER again or wait 10 seconds Indicator light on air conditioner will remain on To set Timer to turn on air conditioner keeping previous settings 1 Turn off air conditioner 2 Press TIMER Indicator light on air conditioner will flash 3 Press the up arrow or down arrow button to chan...

Page 13: ...l High Cool or Turbo Cool the fan circulates air continuously Turbo Cool for maximum cooling High Cool for normal cooling Low Cool for sleeping comfort Fan Only to move air continuously without cooling NOTE Fan runs on Turbo speed only Power Saver on some models fan runs only when cooling is needed Fan stops circulating air when the room temperature matches the Temperature control setting Since th...

Page 14: ...e filter in place 1 Turn off air conditioner 2 Remove air filter by sliding filter out from either side of unit 3 Use a vacuum cleaner to clean air filter If air filter is very dirty wash it in warm water with a mild detergent Do not wash air filter in the dishwasher or use any chemical cleaners Air dry filter completely before replacing to ensure maximum efficiency 4 Replace air filter by sliding...

Page 15: ...es during the hottest part of the day A higher capacity air conditioner may be required depending on the size of the room being cooled Air conditioner cycles on and off too much or does not cool The MODE is set to POWER SAVER on some models Use Power Saver only when you are away from home or asleep since the fan does not circulate the room air continuously Use LOW HIGH or TURBO for your best comfo...

Page 16: ...ytime phone number in your correspondence Please record your model s information Whenever you call to request service on your appliance you need to know your complete model number and serial number You can find this information on the model and serial number label See Electrical Requirements for model and serial number location Please record the model and serial number information below Also recor...

Page 17: ...A Estas palabras significan PELIGRO ADVERTENCIA a usted y a los demás Lea y obedezca siempre todos los mensajes de seguridad Todos los mensajes de seguridad irán a continuación del símbolo de advertencia de seguridad puede morir lesión INSTRUCCIONES IMPORTANTES DE SEGURIDAD ADVERTENCIA Para reducir el riesgo de incendio choque eléctrico o lesiones personales al usar su acondicionador de aire siga ...

Page 18: ...del gabinete Instalación en la ventana Medidas de la abertura de la ventana El ancho de la abertura debe ser de 27 pulg 68 6 cm mínimo a 40 pulg 101 6 cm máximo La altura mínima de la abertura debe ser de 19 pulg 48 3 cm Requisitoseléctricos Las clasificaciones eléctricas para su acondicionador de aire están enumeradas en la etiqueta de número del modelo y de serie La etiqueta con el número de mod...

Page 19: ... las normas señaladas en National Fire Protection Association One Batterymarch Park Quincy Massachusetts 02269 INSTRUCCIONES DE INSTALACIÓN Desempaqueelacondicionador de aire Quite los materiales de empaque Quite y deshágase debidamente de todos los materiales de embalaje Quite las cintas y los residuos de goma del acondicionador de aire antes de encenderlo Frote un poco de detergente líquido para...

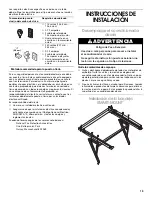
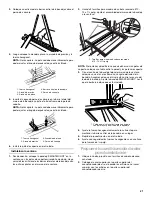
Page 20: ...a bandeja Verifique que la lengüeta esté insertada y que las 2 piezas estén alineadas Coloque 2 tornillos de cabeza hexagonal 8 18 x pulg para asegurarla 5 Repita el procedimiento para la otra barra lateral de la bandeja Fije las patas de soporte 1 Determine las ranuras correctas de la barra lateral de la bandeja basándose en el tipo de construcción exterior del edificio Construcción delgada de la...

Page 21: ...que una tabla entre la pared y las patas de soporte 3 Con el centro de la bandeja lejos del marco de la ventana coloque un nivel en el extremo con ángulo del lado de la bandeja Asegúrese de que el nivel esté contra la ranura del lado de la bandeja Ajuste la bandeja SMART MOUNT hasta que la burbuja indique que está nivelada 4 Ajuste la tuerca hexagonal solamente lo suficiente para mantener la barra...

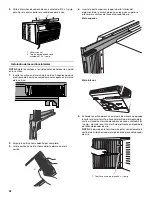
Page 22: ...a parte superior y luego la parte inferior del alojamiento de la cortina derecha en las guías superior e inferior para cortinas del acondicionador de aire Vista superior Vista inferior 5 Extienda la cortina derecha hacia fuera de manera que pueda insertar el primer tornillo a través del orificio del medio de la cortina Usando un tornillo de cabeza de cono achatado 8 x pulg atornille la cortina al ...

Page 23: ...co de la ventana 2 Si el marco de la ventana no cierra a escuadra contra la superficie posterior de la ranura superior saque el acondicionador de aire y ajuste la bandeja SMART MOUNT hasta que el marco de la ventana cierre a escuadra contra la parte posterior superficie de la ranura superior Instalación correcta Si el acondicionador de aire se ve como cualquiera de las ilustraciones de Instalación...

Page 24: ... ventana al marco de la ventana con un tornillo de cabeza redonda 8 x pulg para asegurar la ventana en su lugar 4 Inserte el obturador de espuma de la ventana detrás de la parte superior del marco de la ventana inferior y contra el cristal de la ventana superior 5 Conecte a un contacto de pared de conexión a tierra de 3 terminales 1 Orificio para el tornillo de cabeza redonda 8 x pulg 2 Cortina la...

Page 25: ...d Velocidad de ventilación 5 Selecccione la temperatura Vea Temperatura Mode Modo 1 Oprima MODE Modo hasta que se encienda la luz del indicador para la posición que usted desea 2 Seleccione AUTO Automático COOL Enfriamiento FAN ONLY Sólo ventilación o POWER SAVER Ahorro de energía Auto Automático Enfría la sala mientras automáticamente controla la velocidad de ventilación Usted no puede cambiar la...

Page 26: ...ntermitentemente 3 Oprima el botón de más o menos para cambiar el tiempo de retardo de 1 a 24 horas 4 Oprima TIMER nuevamente o espere 10 segundos La luz del indicador permanecerá encendida Para programar el temporizador de manera que el acondicionador de aire se encienda cambiando los ajustes previos 1 Encienda el acondicionador de aire 2 Ajuste el MODE a Auto Cool Fan Only o Power Saver 3 Ajuste...

Page 27: ...itentemente 2 Oprima el botón con la flecha hacia arriba o abajo para cambiar el tiempo de retardo de 1 a 24 horas 3 Oprima TIMER nuevamente o espere 10 segundos La luz del indicador en el acondicionador de aire permanecerá encendida Para programar el temporizador de manera que el acondicionador de aire se encienda manteniendo los ajustes previos 1 Apague el acondicionador de aire 2 Oprima TIMER L...

Page 28: ...l Poco fría High Cool Muy fría o Turbo Cool Máximo nivel de frío el ventilador hace circular el aire continuamente Turbo Cool para enfriamiento máximo High Cool para enfriamiento normal Low Cool para dormir cómodo Fan Only Sólo ventilación para que el aire circule continuamente sin enfriarse NOTA El ventilador funciona en velocidad Turbo solamente Power Saver Ahorro de energía en algunos modelos E...

Page 29: ...ionador de aire 2 Deslice el filtro de aire hacia afuera desde cualquiera de los lados de la unidad 3 Limpie el filtro de aire usando una aspiradora Si está muy sucio lave el filtro de aire con agua tibia y un detergente suave No lave el filtro de aire en la lavavajillas ni use limpiadores químicos Seque bien el filtro al aire antes de colocarlo nuevamente para asegurarse la máxima eficiencia 4 Vu...

Page 30: ...y conges tionada o se están usando en la misma habitación aparatos que generan calor Use ventiladores aspiradores cuando esté cocinando o bañándose y trate de no usar aparatos que generan calor durante las horas más calurosas del día Podría necesitar un acondicionador de aire con más capacidad dependiendo del tamaño de la habitación que se desea enfriar La unidad se enciende y se apaga demasiado o...

Page 31: ...r más asistencia Si necesita asistencia adicional puede escribir con sus preguntas o dudas a Customer Interaction Center 553 Benson Road Benton Harbor MI 49022 2692 Favor de incluir un número telefónico de día en su correspondencia Por favor anote la información sobre su modelo Siempre que llame para solicitar servicio del aparato necesitará saber el número del modelo y el número de serie completo...

Page 32: ...1187361 2003 All rights reserved Todos los derechos reservados SMART MOUNT is a trademark of Whirlpool U S A SMART MOUNT Marca de Whirlpool EE UU 10 03 Printed in U S A Impreso en EE UU ...

Reviews: