background image

49

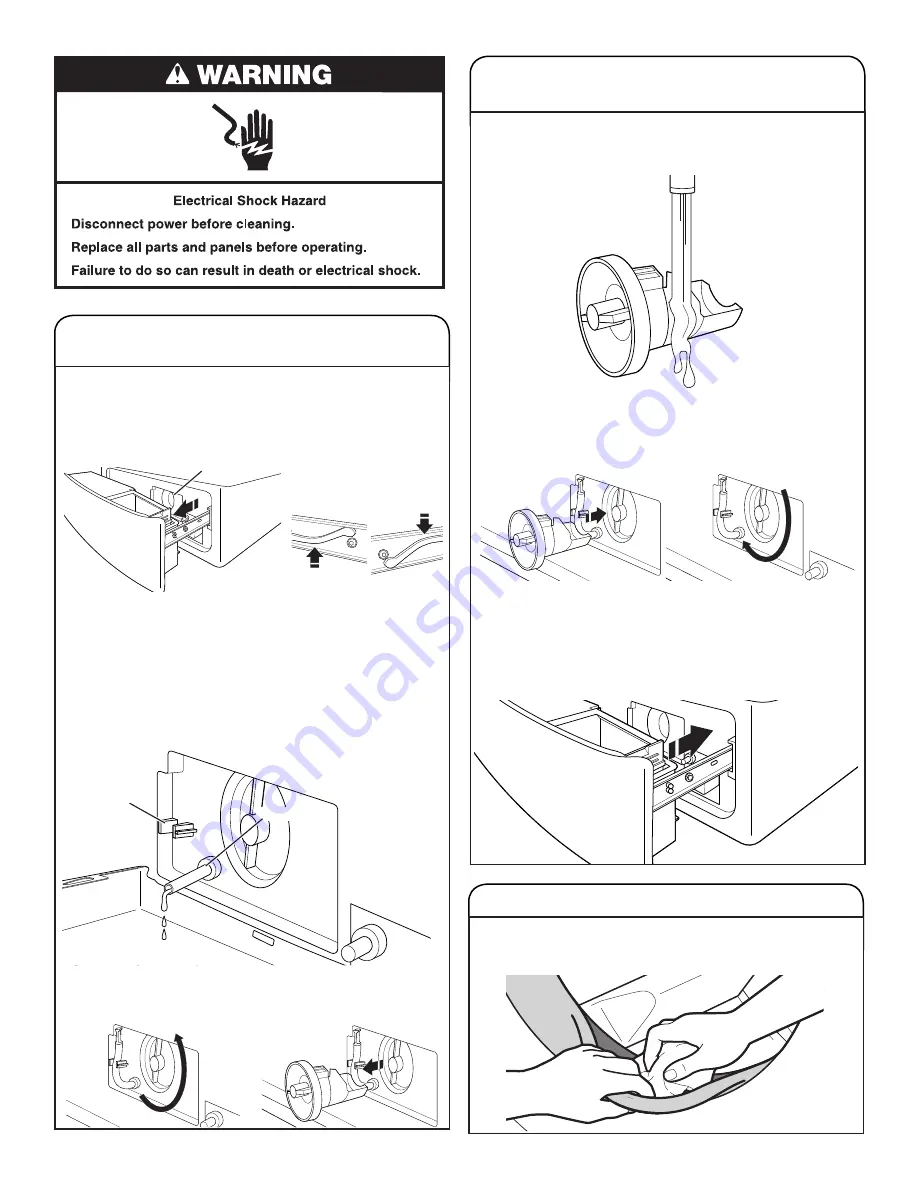
4.

  Remove large clumps of lint by hand from the filter and 

place lint in a suitable waste container. Remove remaining 

residue from the filter by rinsing with water.

5.

  Reinsert the drain pump filter by turning it clockwise.  

Make sure to turn it in as far as it will go, with the filter 

handle remaining as close as possible to the vertical 

position.

6.

  Replace and close the dispenser drawer. Make sure to 

insert both rails simultaneously when replacing the drawer. 

You will hear a clicking sound that indicates the rails have 

engaged. To ensure proper placement of the drawer, pull 

out fully. The drawer should be fully engaged and the rails 

locked in placed. Make sure the drain hose is secured in 

the hose clip and tucked underneath the cutout.

CLEANING THE DRAIN PUMP FILTER/ 

DRAINING RESIDUAL WATER (cont.)

CLEANING THE DRAIN PUMP FILTER/ 

DRAINING RESIDUAL WATER (on some models)

1.

  Open the dispenser drawer by pulling on the handle at the 

base of the washer/dryer. This will reveal the drain pump 

filter. Remove the drawer by releasing the tab on each side. 

2.

  Place a broad, flat container beneath the drain pump filter 

to collect the drain water. Release the black hose from the 

hose clip, remove the plug, and drain the hose into the 

container. Empty the container. Repeat this procedure if 

necessary until all the water has drained. Make sure that  

the black hose is completely dry, replace the plug, and 

secure the hose in the clip.


NOTE: 

If water does not drain well, push in hose slightly to 

remove any possible kinks.

3.

  Lay a cotton cloth beneath the drain pump filter to absorb 

any water still in it. Then remove the drain pump filter by 

turning it counterclockwise.

NOTE:

 Perform the following procedure occasionally.

Black hose

Drain pump 

filter

With your finger, push 

down on tab on right side 

of drawer, and up on tab on 

left side of drawer.

Right side

Left side

Gently pull back the rubber door seal and clean any stained 

areas, soil buildup, or lint with the textured side of an affresh 

Machine Cleaning Wipe.

ADDITIONAL CLEANING

Hose clip

Summary of Contents for 8TWFW5620HW

Page 1: ...cable models 8TWFW5620HW 8TWFW6620HW 滾筒洗衣機 Front Loading Automatic Washer 若您有任何疑問或問題 請造訪網站 www whirlpool com tw If you have any problems or questions visit us at www whirlpool com tw W11316321B 專為使用 HE 高效能洗衣劑而設計 Designed to use only HE High Efficiency detergents ...

Page 2: ...T 40 USING THE DISPENSERS 41 USING YOUR WASHER 42 WASHER MAINTENANCE 46 TROUBLESHOOTING 50 ASSISTANCE AND SERVICE Back Cover 產品規格 機 型 8TWFW5620HW 8TWFW6620HW 商品名稱 洗衣機 洗衣機 適用電源 120 V 60 Hz 120 V 60 Hz 最大洗衣量 乾燥衣物 17 0 kg 17 0 kg 適用水壓 0 03 0 7 MPa 0 03 0 7 MPa 額定消耗電功率 500 W 1 000 W 最高旋轉速度 1 200 rpm 1 200 rpm 產品顏色說明 末碼 W 白 W 白 重量 96 kg 107 kg 外觀尺寸 高 x 寬x 深 982 x 686 x 802 mm 982 x 686 x 802 mm 註 規格以實際...

Page 3: ...不要去洗滌那些曾經被汽油 乾洗溶劑 易燃或容易爆炸 的物質所清洗過 洗滌過 浸泡過的衣物 因為它們會釋 放出可能燃燒或者爆炸的氣體 不要加入汽油 乾洗溶劑或其他易燃或爆炸之物質到洗衣 水裏面 它們會釋放出可能燃燒或者爆炸的氣體 請妥善保存上述安全說明 在某些情況下 如果兩個星期或更長沒有使用的熱水系統 可能會產生氫氣 氫氣是易爆炸氣體 如果熱水系統有很 長一段時間未使用 在使用洗衣機之前 打開水龍頭 讓水在每個水龍頭都流出幾分鐘 這樣可以釋放掉任何聚 集的氫氣 由於該氣體是易燃性的 在此時請不要吸煙或 者使用火苗 當洗衣槽 脫水槽或洗衣棒在轉動時 請不要將手伸入 洗衣機內 請不要將洗衣機安裝或存放在室外日曬雨淋之地方 請勿擅自更改控制器 請不要擅自修理或者更換任何洗衣機零件 除非您具有 修理技能及明確理解本使用或維護指南或其他用戶維修 說明書所指定的修理方法 否則請別擅自修理 參閱 電源要...

Page 4: ...衣機設計的配件 原廠認證零件 這代表專為此款洗衣機 設計的高品質零件與配件 通過時間考驗 的工程符合我們嚴格的品質規範 請利用下列惠而浦原廠配件訂製您的洗衣機與乾衣機 更多配件選擇和訂購相關資訊 請致電 0800 258 558 請造訪網站 www whirlpool com tw 15 底座 搭配洗衣機顏色的底座 能將 機器升高至更舒適的工作高 度 大型抽屜可提供方便的貯 存空間 堆疊配件 若有空間考量 堆疊配件可讓 您把乾衣機安裝在洗衣機的上 方 ...

Page 5: ...選項 接著按您的需求選擇 洗衣方式 行程詳情 請參閱 行程指南 若您未選擇 洗衣方式 洗衣機將自 動作出建議 或使用上一次設定的 洗衣方式 行程 啟動 暫停 持續按壓 3 秒 直到 啟動 暫停 上方的燈光顯示開始行程 或行程進行期間觸碰一次 暫停機器運行 行程狀態顯示畫面 行程狀態顯示畫面 顯示行程進度 您可能注意到流程每個 階段都會發出與傳統洗衣機不同的聲音和暫停 1 2 3 4 預計剩餘時間 預計剩餘時間 顯示完成行程的所需時間 衣物量 調整選 項 所選設定 以及水壓等因素都可能影響所需時間 衣物塞太 滿 放置不平均或過多泡沫都可能讓洗衣機延長行程時間 感應 觸碰 啟動 暫停 後 洗衣機將發出響聲 表示它正在啟動 滾筒將局部轉動 機門上鎖後會發出喀嗒聲 門上鎖第二次後 洗衣機將開始轉動以感應衣物量 行程中將 持續此感應流程 感應衣物量後 將根據此重量顯示預計時間 並開始注水 您也許會聽...

Page 6: ...較快可縮短烘乾時間 但可能會讓衣物較皺 轉速較慢減少衣物皺痕 但衣物會較濕 衣物髒度 已預設每個行程的建議衣物髒度 可變更部份預設的衣物 髒度 若是極為髒汙的堅固布料 衣物髒度 請設定 重 若為略髒的精緻布料 衣物髒度 請設定 輕 較輕的衣物髒度設定有助減少衣物纏繞和皺痕 hold 3 sec for Cycle Signal hold 3 sec for Control Lock hold 3 sec for FanFresh hold 3 sec for PreSoak 5 實用行程 槽洗淨 每 30 次洗衣後用此行程一次 保護洗衣機內部清新和清 潔 此行程使用較高水位 搭配使用 affresh 槽洗錠或液 態含氯漂白劑 徹底清潔洗衣機的內部 使用此行程時 滾筒內應無衣物 不得中斷此行程 請參閱 洗衣機保 養 部份 單獨脫水 本行程排除衣物或手洗的特別保養衣物之過多水份 電力中斷後請使...

Page 7: ...劑盒 此洗劑智慧投放盒能儲存高達 67 6 oz 2 公升 的 HE 高 效能洗衣劑 B 1 公升大型 HE 高效能洗衣劑的洗劑盒 此洗劑智慧投放盒能儲存高達 33 8 oz 1 公升 的 HE 高 效能洗衣劑 每個洗劑盒能放置可供數次洗衣的洗衣劑用量 每次洗衣都 能在適當時間把適當的 HE 高效能洗衣劑用量加進衣物中 參閱 使用洗劑盒 瞭解使用洗劑盒的資訊 重要事項 請勿將含氯漂白水或洗衣粉倒入洗劑智慧投放 盒 洗衣粉必須倒入單次衣物洗劑盒 請參閱 使用洗衣 機 部份 8 A B 可選擇附帶 1 或 2 公升洗劑智慧投放盒的洗衣機 C HE 高效能洗衣劑放置格 本放置格能放置 HE 高效能洗衣劑或洗衣粉 供您主要洗衣 行程之用 且能在行程間自動分配洗劑 D 衣物柔軟劑放置格 本放置格放置衣物柔軟劑 它能在行程最佳時間點 自動分 配衣物柔軟劑 E 液態含氯漂白劑放置格 本放置格在洗衣行程後...

Page 8: ...分機種使用 Oxi 粉劑 冷水溫和清潔 冷水 快速 快洗 以粗體字顯示的設定和選項 是該洗衣行程的預設設定 為達成最佳布料維護目的 選擇最適用於需要清洗的衣物之行程 選項和設定 請務必閱讀和遵循布料保養標籤 以及清洗產品說明 避免把衣物塞太滿 洗衣機塞得太滿 就無法妥善將衣物洗淨或脫水 並非每個行 程都提供所有設定 且部份選項無法合併使用 並非所有機種都提供所有選項 待洗衣料 洗衣方式 基本設定 更多選項 洗衣水溫 脫水轉速 衣物髒度 蒸氣 加強洗清 預先浸泡 Load Go 一般 標準 熱 微熱 溫 涼 冷 高 中高 中 不脫水 輕 正常 重 除皺 熱 微熱 溫 涼 冷 高 中高 中 慢 不脫水 輕 正常 重 強力洗滌 熱 微熱 溫 涼 冷 高 中高 中 不脫水 輕 正常 重 消毒殺菌 部分機種使 用 Oxi 粉劑 熱 高 中高 中 輕 正常 重 冷水 熱 微熱 溫 涼 冷 高 中高 中...

Page 9: ...輕 正常 重 冷水 熱 微熱 溫 涼 冷 高 中高 中 低 不脫水 輕 正常 重 消毒殺菌 部分機種使 用 Oxi 粉劑 熱 高 中高 中等 低 不脫水 輕 正常 重 大物件 標準 熱 微熱 溫 涼 冷 高 中高 中 低 不脫水 輕 正常 重 快洗 熱 微熱 溫 涼 冷 高 中高 中 低 不脫水 輕 正常 重 除皺 熱 微熱 溫 涼 冷 高 中高 中等 低 不脫水 輕 正常 重 強力洗滌 熱 微熱 溫 涼 冷 高 中高 中 低 不脫水 輕 正常 重 冷水 熱 微熱 溫 涼 冷 高 中高 中 低 不脫水 輕 正常 重 本行程去除衣服 床單和毛巾 99 99 的大部份常見細菌 使用適用的最高洗衣水溫並添加 Oxi 粉劑至滾筒 部份機種 確保能進行消毒作業 檢查衣物的建議洗衣水溫並使用製造商建議的 Oxi 用量 部份機種 經測試的細菌包括 克雷伯氏肺炎菌 銅綠假單胞菌和金黃色葡萄球菌 ...

Page 10: ... 高 中高 中 低 不脫水 輕 正常 重 消毒殺菌 部分機種使 用 Oxi 粉劑 熱 高 中高 中等 低 不脫水 輕 正常 重 花色 標準 熱 微熱 溫 涼 冷 高 中高 中 低 不脫水 輕 正常 重 快洗 熱 微熱 溫 涼 冷 高 中高 中 低 不脫水 輕 正常 重 除皺 熱 微熱 溫 涼 冷 高 中高 中等 低 不脫水 輕 正常 重 強力洗滌 熱 微熱 溫 涼 冷 高 中高 中 低 不脫水 輕 正常 重 冷水 熱 微熱 溫 涼 冷 高 中高 中 低 不脫水 輕 正常 重 消毒殺菌 部分機種使 用 Oxi 粉劑 熱 高 中高 中 低 不脫水 輕 正常 重 本行程去除衣服 床單和毛巾 99 99 的大部份常見細菌 使用適用的最高洗衣水溫並添加 Oxi 粉劑至滾筒 部份機種 確保能進行消毒作業 檢查衣物的建議洗衣水溫並使用製造商建議的 Oxi 用量 部份機種 經測試的細菌包括 克雷伯氏肺炎菌...

Page 11: ...澱在乾淨的衣物上 並非所有標示為 高效能 的洗衣劑都內 含相同配方 而減少泡沫的能力也有所不同 例如 天然 有機或 自製 HE 高效能洗衣劑可能會產生大量泡沫 若您使用上述其中一 種產品 並看到顯示畫面上出現 Sd 或 Sud 錯誤碼 考慮 使用不同的 HE 高效能洗衣劑 請務必遵循洗衣劑製造商的說明 決定洗衣劑的用量 僅使用 HE 高效能洗衣劑 關於洗衣劑的濃度 市售液態 HE 高效能洗衣劑都是濃縮的 大部份 HE 高效能濃縮洗 衣劑品牌都會在瓶子上顯示濃度 然而 即使洗衣精瓶子未顯示濃度 也可輕易計算 只要將包裝之 液體容量 除以可洗衣物的次數即可 再參照下表 尋找對應的濃 度 若洗淨效果不如預期 請試著使用較低的濃縮數 若產生過多泡 沫 試著使用較高的濃縮數 若洗衣精濃度並非 2x 請同時觸碰並按住 洗衣水溫 和 衣物 髒度 3 秒 變更洗衣精濃度設定 濃度 濃度盎司數 衣物數 2X...

Page 12: ... 或 33 8 oz 1 公升 的 HE 高效能洗衣劑 注滿洗劑智慧投放盒 拉開洗衣機底部的把手 打開洗劑盒 可視需求從洗衣機取下整個洗劑盒 找到 Load Go 洗劑智慧投放 盒 輕輕向上拉出位於洗劑智慧投 放盒蓋上的突出物 抬起注液門 添加 HE 高效能洗衣劑至 Max 線 參閱右方的插圖 關上注 液門 關門後會發出喀嗒聲 確 定濃度正確 參閱 選擇正確的 洗衣精 部份 更換洗衣精或長期不用洗衣機時 應沖洗洗劑盒 欲知清潔洗劑盒的 說明 參閱 洗衣機保養 部份 添加 HE 高效能洗衣劑至洗劑盒 洗衣粉 將選擇器升高至高位 直接添加至放置格內 僅使用 HE 高效能 洗衣劑 Load Go 洗劑智慧投放盒 部份機種 為單次衣物添加洗衣精 重要事項 開始單次洗衣前 請先停用 Load Go 選項 不要將洗衣膠囊加至洗劑盒 HE 高效能洗 衣劑放置格 僅使用 HE 高 效能洗衣劑 洗衣劑 將選...

Page 13: ...的衣物 按建議行程 水溫和褪色程度分類衣物 請將嚴重髒汙和略髒衣物 分開清洗 請將細緻衣物和堅固布料分開清洗 在衣物的內面測試 去污產品 盡速處理污漬 並檢查褪色程度 重要事項 清空衣服的口袋 零錢 鈕釦或任何小物件都可能堵塞幫浦 以致於需要致電維修 拉上衣服拉鍊 扣好鉤子 繫上繩子和腰帶 然後取下無法清 洗的鑲邊和飾品 縫補裂痕 避免洗衣時進一步損壞衣物 孔 轉接頭 針織品必須翻至反面 避免起毛球 請將易沾附棉絮的衣物與 易產生棉絮的衣物分開清洗 合成纖維 針織品和燈芯絨會沾 附來自毛巾 地毯和雪尼爾布料的棉絨 洗衣後若仍殘留污漬 不得烘乾衣物 因為熱力可能將污漬永 久留在衣物上 請務必閱讀和遵循布料保養標籤 以及洗劑產品說明 不當洗 衣可能損壞您的衣物 2 有需要時 放入洗衣用品 裝入衣物前可將洗衣膠囊 Oxi 類型加強清潔劑 護色漂白劑或香 味晶球放入內桶 使用單次劑量洗衣膠囊時 確...

Page 14: ...物 清洗小型衣物時 用網狀洗衣袋裝入衣物 若為多項衣物 使 用多個袋子 並將衣物平均裝於袋內 4 添加 HE 高效能洗衣劑 HE 高效能洗衣劑 洗劑智慧投放盒 根據所用的 HE 高效能洗劑 液體或粉末 調整選擇器 直接將適量的洗衣劑加入至洗衣劑放置格內 請參閱 使用 洗劑盒 部份 請停用 Load Go 選項 單次衣物 HE 高效能洗衣粉 單次衣物 HE 高效能洗衣劑 Load Go 洗劑智慧投放盒 部份機種 單次衣物洗劑盒 備註 請勿將洗衣膠囊 Oxi 類型加強清潔劑 護色漂白劑或香味 晶球放入洗劑盒內 這些物品無法從洗劑盒內正確地加入清洗的衣 物中 或 若洗劑智慧投放盒已有足夠的洗衣劑來洗衣 只需選擇步驟 10 說明的 Load Go 選項 如需添加洗衣劑至洗劑智慧投 放盒 參閱 使用洗劑盒 部份 ...

Page 15: ...式 為衣物選擇最佳行程組合 欲知行程功 能 請參閱 行程指南 9 若有需要 調整行程選項功能 LED 顯示幕將顯示所選行程的預設設定 要調整設定 請分別按壓 洗衣水溫 脫水轉速 衣物髒度 調整設定可能會變 更 預計剩餘時間 衣物塞太滿 放置不平均或過多泡沫都可能 讓洗衣機延長行程時間 10 選擇任何額外的選項 欲新增行程選項 請分別按壓 蒸氣 加強洗清 或 單獨脫 水 欲使用洗劑智慧投放盒 部份機種 選擇 Load Go 至 於其他選項 請持續按壓對應的按鈕 3 秒 欲從所選行程移除選 項 請再次觸碰該按鈕 倒入定量的衣物柔軟劑至衣物柔軟劑放置格內 請務必遵循製 造商的說明 根據您的衣物量 使用正確的柔軟劑用量 即使已選擇 加強洗清 衣物柔軟劑仍僅會在最後一次洗清 時加入 重要事項 不得過量添加 稀釋或使用超過製造商建議的柔軟 劑用量 倒入柔軟劑時 不得超過格子內顯示的 Max 線 過量的...

Page 16: ...這樣做 可增加衣物的時間將按行程選擇 和衣物量而有所不同 觸碰 啟動 暫停 一次 當洗衣機停止運轉時 機 門將解鎖 這可能需時數分鐘 接著關閉機門 然 後再次觸碰並按住 啟動 暫停 重新啟動行程 增加衣物 燈關閉後增加衣物 取消目前行程 洗衣機會將水排出 需要重新選擇行 程後再次啟動 為達成最佳洗衣和節能效果 請在 加衣 燈亮起時再增加衣物 12 行程結束後立即取出衣物 行程完成後立即取出衣物 避免氣味 金屬物 品的鏽蝕殘留在衣物上 取出衣物時 應將門 膠圈往後拉並檢查機門和洗衣機滾筒之間是否 有小型物品 若您無法即時取出衣物 使用冷風清新選項 若您的機種提供 若選擇冷風清新選項 行程結束後洗衣機將自動啟動風扇 並於最長 12 小時內定時滾動衣物 備註 欲取消冷風清新選項 觸碰 電源 或 啟動 暫停 本洗衣機配備緊密封條 可避免滲水 為避免產生異味 使用 後請讓機門打開 以便洗衣機能風乾 ...

Page 17: ...液態含氯漂 白劑和 1 gallon 3 8 公升 的溫熱自來水 ii 用沾有稀釋溶劑的濕布擦拭門膠圈區域 iii 靜置 5 分鐘 iv 用乾布徹底清潔所有區域 並打開機門 風乾洗衣機 內部 洗衣機保養 續 重要事項 用漂白水清潔時要佩戴手套 參考漂白水製造商的說明 正確使用產品 清潔洗衣機內部 本洗衣機配備特殊行程 能結合 affresh 洗衣機清潔劑 或一 般的液態含氯漂白劑 徹底清潔洗衣機的內部 蒸氣洗衣機機 種也使用蒸氣 提升此特殊行程中的清潔力 重要事項 使用 槽洗淨 行程期間 不得使用增稠 易倒或 不噴濺的漂白劑 因為此舉會產生過多泡沫 備註 展開清潔流程前 請閱讀完整的說明 開始程序 1 槽洗淨 建議使用 因其能達成最佳效能 a 打開機門並取出所有衣物 b 使用 affresh 機器清潔拭紙 或柔軟的濕布或海綿 擦 拭機門窗戶 c 放入 affresh 槽洗錠 至洗衣機滾筒內...

Page 18: ...擦乾盒子 若有需要 使用全效表面清潔劑 針對部份機種 欲清除 Load Go 洗劑智慧投放盒的殘留物 拉起洗劑盒的把手 並從洗衣機櫥櫃中將它拉出 然後用流水 徹底沖洗 用 affresh 機器清潔拭紙 或濕布擦拭洗劑盒的表 面 再用毛巾擦乾盒子 若有需要 使用全效表面清潔劑 把洗劑盒放回洗衣機櫥櫃 確保其已穩妥就定位 重要事項 不得用洗碗機清潔洗劑盒 清潔洗衣機外部 使用 affresh 機器清潔拭紙 或柔軟的濕布或海綿 擦拭任 何溢出物 偶爾擦拭洗衣機外部 讓它看起來光潔如新 使用 affresh 機器清潔拭紙 或溫和的肥皂和水 重要事項 為避免損壞洗衣機的烤漆 不得使用磨蝕性產品 槽洗淨行程提醒 備註 並非所有 槽洗淨 行程都帶有提醒燈 洗衣機運行 30 個洗衣行程後 洗衣行程結束後 槽洗淨 的 LED 燈將閃爍 這是提醒您需運行 槽洗淨 行程 若未啟動 槽洗淨 行程 再完成3次正常洗...

Page 19: ...措施 1 關閉冷熱水龍頭 接著拆下進水管並進行排水 實用秘訣 在洗衣機上標記提醒備註 下次使用洗衣機前 要恢復供水 2 放 1 qt 1 公升 的 R V 防凍劑至洗衣機滾筒內 以標 準 行程運行洗衣機約 2 分鐘 混合防凍劑和殘留水份 3 拔下洗衣機的插頭 或切斷電源 運送洗衣機 1 關閉兩個水龍頭 拆下進水管並進行排水 2 若需在寒冷的天氣下搬運洗衣機 執行作業前請遵循 冬季儲存保養 說明 3 從排水系統和洗衣機背面拆下排水管 4 拔下電源線插頭 5 把進水管和排水管放在洗衣機滾筒內 6 用橡皮筋或纜線紮帶紮緊電線 避免它們懸吊至地面 重要事項 致電維修部安裝全新的運送螺栓 不得重複使用 運送螺栓 必須以直立的方式搬運洗衣機 為避免洗衣機的 結構毀損 搬遷和設定洗衣機的作業 必須由認證技工妥善 執行 孔 轉接頭 重新安裝 再使用洗衣機 在長期未用 度假 冬季儲存或搬遷後重新安裝洗衣機 ...

Page 20: ...電前請務必切斷電源 操作前請裝回所有零件和面板 未拔下插頭可能導致人員傷亡或觸電 警告 清潔排水幫浦過濾器 排出殘留水份 部份機種 1 拉開洗衣機 乾衣機底部的把手 打開洗劑盒 您將看到排水 幫浦過濾器 鬆開兩邊的釋放鍵 取出洗劑盒 2 放一個平寬的容器在排水幫浦過濾器下方 收集排水 鬆開 管夾的黑色管子 取下插頭並排出管內水份至容器 倒空容 器內的水份 若有必要 重複此程序 直到排除所有水份 確定黑色管子已完全乾燥 裝回插頭並連接管子和夾子 備註 若無法妥善排水 稍微推進管子 清除任何可能的扭 曲處 3 放一塊棉布在排水幫浦過濾器下方 吸收任何仍在其內的水 份 接著以順時針方向轉動排水幫浦過濾器 以便把它取下 備註 偶爾執行下列程序 黑色管子 排水幫浦 過濾器 用手指向下推進洗劑盒右邊 的釋放鍵 以及洗劑盒左上 的釋放鍵 右邊 左邊 輕輕拉開橡膠的機門封條 並用 affresh 機器清潔...

Page 21: ...常 機門上鎖時機體將排水 8 分鐘 必須讓排水行程完成 否則錯 誤代碼無法重設 完成後 觸碰 電源 一次 清除代碼 接 著再觸碰 電源 重新啟動洗衣機 若再次顯示代碼 致電 維修部 兩個進水管都必須接上 且水應流進進水閥 冷熱水水龍頭都必須 開啟 也許洗衣機的進水閥網罩堵塞 清除進水管任何扭曲處 若有使用 自動關閉連接器和管子都必須妥善安裝 檢查進水管是否妥善 僅使用製造商建議的進水管 顯示畫面顯示 F9 後再顯 示 E1 或 F09 後再顯示 E01 排水幫 浦系統錯誤 檢查管線 確定已正確安裝排水管 排 水管應延伸至立管的 41 2 114 mm 處 檢查已正確安裝排水管 確定排水管沒有糾結 刺穿或堵塞 取出管內任何堵塞物 使用排水管固定架 並穩妥連接至漏盆或水槽 若排水管末端離地面有 96 2 4 m 降低排水管的高度 未使用 HE 高效能洗衣劑 或使用太多 HE 高效能洗衣劑 僅使...

Page 22: ... 觸碰 啟動 暫停 時 洗衣機會發出嗶聲 洗衣機門關不緊 完全關上洗衣機門 槽洗淨 LED 燈在洗衣行 程結束後閃爍 部份機種 洗衣機已運行了 30 次洗衣行程 提醒 您要運行 槽洗淨 行程 運行 槽洗淨 行程 若未啟動 槽洗淨 行程 運行 3 次或以 上的正常洗衣行程後 洗衣行程結束後 LED 燈將停止閃爍 完成 30 次以上的洗衣行程後 槽洗淨 LED 燈將於特定洗衣 行程結束後再度閃爍 作為提醒 孔 轉接頭 故障排除 如果您經歷了 可能原因 解決方案 顯示畫面中顯示錯誤代碼 顯示 2 和 3 位數 續上頁 顯示畫面出現 rL 取出衣物 槽洗淨 行程時偵測到滾筒內有衣 物 取出滾筒的衣物 然後重新啟動 槽洗淨 行程 首先 請嘗試此處的建議辦法 或造訪我們的網站 www whirlpool com tw ...

Page 23: ...動 且機門會上鎖 行程結束前 機門都將上鎖 這是正常現象 洗衣機排水系統內有物件 洗衣前清空口袋 零錢之類的零散物品可能掉落至洗衣機滾筒 和水槽之間 進而堵住幫浦 也許需要致電維修部清除物品 聽到衣物金屬物品 例如 金屬按扣 搭扣或拉鍊與不鏽鋼滾 筒接觸後發出聲音是正常現象 淙淙聲或嗡嗡聲 洗衣機也許正在排水 幫浦也許會發出嗡嗡聲 並偶爾發出淙淙聲或在轉動 排水行程 排去最後水量時發出沖水聲 這在行程特定階段是正常現象 滾動或晃動 並偶爾發出喀 嗒聲 在低速轉動時 平衡系統的鋼珠正在平衡衣物 這在行程特定階段是正常現象 漏水 檢查已遵循正確的排水管安 裝說明 未緊密連接注水管 拴緊注水管的連接處 注水管的墊圈 穩妥拴緊所有四個注水管的扁平墊圈 排水管連接 檢查已妥善連接排水管至漏盆或水槽 針對部份機種 未妥善安裝排水幫浦過 濾器 針對部份機種 確定已把過濾器放在幫浦的正確位置 參閱 清潔排...

Page 24: ...行程開始後開門 導致水從門內滴落 機門四周漏水 內門窗戶沾有頭髮 棉絮或其他殘留 物 以致於門膠圈無法密合 清潔內門窗戶和門膠圈 參閱 洗衣機維護 部份的 清潔門膠 圈 洗衣機未如預期的妥善運行 衣物未全部浸泡於水中 機門看不到水位 或水位未超過全 部衣物 這是 HE 滾筒式洗衣機的正常現象 洗衣機感應到衣物量 並注入 正確的水量 以達成最佳清潔效果 洗衣機未運行或注水 洗衣機停止運作 檢查妥善的水源 兩個進水管都必須接上 且水應流進進水閥 冷熱水水龍頭都必須開啟 檢查進水閥網罩沒有堵塞 檢查進水管任何扭曲處 此現象可能限制水流 洗衣機未運行或注水 洗衣 機停止運作 續 檢查正常的電源供應 將電源線插入一個 3 孔的接地電源插座上 請勿使用延長線 確保插座有電源 不得插入至 GFCI 接地故障斷路器 檢查電源 或致電電工 檢查電壓是否過低 重設跳閘的斷路器 更換任何燒壞的保險絲 備註 若問...

Page 25: ...投放盒的蓋子 未按建議將衣物放入洗衣機內 取出數件衣物 再於洗衣筒內平均放置衣物 關門 然後觸碰 並按住 啟動 暫停 行程開始後不要放入超過一或兩件衣物 避免把洗衣機塞滿或 衣物放置不平均 不要加水至洗衣機 未使用 HE 高效能洗衣劑 或使用太多 HE 高效能洗衣劑 僅使用 HE 高效能洗衣劑 一般洗衣劑起的泡沫可能會減緩或 停止洗衣機運行 請務必測量洗衣劑用量 並根據衣物量要 求 遵循製造商的用量說明 要清除泡沫 請取消行程 選擇 單獨脫水 與 加強洗清 觸碰 啟動 暫停 請勿加入更多洗衣劑 若使用單次劑量洗衣精 請確認已停用 Load Go 兩行程之間沒有把門打開 完成任何洗衣行程後 必須開門 然後在開始新行程時 再關 門 洗衣機沒有排水 轉動 衣物仍濕 排水管應延伸至立管的 4 5 114 mm 處 檢查已正確安裝排水管 使用排水管固定架 並穩妥連接至漏 盆或水槽 不要用膠帶黏住排水...

Page 26: ... 清潔排水幫浦過濾器 參閱 清潔排水幫浦過 濾器 排出殘留水份 已取消洗衣行程 且在排水前打開機門 運行 單獨脫水 清除任何過多水份 洗衣機在沒有水的情 況下空轉衣物 洗衣機正在測量乾燥衣物的體積 測量是正常作業 確保為衣物設定最佳行程時間 洗衣行程結束後門上 鎖 洗衣行程結束後洗衣機仍殘留水份 選擇 單獨脫水 排去殘留在洗衣機內的任何水份 排水結 束後洗衣機門將解鎖 機門不會解鎖 機門將於行程開始時上鎖 若 加衣 燈亮起 觸碰 啟動 暫停 一次 機門將解鎖 洗衣或洗清溫度不正 確或錯誤 檢查妥善的水源 確保沒有錯誤連接冷熱水進水管 兩條管子都必須連接至洗衣機和水龍頭 且都有冷熱水流進進 水閥 檢查進水閥網罩沒有堵塞 清除管子內任何扭曲處 清洗過多衣物 您的熱水槽也許沒有足夠的熱水 來供應熱水或暖水洗衣的次 數 這是正常現象 想要的設定或選項沒 有亮起 為達成最佳效果 並非每個行程都提供所...

Page 27: ...少纏繞 選擇適合洗衣類型的建議行程 衣物的洗衣時間太久 選擇較低污垢程度 注意 選擇較高污垢程度 不見得就能深層清 洗該衣物 洗衣轉速太快 選擇較低轉速 注意 轉速低時 比起轉速高行程 衣物會較濕 未即時取出洗衣機的衣物 即時取出洗衣機的衣物 或若行程結束時無法取出衣物 使用選 項 未為須清洗衣物選擇正確的行程 選擇 細緻 行程或其他慢速行程 減少皺摺 洗衣水不夠暖 無法撫平皺痕 若對衣物安全無礙 使用溫水或熱水 未清潔或去除污漬 未按建議將衣物放入洗衣機內 放入適量 能自由翻滾的衣物量 衣物應能移動自如 才能取得最佳 清潔效果 參閱 行程指南 瞭解每個行程的建議衣物量 洗衣機啟動後僅放入一或兩件衣物 未使用 HE 高效能洗衣劑 或使用太 多 HE 高效能洗衣劑 僅使用 HE 高效能洗衣劑 請務必測量洗衣劑用量 並根據衣物量 和污垢程度 遵循製造商的用量說明 硬水或水中的鐵 鐵鏽 濃度高 ...

Page 28: ...或硬水清洗極骯髒衣物時 請使用較多洗衣劑 異味 未按建議進行每月維護 每月或運行 30 個行程後 運行 槽洗淨 請參閱 洗衣機維 護 部份的 洗衣機保養 行程完成後立即取出洗衣機的衣物 若完成清洗後無法立即從洗衣 機取出衣物 使用選項 未使用 HE 高效能洗衣劑 或使用太多 HE 高效能洗衣劑 僅使用 HE 高效能洗衣劑 請正確測量用量 請務必遵循製造商的 說明 請參閱 洗衣機保養 部份 用後門沒有維持打開 本洗衣機配備緊密封條 避免水滲漏 為避免氣味 讓機門打開 以便用後洗衣機能風乾 布料損壞 洗衣行程期間 口袋裡有尖銳物品 洗衣前清空口袋 拉上拉鍊 扣上按扣或鉤子 避免鉤破和撕裂 衣物 繩子和帶子可能會纏繞 開始清洗衣物前 繫上所有繩子和帶子 洗衣前衣物可能就已毀損 洗衣前修補接縫處的撕裂口和斷線 若洗衣機塞太滿 將可能會損壞布料 避免把衣物塞太滿 僅放入乾燥衣物 使用待洗衣料專用的行...

Page 29: ...程完成後有水殘留於洗劑盒 行程完成後有少量水殘留於洗劑盒是正常現象 洗衣膠囊沒有溶解 加入膠囊的程序不正確 確定是在放入衣物前加入膠囊 不要將膠囊加至洗劑盒 遵循製造 商說明 避免損壞衣物 行程時間變更 或行程時 間太長 正常的洗衣機運作 行程時間按水壓 水溫 洗衣劑和衣物而自動變更 您選擇的選項 也將影響行程時間 洗衣機有過多泡沫 偵測到過多泡沫時 將自動啟動特殊的泡沫例行作業 以清除過多泡 沫 同時確保妥善沖洗衣物 此作業將增加原有行程的運行時間 衣物也許放置得不平均 若未平均放置衣物 將開始一個重新分佈衣物的洗衣流程 此舉可 能延長行程時間 避免清洗單一衣物 用額外幾種衣物平衡類似地 毯或牛仔夾克之類的單一衣物 沒有按衣物類型使用正確的行程 快洗 行程旨在清洗小量略髒衣物 2 4 件 若用此行程清洗 大量衣物 行程時間將增加 使用 快洗 或 細緻 行程時 您應清洗小量衣物 此舉確保能...

Page 30: ... 在打電話之前 請先了解洗衣機之購買日期 完整的機 型與機號 這些的資料可幫助我們更快地回應您的需求 如果您需要更換的零件 如果您需要訂購更換之零件 我們建議您僅使用工廠指定 的零件 這些零件可適當的匹配並運作正常 因為其生產製作依從 所有惠而浦家電的同樣精密標準製造 要在您的所在地區找到原廠指定之零件 請直接與出售洗衣機之經銷商或惠而浦公司連絡 進口商資訊 台灣惠而浦股份有限公司 消費者免付費服務專線 0800 258 558 消費者服務信箱 service_tw whirlpool com 官網 www whirlpool com tw ...

Page 31: ...pressure 0 03 0 7 MPa 0 03 0 7 MPa Rated power 500 W 1 000 W Maximum spin speed 1 200 rpm 1 200 rpm Product color end digit W White W White Weight 96 kg 107 kg External dimensions H x W x D 982 x 686 x 802 mm 982 x 686 x 802 mm NOTE Actual specifications are as shown on the machine nameplate For information on RoHs please visit the official website www whirlpool com tw ...

Page 32: ... capabilities or lack of experience and knowledge unless they have been given supervision or instruction concerning use of the appliance by a person responsible for their safety If the power supply cord is damaged it must be replaced by manufacturer or its service agent or similarly qualified person in order to avoid a hazard ...

Page 33: ...ccessories designed for your appliance Customize your new washer and dryer with the following genuine Whirlpool accessories For more information on options and ordering call 0800 258 558 or visit us at www whirlpool com tw 15 Pedestal Color matched pedestals raise the washer and dryer to a more comfortable working height The large drawer provides convenient storage Stack Kit If space is at a premi...

Page 34: ...w to Wash cycle START PAUSE Touch and hold for 3 seconds until the light above Start Pause comes on to start a cycle or touch once while a cycle is in process to pause it CYCLE STATUS DISPLAY The Cycle Status Display shows the progress of a cycle At each stage of the process you may notice sounds or pauses that are different from traditional washers 1 2 3 4 Estimated Time Remaining The Estimated T...

Page 35: ...ower spin speeds reduce wrinkling but will leave your load more damp Soil The recommended soil level is preset for each cycle Some preset soil levels can be changed For heavily soiled and sturdy fabrics select the Heavy Soil Level setting For lightly soiled and delicate fabrics select the Light Soil Level setting Lower soil level settings will help reduce tangling and wrinkling hold 3 sec for Cycl...

Page 36: ...o 33 8 oz 1 L of liquid HE detergent Each dispenser holds enough detergent for many loads of laundry Each adds the appropriate quantity of HE detergent to the wash load at the proper time See the Using the Dispensers section for information on using the dispenser IMPORTANT Do not use chlorine bleach or powdered detergent in the bulk dispenser Powdered detergent must be added to the single load dis...

Page 37: ...n bold are default settings for that wash cycle For best fabric care choose the cycle options and settings that best fit the load being washed Always read and follow fabric care labels and laundry product instructions Avoid tightly packing the washer The washer will not rinse well or spin correctly if tightly packed Not all settings are available with each cycle and some options cannot be used tog...

Page 38: ...y Items Normal Hot Very Warm Warm Cool Cold Fast Medium Fast Medium Slow Off Light Normal Heavy Quick Hot Very Warm Warm Cool Cold Fast Medium Fast Medium Slow Off Light Normal Heavy Wrinkle Control Hot Very Warm Warm Cool Cold Fast Medium Fast Medium Slow Off Light Normal Heavy Heavy Duty Hot Very Warm Warm Cool Cold Fast Medium Fast Medium Slow Off Light Normal Heavy Cold Wash Hot Very Warm Warm...

Page 39: ... Medium Fast Medium Slow Off Light Normal Heavy Quick Hot Very Warm Warm Cool Cold Fast Medium Fast Medium Slow Off Light Normal Heavy Wrinkle Control Hot Very Warm Warm Cool Cold Fast Medium Fast Medium Slow Off Light Normal Heavy Heavy Duty Hot Very Warm Warm Cool Cold Fast Medium Fast Medium Slow Off Light Normal Heavy Cold Wash Hot Very Warm Warm Cool Cold Fast Medium Fast Medium Slow Off Ligh...

Page 40: ...memade HE detergents may generate a high level of suds If you use one of these and see a SUD error code appear in the display consider using a different HE detergent Always follow the detergent manufacturer s instructions to determine the amount of detergent to use Use only High Efficiency HE detergent About Detergent Concentration Today s liquid HE detergents are concentrated Most brands of conce...

Page 41: ...se only High Efficiency HE liquid detergents The bulk dispensers will hold about 67 6 oz 2 L or 33 8 oz 1 L of liquid HE detergent depending on dispenser or enough for many loads of laundry To Fill Bulk Dispeners Open the dispenser drawer by pulling on the handle at the base of the washer If desired the drawer can be completely removed from the washer Locate the Load Go bulk dispenser Gently pull ...

Page 42: ...can plug pumps and may require a service call Close zippers fasten hooks tie strings and sashes and remove non washable trim and ornaments Mend rips and tears to avoid further damage to items during washing Turn knits inside out to prevent pilling Separate lint takers from lint givers Synthetics knits and corduroy fabrics will pick up lint from towels rugs and chenille fabrics Do not dry garments ...

Page 43: ...t bags For multiple items use more than one bag and fill bags equally 4 Add HE detergent Liquid HE detergent bulk dispenser Adjust the selector based on type of HE detergent used either liquid or powdered Add a measured amount of detergent directly into the detergent compartment See the Using the Dispensers section Disable the Load Go option Single load powdered HE detergent Single load liquid HE ...

Page 44: ...ing touch its name Temp Spin or Soil Adjusting settings may change the Estimated Time Remaining Tightly packing the load unbalanced loads or excessive suds may also cause the washer to increase the cycle time 10 Select any additional options hold 3 sec for Cycle Signal hold 3 sec for Control Lock hold 3 sec for FanFresh hold 3 sec for PreSoak To add an option to the cycle touch its name Steam Clea...

Page 45: ...ater will drain and you will need to reselect cycle and restart For best wash performance and optimal energy savings add garments only when the Add Garment light is on 12 Remove garments promptly after cycle is finished Promptly remove garments after cycle has completed to avoid odor and rusting of metal objects on garments When unloading garments pull back the door seal and check for small items ...

Page 46: ...ace with the textured side of an affresh Machine Cleaning Wipe b Dilute Liquid Chlorine Bleach Procedure i Mix a dilute bleach solution using 3 4 cup 177 mL of liquid chlorine bleach and 1 gallon 3 8 L of warm tap water ii Wipe the seal area with the dilute solution using a damp cloth WASHER CARE cont iii Let stand 5 minutes iv Wipe down area thoroughly with a dry cloth and let washer interior air...

Page 47: ...damp cloth and towel dry either before or after you run the Clean Washer with affresh cycle Use an all purpose surface cleaner if needed On some models To remove residue from the Load Go bulk dispenser lift the handle on the dispenser housing and pull to remove it from the washer cabinet then rinse the dispenser thoroughly with running water Wipe the outside dispenser surface with an affresh Machi...

Page 48: ...k on before washer s next use 2 Put 1 qt 1 L of R V type antifreeze in washer drum and run washer on Normal cycle for about 2 minutes to mix antifreeze and remaining water 3 Unplug washer or disconnect power TRANSPORTING YOUR WASHER 1 Shut off both water faucets Disconnect and drain water inlet hoses 2 If washer will be moved during freezing weather follow Winter Storage Care directions before mov...

Page 49: ...n the handle at the base of the washer dryer This will reveal the drain pump filter Remove the drawer by releasing the tab on each side 2 Place a broad flat container beneath the drain pump filter to collect the drain water Release the black hose from the hose clip remove the plug and drain the hose into the container Empty the container Repeat this procedure if necessary until all the water has d...

Page 50: ...e appears again call for service Both hoses must be attached and have water flowing to the inlet valve Both hot and cold water faucets must be on Inlet valve screens on washer may be clogged Remove any kinks in the inlet hose If used auto shut off connectors and hoses must be properly installed and in working order Check for proper inlet hoses Use only manufacturer s recommended inlet hoses F9 fol...

Page 51: ...as run 30 wash cycles and is indicating a reminder to run the Clean Washer with affresh cycle Run the Clean Washer with affresh cycle If the Clean Washer with affresh cycle is not turned on the LED will stop flashing at the end of a wash cycle after running three more regular wash cycles After 30 more wash cycles are completed the Clean Washer with affresh LED will again flash at the end of a wash...

Page 52: ...etween washer drum and tub or may block pump It may be necessary to call for service to remove items It is normal to hear metal items on clothing such as metal snaps buckles or zippers touch against the stainless steel drum Gurgling or humming Washer may be draining water The pump may make a humming sound with periodic gurgling or surging as final amounts of water are removed during the spin drain...

Page 53: ...l See Cleaning the Door Seal in the Washer Maintenance section Washer Not Performing As Expected Load not completely covered in water Water level not visible on door or does not cover clothes This is normal for an HE front load washer The washer senses load sizes and adds the correct amount of water for optimal cleaning Washer won t run or fill washer stops working Check for proper water supply Bo...

Page 54: ... load evenly in washer drum Close door then touch and hold START PAUSE Do not add more than one or two additional items after cycle has started to avoid tightly packing or unbalancing Do not add more water to the washer Not using HE detergent or using too much HE detergent Only use HE detergent Suds from regular detergents can slow or stop the washer Always measure detergent following manufacturer...

Page 55: ... to remove any excess water Washer is spinning clothes without water The washer is measuring the mass of the dry load This measurement is normal and ensures the best cycle time for your load Door locked at end of wash cycle Water remaining in washer after cycle Select DRAIN SPIN to remove any water remaining in the washer The washer door will unlock at the end of the drain Door will not unlock Doo...

Page 56: ...for load Select a slower spin speed Note that items will be wetter than when using a faster spin speed The washer is not unloaded promptly Unload the washer as soon as it stops or use FanFresh option if you will not be able to unload the washer at the end of the cycle Not choosing the right cycle for the load being washed Use the Delicates cycle or another cycle with a slow spin speed to reduce wr...

Page 57: ...tenance section Unload washer as soon as cycle is complete Use the FanFresh option if load cannot be removed immediately after the wash is complete Not using HE detergent or using too much HE detergent Use only HE detergent Be sure to measure correctly Always follow the manufacturer s directions See the Washer Care section Door not left open after use This washer has a tight seal to avoid water le...

Page 58: ...es Do not add packet to dispenser Follow the manufacturer s instructions to avoid damage to your garments Cycle time changes or cycle time too long Normal washer operation The cycle times vary automatically based on your water pressure water temperature detergent and clothes load The options you select will also affect the cycle times Excessive suds in washer When excessive suds are detected a spe...

Page 59: ...mp Filter Draining Residual Water This procedure should be performed occasionally Dried loads are wrinkled The load was not removed from washer at the end of the drying cycle Remove garments promptly at the end of the drying cycle or use the FanFresh option The washer was tightly packed Dry smaller loads that can tumble freely Loading drum a quarter full or less will improve drying performance and...

Page 60: ...better respond to your request If you need replacement parts If you need to order replacement parts we recommend that you only use factory specified parts These parts fit right and work right because they are manufactured to the same precise standards used to make each new Whirlpool product To locate original factory specified parts in your area Please directly contact the dealer who sold the wash...

Reviews: