background image

5019 318 33305

Electrical connection

The mains voltage must match that given on the rating plate 

located inside the hood. If  provided with a plug, connect the 

hood to a socket complying with the current regulations and 

located in an accessible area. If it does not have a plug (direct 

connection to the power supply) or if the plug is not in an 

accessible place, fit a suitable double-pole switch that ensures 

complete disconnection from the power supply in category III 

overvoltage conditions, complying with the installation rules.


WARNING: 

Before reconnecting the hood circuit to the 

power supply and checking correct operation, always make sure 

the power cable is correctly fitted and that it was NOT crushed 

in its housing during installation. Make sure to have this operation 

carried out by a specialised technician.

Cleaning the hood


WARNING!

 Failure to remove oil/grease (at least once a 

month) could result in fire.

Use a soft cloth with a neutral detergent. Never use abrasive 

substances or alcohol.

Before using the hood

Please read these instructions carefully and keep them for future 

reference, in order to ensure best use of your hood. 

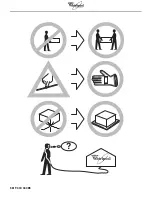
The packing materials (plastic bags, polystyrene, etc.) are a 

potential source of danger and must be kept out of the reach of 

children.

Make sure the hood has not been damaged during transport. 

Declaration of conformity

This product has been designed, manufactured and put on the 

market in conformity with:

- safety objectives of the “Low Voltage” Directive 2006/95/EC 

(which replaces 73/23/EEC as amended)

- protection requirements of “EMC” Directive 89/336/EEC 

amended by Directive 93/68/EEC.

Troubleshooting guide

If the hood does not work:

• Is the plug properly inserted in the power socket?

• Is there a power failure?

If the hood is not extracting enough:

• Is the right speed selected?

• Do the filters need cleaning or replacing?

• Are the air outlets blocked?

If the lamp does not work:

• Does the lamp need replacing?

• Is the lamp correctly fitted?

AFTER-SALES SERVICE

Before calling the After-Sales Service

1. Check to see if you can fix the problem yourself (see 

“Troubleshooting Guide”).

2. Switch the appliance off and then on again to check if the 

problem has been eliminated.

3. If the problem persists, contact the After-Sales Service.

Specify:

• the type of fault,

• the product model given on the dataplate inside the hood, 

visible on removing the grease filters,

• your full address,

• your telephone number and area code,

• the Service code (the number under the word SERVICE on 

the dataplate inside the hood, behind the grease filter).

If any repairs are necessary, contact an authorised Service Centre 

(to ensure the use of original spare parts and correct repair).

Failure to comply with these instructions can compromise the 

safety and quality of the product.

GB

SK

CZ

PL

H RUS BG RO

Summary of Contents for 968

Page 1: ...ěkterým modelům nebo se vůbec nedodává a je nutné je zakoupit Vzhledem k tomu že je odsavač par velmi těžký musí jeho stěhování a instalaci provádět nejméně dvě osoby INŠTALAČNÁ SCHÉMA Minimálna vzdialenost medzi plochou varnej dosky a najnižšej časti odsávača pár NESMIE BYT menšia ako 50 cm v prípade elektrickej varnej dosky a 65 cm v prípade plynovej alebo kombinovanej varnej dosky Ak pokyny na ...

Page 2: ... които са включени само към някои модели или части които се закупуват допълнително Уред с много голямо тегло C преместването и инсталирането на аспиратора трябва да се извършва от найCмалко двама души FIŞA DE INSTALARE Distanţa minimă între suprafaţa de sprijin a recipientelor de pe mașina de gătit și partea cea mai joasă a hotei de bucătărie NU TREBUIE SĂ FIE mai mică de 50 cm în cazul plitelor e...

Page 3: ...5019 318 33305 ...

Page 4: ...5019 318 33305 X X G 10 13 12a 12a B H 7 8 7 8 8 7 9 9 6 6 2 3 1 3 3 3 3 12b 12b 5 G 4 4 4 11 G F X F 5x45 5x45 2 9x6 5 2 9x6 5 4x8 5x45 5x45 5x45 5x45 3 5x6 5 3 5x6 5 ...

Page 5: ...ions and or pipes 10 The ventilation ducts must always discharge to the outside 11 The Manufacturer declines any liability for improper use or incorrect setting of the controls 12 The appliance is not intended for use by children or persons with limited physical sensory or mental abilities or without experience and knowledge of it unless they are under the supervision of or instructed in its use b...

Page 6: ...has not been damaged during transport Declaration of conformity This product has been designed manufactured and put on the market in conformity with safety objectives of the Low Voltage Directive 2006 95 EC which replaces 73 23 EEC as amended protection requirements of EMC Directive 89 336 EEC amended by Directive 93 68 EEC Troubleshooting guide If the hood does not work Is the plug properly inser...

Page 7: ...the hood 3 Place the lower support bracket on the hole diagram so that it matches the dotted rectangle mark the two external holes and drill Note Drill all the holes indicated on the template the top 2 holes are for hanging the hood and the bottom holes generally 1 central or 2 side holes are for fixing it securely to the wall Remove the hole diagram insert the wall plugs and fix the hood support ...

Page 8: ...ting press the TIMER button again within 5 seconds of setting the desired countdown time Once the countdown has started the timer can be cancelled by pressing the TIMER button 2 Light switch Light ON OFF button 3 Display Shows whether the hood is on off 4 Speed decrease motor OFF button To switch the hood off press the button to decrease the speed until the motor switches off 5 Speed increase moto...

Page 9: ...his the Charcoal Filter warning disappears resetting is confirmed by a beep and the display shows the normal operation functions After this procedure the carbon filter counter returns to zero Enabling Disabling the Carbon Filter Indicator The carbon filter indicator can be enabled or disabled by pressing the and buttons at the same time for 5 seconds The motor and light must be switched off in ord...

Page 10: ...r is in a dishwasher at the highest temperature possible using a normal dishwasher detergent To avoid particles of food or dirt settling on the filter during washing and giving rise to unpleasant smells it is advisable to wash the filter on its own After washing dry the filter in the oven at 100 C for 10 minutes to reactivate it The filter will retain its odour absorbing capacity for three years a...

Reviews: