


14
To Use:
1.
Press CHOICE BAKE
®
function.
Press the TEMP “up” or “down” arrow pad to set a
temperature other that 350°F (175°C) in 5 degree amounts.
The bake range can be set between 170°F and 500°F (75°C
and 260°C).
2.
Press START.
The temperature can be changed after this step. Start does
not need to be pressed again.
3.
Press OFF/CANCEL when finished cooking.
To use the CHOICE BAKE
®
function during a regular BAKE cycle
to achieve less top browning, press CHOICE BAKE
®
function, set
the desired temperature and press START.
Broiling
Broiling uses direct radiant heat to cook food. Changing the
temperature when Custom Broiling allows more precise control
when cooking. The lower the temperature, the slower the
cooking. Thicker cuts and unevenly shaped pieces of meat, fish
and poultry may cook better at lower broiling temperatures.
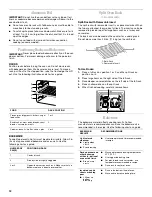
■
Use only the broiler pan and grid provided with the range. It is
designed to drain juices and help prevent spatter and smoke.
■
For proper draining, do not cover the broiler grid with foil. The
bottom of the pan may be lined with aluminum foil for easier
cleaning.
■
Trim excess fat to reduce spattering. Slit the remaining fat on
the edges to prevent curling.
■
Pull out oven rack to the stop position before turning or
removing food. Use tongs to turn food to avoid the loss of
juices. Very thin cuts of fish, poultry or meat may not need to
be turned.
■
After broiling, remove the pan from the oven when removing
the food. Drippings will bake on the pan if left in the heated
oven, making cleaning more difficult.
Before broiling, position rack according to Broiling Chart. It is not
necessary to preheat the oven before putting food in unless
recommended in the recipe. Position food on grid in the broiler
pan, then place it in the center of the oven rack. Close the door to
the broil stop position to ensure proper broiling temperature.
To Broil:
1.
Press CUSTOM BROIL.
2.
Press START.
3.
Press CANCEL when finished.
To Custom Broil:
1.
Press CUSTOM BROIL.
2.
Press TEMP “up” or “down” arrow pad to change the
temperature in 5° amounts. The broil range can be set
between 300°F and 500°F (150°C and 260°C).
3.
Press START.
On some models, if broiling while the time is counting down,
the set broiling temperature can be seen for 5 seconds by
pressing CUSTOM BROIL.
4.
Press CANCEL when finished.
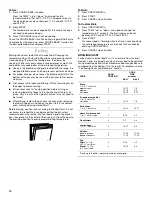
BROILING CHART
For best results, place food 3 in. (7 cm) or more from the broil
element. Times are guidelines only and may need to be adjusted
for individual foods and tastes. Recommended rack positions are
numbered from the bottom (1) to the top (5). For diagram, see the
“Positioning Racks and Bakeware” section.
FOOD
RACK
POSITION
COOK
TIME
minutes
Side 1 Side 2
Steak
1 in. (2.5 cm) thick
medium rare
medium
well done
4
4
4
14-15
15-16
18-19
7-8
8-9
9-10
*Ground meat patties
³₄
in. (2 cm) thick
well done
4
13-14
7-8
Pork chops
1 in. (2.5 cm) thick
4
20-22
10-11
Ham slice, precooked
¹₂
in. (1.25 cm) thick
4
8-10
4-5
Frankfurters
4
5-7
3-4
Lamb chops
1 in. (2.5 cm) thick
4
14-17
8-9
Chicken
bone-in pieces
boneless breasts
3
4
17-20
11-16
17-20
11-16
Fish
Fillets
¹₄
-
¹₂
in.
(.6-1.25 cm) thick
Steaks
³₄
- 1 in.
(2-2.5 cm) thick
4
4
8-10
16-18
4-5
8-9
*Place up to 9 patties, equally spaced, on broiler grid.


