


15
Warm Hold Feature
(on some models)
IMPORTANT:
Food must be at serving temperature before
placing it in the warmed oven. Food may be held up to one hour,
however breads and casseroles may become too dry if left in the
oven during Warm Hold.
Warm Hold Feature allows hot cooked foods to stay serving
temperature. It can also be used at the end of a timed cook.
To Use Automatic Warm Hold Feature:
At the end of a timed cook, either with or without a delayed start,
or at the end of a sequence program in which the last step is not
the Warm Hold mode, the oven will automatically default to a
1-hour warm hold mode at 170°F (77°C).
When the cook time ends or the last step of the sequence is
complete, the display will show a warming countdown time.
When warming ends, the oven will automatically shut off and
“End” will appear on the display. Four tones will sound, and then
four 1-second reminder tones will sound every minute thereafter.
To Disable Automatic Warm Hold:
Press and hold WARM for 5
seconds. “Off” will appear in the 4-digit display. Repeat to turn
back on.
When using the Automatic Warm Hold Feature, cook times may
need to be adjusted accordingly so that foods do not become
overcooked and dry.
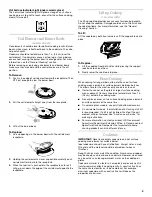
To Use Manual Warm Hold Feature:
1.
Press WARM.
2.
Set the temperature (optional).
Press the TEMP “up” or “down” arrow pad to raise or lower
the temperature in 5°F (3°C) amounts to set a temperature
other than 150°F (66°C). The warm range is 100°F-200°F
(38°C-93°C).
3.
Press START.
4.
Press OFF/CANCEL when finished.
Timed Cooking
(on some models)
Timed Cooking allows the oven to be set to turn on at a certain
time of day, cook for a set length of time, and/or shut off
automatically. Delay start should not be used for food such as
breads and cakes because they may not bake properly.
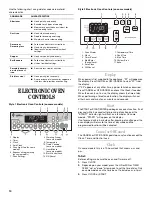
Style 1 Series Electronic Oven Control (see “Electronic
Oven Controls” section)
To Set a Timed Cook:
1.
Press BAKE (optional).
2.
Press the TEMP “up” or “down” arrow pads to enter a
temperature other than the one displayed.
3.
Press STOP TIME.
4.
Press the HR and MIN “up” or “down” arrow pads to enter
the desired time to end cooking.
5.
Press START. The display will count down the time.
When the time ends, the oven will shut off automatically and
“End” will appear on the display. End-of-cycle tones will
sound, then, if enabled, reminder tones will sound every
minute.
6.
Open and close the oven door to clear the display and/or
stop reminder tones.
To Set a Delayed Timed Cook:
Before setting, make sure the clock is set to the correct time of
day. See “Clock” section.
1.
Press desired cook function.
2.
Press the TEMP “up” or “down” arrow pads to enter a
temperature other than the one displayed.
3.
Press START TIME or DELAY START TIME.
4.
Press the HR and MIN “up” or “down” arrow pads to enter
the time of day to start.
5.
Press STOP TIME (optional).
6.
If STOP TIME has been pressed, press the HR and MIN “up”
or “down” arrow pads to enter the desired time to end
cooking.
7.
Press START. “DELAY” will appear on the display.
When the start time is reached, the oven will automatically
turn on. When the stop time is reached (if programmed), the
oven will shut off automatically and “End” will appear on the
display. End-of-cycle tones will sound, then, if on, reminder
tones will sound every minute.
8.
Open and close the oven door to clear the display and/or
stop reminder tones.
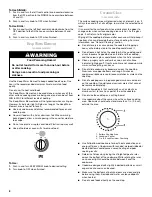
WARNING
Food Poisoning Hazard
Do not let food sit in oven more than one hour
before or after cooking.
Doing so can result in food poisoning or
sickness.
WARNING
Food Poisoning Hazard
Do not let food sit in oven more than one hour
before or after cooking.
Doing so can result in food poisoning or
sickness.


