background image

17

To Modify Sequence Programming:

1.

Press UNDO.

The last step of the sequence will be canceled, and the step 
prior to the canceled sequence will show on the display for 
either review or modification.

If the programmed sequence has not been started, see “To 
Program Next Steps of the Sequence” section to program a 
step to replace the canceled cook function.

2.

Press START.

The first step will show on the display and the program 
sequence will begin.

Changes can be made during a programmed cook function; 
however, changes cannot be made after a programmed cook 
function has been completed.

If at any time during an active sequenced program FIRST/
NEXT STEP is pressed, three tones will sound.
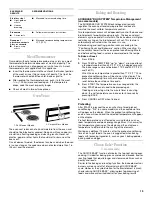
Warming Drawer

(on some models)

The Warming Drawer is ideal for keeping hot cooked foods at 
serving temperature. It may also be used for warming breads and 
pastries.

Different types of food may be placed in the warming drawer at 
the same time. For best results, do not hold foods longer than 
one hour. For smaller quantities or heat-sensitive foods, such as 
eggs, do not hold longer than 30 minutes. 

Food must be at serving temperature before being placed in the 
warming drawer. Breads, pastries, and fruit pies may be heated 
from room temperature on the HI setting.

Remove food from plastic bags and place in oven-safe container. 
Cover foods with a lid or aluminum foil.

Do not cover with plastic wrap. 

Empty serving dishes and oven proof dishes can be heated while 
the warming drawer is preheating.

Before using the warming drawer, wash the tray that lines the 
bottom of the drawer with soap and water. See “General 
Cleaning” section.

The warming drawer comes with a liner that helps keep the 
drawer clean.

Do not place food to be warmed directly on warming drawer liner.

To Use:

1.

Place cooked food(s) in warming drawer.

2.

Press WARMING DRAWER.

“dr Lo,” “DRAWER” and “START?” will appear on the display.

3.

Press START.

“DRAWER” and “ON” will appear on the display.

4.

Press DRAWER OFF when finished.

Warming Drawer Settings:

The warming drawer is pre-set for a “Lo” temperature, but can be 
changed by pressing the TEMP “up” arrow pad. Use the 
following chart as a guide when selecting a different temperature 
other than “Lo.”

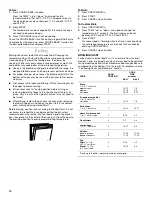
Warming Drawer Temperature Chart

Different foods require different settings in order to maintain the 
ideal serving temperature. Use the following chart as a guide.

WARNING

Food Poisoning Hazard

Do not let food sit for more than one hour before 
or after cooking.

Doing so can result in food poisoning or 
sickness.

SETTINGS

TEMPERATURES

dr Lo (Low)
keeps soft rolls warm

100°F (38°C)

dr 2 (Medium Low)

140°F (60°C)

dr 3 (Medium)

160°F (71°C)

dr 4 (Medium High)

180°F (88°C)

dr HI (High)
keeps french fries crisp and 
warm

195°F (91°C)

FOOD

SETTING

Appetizers

dr HI

Biscuits

dr LO

Chicken
Boneless, Breaded
Nuggets

dr HI
dr HI

Coffee Cake

dr LO

Dinner Plate (1)
Salisbury Steak, Mashed Potatoes, Corn

dr HI

Fish Pieces
Breaded
Battered

dr HI
dr HI

French Fries

dr HI

Gravy

dr 4

Ham, Boneless

dr 3

Hard Rolls

dr LO

Lasagna

dr 4

Pastries
Prepackaged, baked
Prepackaged, frozen

dr 4
dr LO

Pie
Single Crust
Double Crust

dr LO
dr LO

Summary of Contents for 9754384

Page 1: ...ELECTRIC RANGE Use CareGuide For questions about features operation performance parts accessories or service call 1 800 253 1301 or visit our website at www whirlpool com Table of Contents 2 9756384 ...

Page 2: ...Clock 10 Tones 11 Fahrenheit and Celsius 11 Timer 11 Control Lock 11 Oven Temperature Control 11 OVEN USE 11 Aluminum Foil 12 Positioning Racks and Bakeware 12 Split Oven Rack 12 Bakeware 12 Meat Thermometer 13 Oven Vents 13 Baking and Roasting 13 Choice Bake Function 13 Broiling 14 Warm Hold Feature 15 Timed Cooking 15 Sequence Programming 16 Warming Drawer 17 RANGE CARE 18 Self Cleaning Cycle 18...

Page 3: ...R or WARNING These words mean Tip Over Hazard A child or adult can tip the range and be killed Connect anti tip bracket to rear range foot Reconnect the anti tip bracket if the range is moved See the installation instructions for details Failure to follow these instructions can result in death or serious burns to children and adults WARNING Anti Tip Bracket Making sure the anti tip bracket is inst...

Page 4: ...e the cooktop and surfaces facing the cooktop IMPORTANT SAFETY INSTRUCTIONS Use Proper Pan Size The range is equipped with one or more surface units of different size Select utensils having flat bottoms large enough to cover the surface unit heating element The use of under sized utensils will expose a portion of the heating element to direct contact and may result in ignition of clothing Proper r...

Page 5: ...f the appliance may become hot enough to cause burns among these surfaces are oven vent openings and surfaces near these openings oven doors and windows of oven doors IMPORTANT SAFETY INSTRUCTIONS SAVE THESE INSTRUCTIONS For self cleaning ranges Do Not Clean Door Gasket The door gasket is essential for a good seal Care should be taken not to rub damage or move the gasket Do Not Use Oven Cleaners N...

Page 6: ... models 9 Surface Cooking Area Locator 10 Keep Warm Element Control Knob on some models 2 3 5 1 4 6 10 7 8 9 1 Oven Vent on ceramic glass models 2 Ceramic Glass on some models 3 Dual Element on some models 4 Anti Tip Bracket 5 Model and Serial Number Plate behind left side of storage drawer 6 Storage Drawer on some models or Warming Drawer on some models 7 Control Panel 8 Keep Warm Element on some...

Page 7: ...g Zone section 3 Turn the ACCUSIMMER Range control knob back to the Normal Burner setting when finished cooking The indicator light will go out DualCookingZone onsomemodels 1 Single size 6 in 15 24 cm 2 Dual size 10 in 25 4 cm The Dual Cooking Zone offers flexibility depending on the size of the cookware Single size can be used in the same way as a regular element The dual size combines both the s...

Page 8: ...r more information see General Cleaning section Do not store jars or cans above the cooktop Dropping a heavy or hard object onto the cooktop could crack it Do not leave a hot lid on the cooktop As the cooktop cools air can become trapped between the lid and the cooktop and the ceramic glass could break when the lid is removed Clean up sugary spills and soils as soon as hot surface indicator light ...

Page 9: ... lock into place To Replace 1 Lift the cooktop from both sides while pressing the support rods back to unlock them 2 Slowly lower the cooktop into place HomeCanning When canning for long periods alternate the use of surface cooking areas elements or surface burners between batches This allows time for the most recently used areas to cool Center the canner on the grate or largest surface cooking ar...

Page 10: ...et Before setting make sure the oven and Timer are off 1 Press CLOCK 2 Depending on your model press the HR or MIN or TIME TEMP up or down arrow pads to set the time of day Only on some models can the time be set to include a m or p m 3 Press CLOCK or START COOKWARE CHARACTERISTICS Aluminum Heats quickly and evenly Suitable for all types of cooking Medium or heavy thickness is best for most cookin...

Page 11: ...ok 3 Press START or TIMER SET When the set time ends end of cycle tones will sound then if enabled reminder tones will sound every minute on some models 4 Press TIMER OFF or TIMER CANCEL anytime to cancel the Timer and reminder tones Remember do not press the CANCEL pad because the oven will turn off To display the time of day for 5 seconds when the timer is counting down press CLOCK ControlLock T...

Page 12: ...be used on the counter for a cooling rack Do not place more than 25 lbs 11 3 kg on the split rack To Use Racks 1 Place a full rack on position 1 or 2 and the split rack on position 3 or 4 2 Place large items on the right side of the full rack 3 Place deeper covered dishes on the left side of the full rack 4 Place shallow dishes on the split rack 5 When finished cooking carefully remove items Bakew...

Page 13: ... The bake range can be set between 170 F and 500 F 75 C and 260 C When the oven temperature is greater than 170 F 77 C no preheat conditioning time will be shown in the display The preheat conditioning time will not change if the temperature is reset before the countdown time ends 3 Press START The temperature can be changed after this step START does not need to be pressed again If baking and roa...

Page 14: ...in the heated oven making cleaning more difficult Before broiling position rack according to Broiling Chart It is not necessary to preheat the oven before putting food in unless recommended in the recipe Position food on grid in the broiler pan then place it in the center of the oven rack Close the door to the broil stop position to ensure proper broiling temperature To Broil 1 Press CUSTOM BROIL ...

Page 15: ...food such as breads and cakes because they may not bake properly Style 1 Series Electronic Oven Control see Electronic Oven Controls section To Set a Timed Cook 1 Press BAKE optional 2 Press the TEMP up or down arrow pads to enter a temperature other than the one displayed 3 Press STOP TIME 4 Press the HR and MIN up or down arrow pads to enter the desired time to end cooking 5 Press START The disp...

Page 16: ... display A flashing 1 will also appear on the display indicating that step 1 is being programmed 2 Choose the desired cook function by pressing any cook function key 3 Press START TIME then HR and MIN up or down arrow pads to set the time of day for the first cook function to begin If START TIME is not pressed then the sequence of cook functions will begin immediately once programming is complete ...

Page 17: ...while the warming drawer is preheating Before using the warming drawer wash the tray that lines the bottom of the drawer with soap and water See General Cleaning section The warming drawer comes with a liner that helps keep the drawer clean Do not place food to be warmed directly on warming drawer liner To Use 1 Place cooked food s in warming drawer 2 Press WARMING DRAWER dr Lo DRAWER and START wi...

Page 18: ...ng cycle uses very high temperatures burning soil to a powdery ash The oven is preset for a 3 hour 30 minute clean cycle but the time can be changed Suggested clean times are 2 hours 30 minutes for light soil and between 3 hours 30 minutes and 4 hours 30 minutes for average to heavy soil Once the oven has completely cooled remove ash with a damp cloth Do not wipe down any of the inside surfaces un...

Page 19: ...s CERAMIC GLASS on some models Do not use steel wool abrasive powder cleansers chlorine bleach rust remover or ammonia because damage may occur Always wipe with a clean wet cloth or sponge and dry thoroughly to prevent streaking and staining Cooktop Polishing Creme is recommended regularly to help prevent scratches pitting and abrasions and to condition the cooktop and can be ordered as an accesso...

Page 20: ...Cleaning cycle See Self Cleaning Cycle first Remove racks or they will discolor and become harder to slide If this happens a light coating of vegetable oil applied to the rack guides will help them slide Steel wool pad BROILER PAN AND GRID Do not clean in the Self Cleaning cycle Mildly abrasive cleanser Scrub with wet scouring pad Solution of cup 125 mL ammonia to 1 gal 3 75 L water Soak for 20 mi...

Page 21: ...s horizontal Insert hinge hangers into the front frame hinge slots 3 Tilt top of door toward range Slide hinge hangers down onto front frame support pins Make sure the hinge hangers are fully seated and engaged on the support pins 4 Insert the door stop clip with the angular surface at the top of the frame hinge slot then push in the bottom of the clip until flanges are flush with the front frame ...

Page 22: ... appliance See the Installation Instructions Oven will not operate Is the electronic oven control set correctly See Electronic Oven Control section Has a delay start been set See Timed Cooking section On some models is the Control Lock set See Control Lock section Oven temperature too high or too low Does the oven temperature calibration need adjustment See Oven Temperature Control section On some...

Page 23: ...t right and work right because they are made with the same precision used to build every new WHIRLPOOL appliance To locate FSP replacement parts in your area call our Customer Interaction Center telephone number or your nearest Whirlpool designated service center IntheU S A Call the Whirlpool Customer Interaction Center toll free 1 800 253 1301 Our consultants provide assistance with Features and ...

Page 24: ... Guide 6 Repairs to parts or systems resulting from unauthorized modifications made to the appliance 7 Replacement parts or repair labor costs for units operated outside the United States 8 Any labor costs during the limited warranty period WHIRLPOOL CORPORATION SHALL NOT BE LIABLE FOR INCIDENTAL OR CONSEQUENTIAL DAMAGES Some states do not allow the exclusion or limitation of incidental or consequ...

Reviews: