background image

6

8.

If installing the range in a mobile

home, you must secure the range to the
floor. Any method of securing the range
is adequate as long as it conforms to the
“Manufactured Home Construction and
Safety Standard,” Page 2.

9.

Place rack in oven. Place level on

rack, first side to side; then front to back.

If range is not level, pull range forward
until rear leveling leg is removed from
the anti-tip bracket. Use 3/8" drive ratchet
and channel lock pliers to adjust leveling
legs up or down until range is level. Push
range back into position. Check that rear
leveling leg is engaged in anti-tip bracket.

NOTE:

Oven must be level for satisfactory

baking conditions.

7.

Making sure the anti-tip bracket is

installed:

• Look for the  anti-tip bracket securely

attached to floor.

• Slide range back so rear range foot is

under anti-tip bracket. 

anti-tip
bracket

range foot

10.

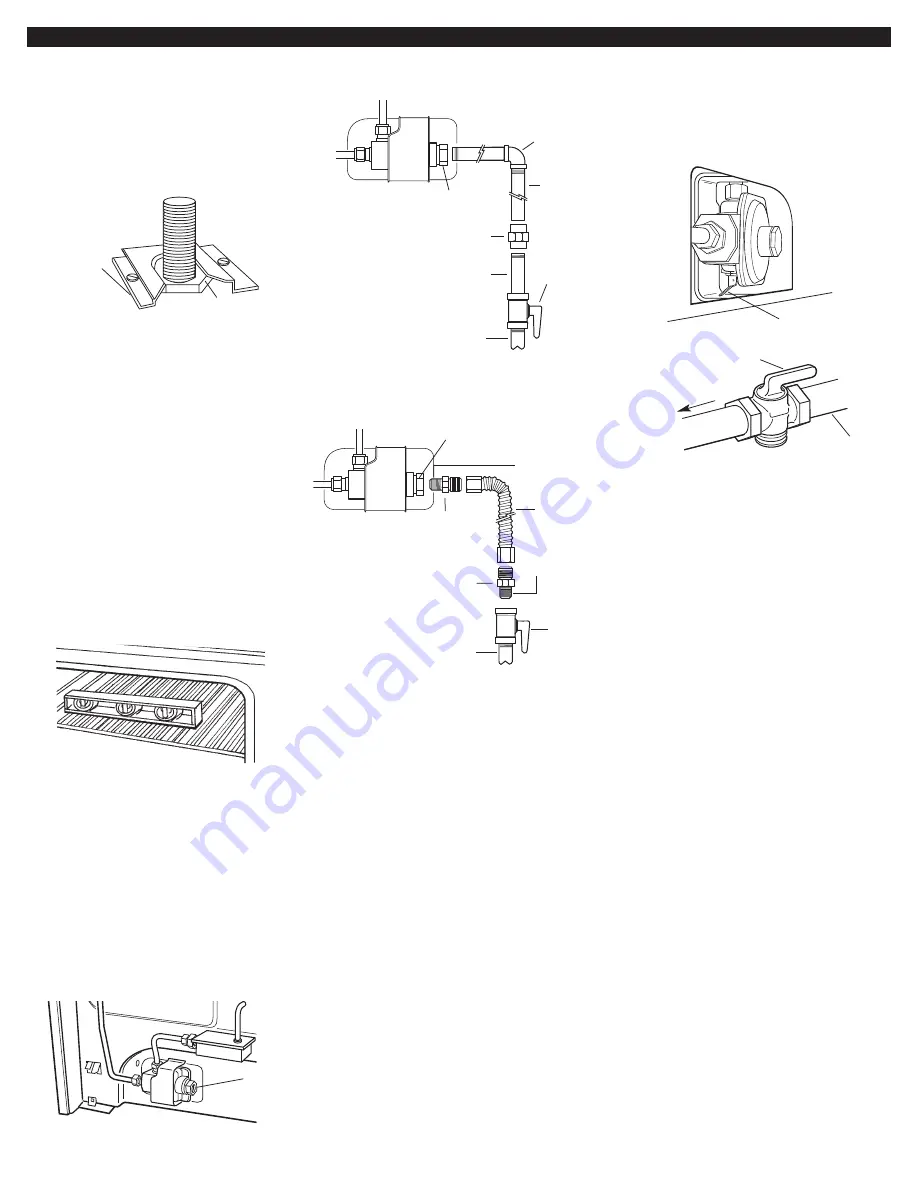
Assemble the flexible connector

to the gas supply pipe to the pressure
regulator connection fitting, using the
adapter fittings provided with the flexible
connector. Use pipe-joint compound
made for use with L.P. gas to seal all pipe
thread connections. 

regulator
connection
fitting

All connections must be wrench-tightened.

1/2" to 3/4"
gas pipe

nipple

manual
gas
shutoff
valve

black iron
pipe

union

pressure regulator
connection fitting

90˚elbow

Typical rigid 
pipe connection

11.

If a flexible appliance connector

is used, be certain connector is not
kinked.

12.

Check that all control knobs are

in the “OFF” position.

adapter

adapter

manual
gas
shutoff
valve

A 1/2" male pipe thread is needed for connection to
pressure regulator female pipe threads.

1/2" to 3/4"
gas pipe

pressure regulator
connection fitting

Typical flexible connection

flexible
connector

use pipe-joint
compound

use pipe-joint
compound

13.

Check that range regulator

shutoff valve is in the “on” position. Open
the manual shutoff valve in the gas
supply line.

manual shutoff valve

“open” position

gas supply

to range

regulator shutoff

valve in

“on” position

viewed from
inside broiler
compartment

Check operation

Gas and electrical
connection

Electronic ignition system.

Cooktop and oven burners use electronic
ignitors in place of standing pilots. When
a cooktop control knob is turned to the
“LITE” position, the system creates a
spark to light the burner. This sparking
continues until the control knob is turned
to the desired setting.

When the oven control is turned to the
desired setting, a hot surface ignitor
heats to a bright orange and ignites the
gas. No sparking occurs. The glow bar
remains on while the burner operates.

14.

Test all connections by brushing

on an approved non-corrosive leak-
detection solution. Bubbles will show a
leak. If a leak appears, shut off gas
supply valve and tighten connections.
Then check connections again.  Clean all
leak-detection solution from gas
connections. Close broiler door.

15.

Place burners, burner caps and

grates on cooktop.

16.

Plug power supply cord into

grounded electrical outlet.

Summary of Contents for 98015194

Page 1: ...ip bracket to rear range foot Reconnect the anti tip bracket if the range is moved Failure to follow these instructions can result in death or serious burns to children and adults Write down the model and serial numbers before installing range Both numbers are listed on the model serial rating plate located on the frame behind the broiler door Model _________________________ Serial _______________...

Page 2: ... department Installation and service must be performed by a qualified installer service agency or the gas supplier To eliminate the risk of burns or fire by reaching over heated surface units cabinet storage space located above the surface units should be avoided If cabinet storage is to be provided the risk can be reduced by installing a range hood that projects horizontally a minimum of 5 inches...

Page 3: ...ure that the materials used will not discolor delaminate or sustain other damage Bracket must be securely mounted to sub floor Thickness of flooring may require longer screws to anchor the bracket to sub floor anti tip bracket 2 screws 10 x 1 1 2 2 plastic anchors Not shown literature pack orifice spuds The floor anti tip bracket must be installed To install the anti tip bracket shipped with the r...

Page 4: ... up to 2 000 feet For assistance when installing the range at higher elevations contact your local service company Type of gas This range is design certified by CSA International for use with L P gas or after proper conversion for use with Natural gas This range is factory set for use with L P gas Gas conversion instructions are provided on pages 8 9 The model serial rating plate located on the fr...

Page 5: ...ting holes through your type floor covering 4 Use the anti tip bracket template instruction sheet to install the anti tip bracket Anti tip bracket must be anchored securely to the sub floor Depending on the thickness of your flooring longer screws may be needed to anchor the bracket to the sub floor Longer screws are available from your local hardware store 6 Remove cardboard shipping base from un...

Page 6: ... is used be certain connector is not kinked 12 Check that all control knobs are in the OFF position adapter adapter manual gas shutoff valve A 1 2 male pipe thread is needed for connection to pressure regulator female pipe threads 1 2 to 3 4 gas pipe pressure regulator connection fitting Typical flexible connection flexible connector use pipe joint compound use pipe joint compound 13 Check that ra...

Page 7: ...ner to be adjusted Push knob in and turn to LITE position When burner lites turn to HI position c Adjust the air shutter by hand as needed Close the air shutter to decrease the amount of air to the flame Open the air shutter to increase the amount of air to the flame Adjust the air shutter to the widest opening that will not cause the flame to lift or blow off the burner Turn burner off and remove...

Page 8: ... cap burner burner cap screw viewed from inside broiler compartment d Locate Natural gas orifice spuds for top burners in literature package included with the range Three Natural gas spuds are stamped 145 and one 52 Remove Natural gas orifice spuds using a 3 8 combination wrench Install Natural gas orifice spuds in locations shown to replace the L P gas orifice spuds NOTE Depending on model the ra...

Page 9: ...ndard burners or 3 standard burners and 1 power burner Spud size location remain the same Place Natural gas orifice spuds in plastic parts bag for future use and keep with literature package Reinstall burner tube and bracket assemblies orifice spuds NAT L P L R L F R R R F gas manifold notches Remove and replace orifice spuds NOTE Burner tube and brackets not shown 65 62 65 65 oven burner orifice ...

Page 10: ... tip bracket is installed Look for the anti tip bracket securely attached to floor Slide range back so rear range foot is under anti tip bracket anti tip bracket range foot 6 Check that range is level 7 Reconnect gas line to range and check for leaks 8 Plug in range or reconnect power WARNING Tip Over Hazard A child or adult can tip the range and be killed Connect anti tip bracket to rear range fo...

Page 11: ... of your telephone directory under Appliances Household Major Service and Repair or Call the Customer Interaction Center The toll free number is listed in your Use and Care Guide When you call you will need The range model number The range serial number Both numbers are listed on the model serial rating plate located on the frame behind the broiler door Maintain the quality built into your range b...

Page 12: ...Part No 98015194 2004 Whirlpool Corporation Benton Harbor Michigan 49022 Printed in Mexico 1 04 ...

Reviews: