background image

6

Installing Air Conditioner

NOTE: Handle air conditioner gently.

Window installation (on some models)

NOTE: Attach top channel and side curtains to air conditioner 
cabinet before placing cabinet in window.

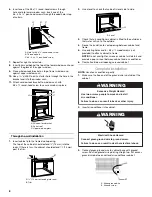
1. Locate supplied bag of screws. 

2. Place top channel on top of air conditioner cabinet, lining up 

the 3 holes in top channel with the 3 holes on top of air 
conditioner cabinet. 

3. Using 3 - #10 - 12 x 

³⁄₈

" pan-head Phillips screws, attach top 

channel to air conditioner cabinet.

4. Insert top and then bottom of right-hand curtain housing in 

top and bottom curtain guides on air conditioner cabinet.

Back View


Bottom View


5. Extend right-hand curtain outward so you may insert the 

first screw through the middle hole of the curtain. Using 
#8 - 18 x 

³⁄₈

"


pan-head screw

screw curtain to middle hole 

in air conditioner cabinet. 

NOTE: This screw is required to correctly attach curtain (top 
to bottom) to the air conditioner cabinet.

6. While the right-hand curtain is still extended, insert 

#8 - 18 x 

³⁄₈

" pan-head screws into the top and bottom 

slots of curtain. Screw curtain to the top and bottom holes 
in air conditioner cabinet.

NOTE: Some curtains may have 2 slots at each end. You will 
be able to see a mounting hole through the correct slot.

7. Slide curtain housing into guides as far as it will go.

8. Repeat above steps for left-hand curtain.

Through-the-wall installation 

NOTES: 

It is the customer's responsibility and obligation to have this 
product installed by a qualified technician familiar with 
through-the-wall room air conditioner installations.

The location where the power cord exits the air conditioner 
should be no more than 4 ft (122 cm) from a grounded 
3 prong  outlet.

Do not block louvers.

Option 1—Wood, metal or plastic molding

When you are using wood, metal or plastic molding, the wood 
frame should line up with inside wall as shown.


A. Top channel
B. #10 - 12 x 

³⁄₈

" pan-head Phillips screws

A. Curtain housing
B. Curtain guides

A. Curtain housing
B. Curtain guides

A

B

B

B

A

B

A

B

A. #8 - 18 x 

³⁄₈

" pan-head screw

A. Molding
B. Inside wall

C. Wood frame
D. Louvers

A

A

C

B

D

Summary of Contents for ACC082XR0

Page 1: ...s accessories or service call 1 800 253 1301 in the U S A ACONDICIONADOR DE AIRE ManualdeUsoyCuidado Si tiene preguntas respecto a las características funcionamiento rendimiento partes accesorios o servicio técnico llame al 1 800 253 1301 en los EE UU Table of Contents Índice 2 1188081A ...

Page 2: ...R DE AIRE 25 Cómo poner en marcha su acondicionador de aire 25 Cómo cambiar la dirección del aire 28 Sonidos normales 28 CUIDADO DE SU ACONDICIONADOR DE AIRE 29 Limpieza del filtro de aire 29 Limpieza del panel delantero 29 Reparación de la pintura dañada 29 Mantenimiento anual 29 SOLUCIÓN DE PROBLEMAS 29 AYUDA O SERVICIO TÉCNICO 31 Accesorios 31 AIR CONDITIONER SAFETY You can be killed or serious...

Page 3: ...ning for the air conditioner Adequate wall support for weight of air conditioner Air conditioner weighs between 80 and 110 lbs 36 3 to 49 9 kg NOTE Cabinet louvers must not be obstructed Air must be able to pass freely through the cabinet louvers Window installation on some models Window opening measurements Width 27 68 6 cm minimum to 40 101 6 cm maximum Height 16 41 3 cm minimum IMPORTANT SAFETY...

Page 4: ...fied electrical installer It is the customer s responsibility To contact a qualified electrical installer To assure that the electrical installation is adequate and in conformance with National Electrical Code ANSI NFPA 70 latest edition and all local codes and ordinances Copies of the standards listed may be obtained from National Fire Protection Association One Batterymarch Park Quincy MA 02269 ...

Page 5: ...mall amount of liquid dish soap over the adhesive with your fingers Wipe with warm water and dry Do not use sharp instruments rubbing alcohol flammable fluids or abrasive cleaners to remove tape or glue These products can damage the surface of your air conditioner Handle air conditioner gently 1 Remove air conditioner from carton and place on cardboard 2 Remove shipping screw from side wall of cab...

Page 6: ...e right hand curtain is still extended insert 8 18 x pan head screws into the top and bottom slots of curtain Screw curtain to the top and bottom holes in air conditioner cabinet NOTE Some curtains may have 2 slots at each end You will be able to see a mounting hole through the correct slot 7 Slide curtain housing into guides as far as it will go 8 Repeat above steps for left hand curtain Through ...

Page 7: ... cm from a grounded 3 prong outlet Do not block the louvers on the front panel Do not block the louvers on the outside of the air conditioner Window installation on some models 1 Center empty cabinet in window Check that lower rail of air conditioner cabinet is behind and against back side of windowsill Maintain a firm hold on the air conditioner cabinet Lower window sash to hold cabinet in place ...

Page 8: ...the insulation to seal opening between cabinet and frame 5 Use existing holes and 6 8 x wood screws not provided to attach cabinet to frame NOTE Do not overtighten screws or cabinet will distort and provide a poor air seal between cabinet and air conditioner 6 Caulk all outside wall openings around cabinet CompleteInstallation NOTE Handle air conditioner gently 1 Make sure the free end of the grou...

Page 9: ...ir conditioner operation IMPORTANT If you turn off the air conditioner wait at least 3 minutes before turning it back on This prevents the air conditioner from blowing a fuse or tripping a circuit breaker Do not try to operate your air conditioner in the cooling mode when outside temperature is below 65 F 18 C The inside evaporator coil will freeze up and the air conditioner will not operate prope...

Page 10: ... setting Display shows the current room temperature Power Saver Fan runs only when cooling is needed You can select the fan speed by pressing FAN SPEED Because the fan does not circulate the room air continuously less energy is used but the room air is not circulated as often Use Power Saver when you are asleep or away from home Fan Speed NOTE The Fan Speed button will operate only when Cool Fan O...

Page 11: ... Cool Fan Only or Power Saver NOTE For Auto mode go to Step 4 3 For Cool Fan Only or Power Saver mode adjust FAN SPEED to Turbo High or Low 4 Adjust temperature between 64 F 18ºC and 86 F 30ºC 5 Wait 3 seconds before turning off air conditioner 6 Press TIMER Timer indicator light will flash Hour indicator light will turn on and display will show remaining hours before air conditioner will turn on ...

Page 12: ...f air conditioner 2 Press TIMER Timer indicator light on air conditioner will flash Hour indicator light on air conditioner will turn on and display on air conditioner will show remaining hours before air conditioner will turn off 3 Press the plus or minus button to change delay time 1 to 24 hours 4 Press TIMER again or wait 10 seconds Timer indicator light on air conditioner will remain on Hour i...

Page 13: ...duce paint damage during the winter install a heavy duty cover over air conditioner cabinet For information on ordering a heavy duty cover see Accessories AnnualMaintenance Your air conditioner needs annual maintenance to help ensure steady top performance throughout the year Call your local authorized dealer to schedule an annual checkup The expense of an annual inspection is your responsibility ...

Page 14: ...or your room Check the cooling capabilities of your room air conditioner Room air conditioners are not designed to cool multiple rooms The filter is dirty or obstructed by debris Clean the filter The inside evaporator and outside condenser coils are dirty or obstructed by debris See Annual Maintenance There is excessive heat or moisture open container cooking showers etc in the room Use a fan to e...

Page 15: ...ndence Please record your model s information Whenever you call to request service on your appliance you need to know your complete model number and serial number You can find this information on the model and serial number label See Electrical Requirements for model and serial number location Please record the model and serial number information below Also record the purchase date of your applian...

Page 16: ...16 Notes ...
Page 17: ... símbolo de advertencia de seguridad Este símbolo le llama la atención sobre peligros potenciales que pueden ocasionar la muerte o una y de la palabra PELIGRO o ADVERTENCIA Estas palabras significan PELIGRO ADVERTENCIA a usted y a los demás Lea y obedezca siempre todos los mensajes de seguridad Todos los mensajes de seguridad irán a continuación del símbolo de advertencia de seguridad puede morir ...

Page 18: ...or de aire El acondicionador de aire pesa entre 80 y 110 libras 36 3 a 49 9 kg NOTA No deben obstruirse las rejillas del gabinete El aire debe circular libremente a través de las rejillas del gabinete Instalación en la ventana en algunos modelos Medidas de la abertura de la ventana Ancho 27 68 6 cm mínimo a 40 101 6 cm máximo Altura 16 41 3 cm mínimo Instalación a través de la pared Las medidas de...

Page 19: ...ar a un instalador eléctrico calificado Asegurarse de que la instalación eléctrica sea adecuada y esté hecha de acuerdo con el Código Nacional Eléctrico ANSI NFPA 70 última edición y todos los códigos y reglamentos locales Pueden obtenerse copias de las normas señaladas en National Fire Protection Association One Batterymarch Park Quincy MA 02269 Cable de suministro de energía NOTA Su aparato pued...

Page 20: ...os materiales de embalaje Quite las cintas y los residuos de goma de la superficie antes de encender el acondicionador de aire Frote un poco de detergente líquido para vajillas sobre el adhesivo con los dedos Limpie con agua tibia y seque No use instrumentos filosos alcohol para fricciones líquidos inflamables o productos de limpieza abrasivos para eliminar los restos de cinta o goma Estos product...

Page 21: ...ior para cortinas en el gabinete del acondicionador de aire Vista posterior Vista inferior 5 Extienda la cortina derecha hacia fuera de manera que pueda insertar el primer tornillo a través del orificio del medio de la cortina Utilice tornillos de cabeza de cono achatado 8 18 x para atornillar la cortina al orificio del medio en el gabinete del acondicionador de aire NOTA Se requiere este tornillo...

Page 22: ...5 Inserte el marco en la abertura en la pared Cuadre y nivele el marco 6 Sujete con firmeza el marco a la pared Colocacióndelgabinetedel acondicionadordeaire Trate el acondicionador de aire con cuidado Asegúrese de que el gabinete del acondicionador de aire no se caiga de la abertura durante la instalación o al quitarlo La parte de donde sale el cable eléctrico del acondicionador de aire debe colo...

Page 23: ...a en su lugar Instalación a través de la pared 1 Inserte el gabinete en la abertura de la pared con el marco La parte superior del gabinete debe extenderse 13 mm dentro de la habitación Si hay un resguardo el gabinete debe extenderse 13 mm más allá del resguardo 2 Use un nivel para verificar que el gabinete esté nivelado de lado a lado 3 Verifique que el gabinete del acondicionador de aire esté in...

Page 24: ...nel delantero Vuelva a colocar las perillas de control en algunos modelos NOTA Haga pasar el cable de alimentación por la muesca en el panel delantero 8 Conecte a un contacto de pared de conexión a tierra de 3 terminales 9 Presione RESET Reposición sobre el enchufe del cable de suministro de energía A Alambre verde de conexión a tierra B Tornillo de puesta a tierra A Obturador de espuma ADVERTENCI...

Page 25: ... de ventilación Turbo 72 F 22 C por 3 segundos Cuando se encienda todas las otras veces mostrará los ajustes previos por 3 segundos y luego la temperatura de la habitación 3 Selecccione el modo Vea Mode Modo más adelante en esta sección 4 Selecccione la velocidad de ventilación Vea Fan Speed Velocidad de ventilación más adelante en esta sección 5 Selecccione la temperatura Vea Temperatura más adel...

Page 26: ... apague el acondicionador de aire tiene que estar Encendido 1 Oprima TIMER Temporizador La luz indicadora Timer destellará La luz indicadora Hour Hora se encenderá y la pantalla mostrará las horas restantes antes de que se apague el acondicionador de aire 2 Oprima el botón de más o de menos para cambiar el tiempo de retardo de 1 a 24 horas 3 Oprima TIMER nuevamente o espere 10 segundos La luz indi...

Page 27: ...n Only Sólo ventilación o Power Saver Ahorro de energía usted puede ajustar la velocidad de ventilador Para seleccionar la velocidad de ventilación solamente en el modo de Cool Fan Only o Power Saver Oprima TURBO HIGH Alta o LOW Baja Para subir la temperatura Presione el botón de más La luz indicadora Room Habitación en el acondicionador de aire se apagará y se encenderá la luz indicadora Set Fijo...

Page 28: ...ncienda cambiando los ajustes previos 1 Encienda el acondicionador de aire 2 Ajuste el Modo a Auto Cool Cool Fan Only o Power Saver NOTA Para el modo Auto Cool Enfriamiento automático vaya al paso 4 3 Para el modo Cool fresco Fan Only Sólo ventilación o Power Saver ahorro de energía ajuste Fan Speed velocidad de ventilación a Turbo High alta o Low baja 4 Ajuste la temperatura entre 64 F 18 C y 86 ...

Page 29: ...rante el invierno instale una cubierta resistente sobre el gabinete del acondicionador de aire Para obtener información sobre cómo pedir una cubierta resistente vea la sección Accesorios Mantenimientoanual Su acondicionador de aire necesita mantenimiento anual para ayudar a asegurar un rendimiento constante de la mejor calidad durante todo el año Llame al vendedor autorizado de su localidad para h...

Page 30: ...tiene el tamaño adecuado para su habitación Verifique la capacidad de enfriamiento de su acondicionador de aire para habitacion Los acondicionadores de aire para habitaciones no están diseñados para enfriar varias habitaciones El filtro está sucio u obstruido por escombros Limpie el filtro El evaporador interno y los serpentines del condensador externo están sucios u obstruidos por escombros Vea M...

Page 31: ...r anote la información sobre su modelo Siempre que llame para solicitar servicio del aparato necesitará saber el número del modelo y el número de serie completos Esta información la encuentra en la placa de número del modelo y número de serie Vea la ubicación del número del modelo y del número de serie en Requisitos eléctricos Por favor anote la información sobre el número del modelo y el número d...

Page 32: ...1188081A 2005 All rights reserved Todos los derechos reservados 5 05 Printed in U S A Impreso en EE UU ...

Reviews: