background image

USING THE OVEN

• Open the oven door fully.
• Press the thermostat knob lightly and turn it anticlockwise to the max. position.

For ovens with electric ignition, follow the instructions given below

• Press until the oven lights, holding it down for a few seconds to activate the thermocouple. Release the knob.
• Check oven burner lighting through the slots at the front of the oven bottom and make sure the burner flame remains alight

when the knob is released. If it does not, repeat the operation. Make sure the burner operates correctly with the door closed.
Do not use excessive force when closing the door.

• Turn the knob to the required temperature.
• Place food in the oven.

If the oven does not light or is not provided with electric ignition, proceed as follows:

• Light the burner with a match or gas lighter at the central ignition slot at the front of the oven base.
The oven burner is equipped with a safety valve that shuts off the gas supply:
• if the thermostat knob is turned accidentally and gas is supplied to the oven burner
• if the burner flame accidentally goes out
• if there is no gas supply. The thermostat is equipped with a lock to stop the burner from going out while adjusting the oven

temperature from max. to min. To switch off the burner when it is set to min., press the knob lightly and turn it until the mark on
the knob matches the one on the panel.

USING THE GRILL

• Open the oven door.
• Place the food on the grill or on an oven tray.
• Place the drip-tray under the grill.
• Position the knob guard on the bottom part of the control panel.
• Press the knob lightly and turn it clockwise to the grill position.
• Press the knob down to activate the electric ignition (if provided), keeping it pressed

for a few seconds to activate the safety thermocouple.

• Check grill burner lighting and make sure the burner flame remains alight when the

knob is released. If it does not, repeat the operation.

• Close the oven door so that it touches the knob guard.
• Turn food over about halfway through cooking.

USING THE TURNSPIT

Open the oven door.
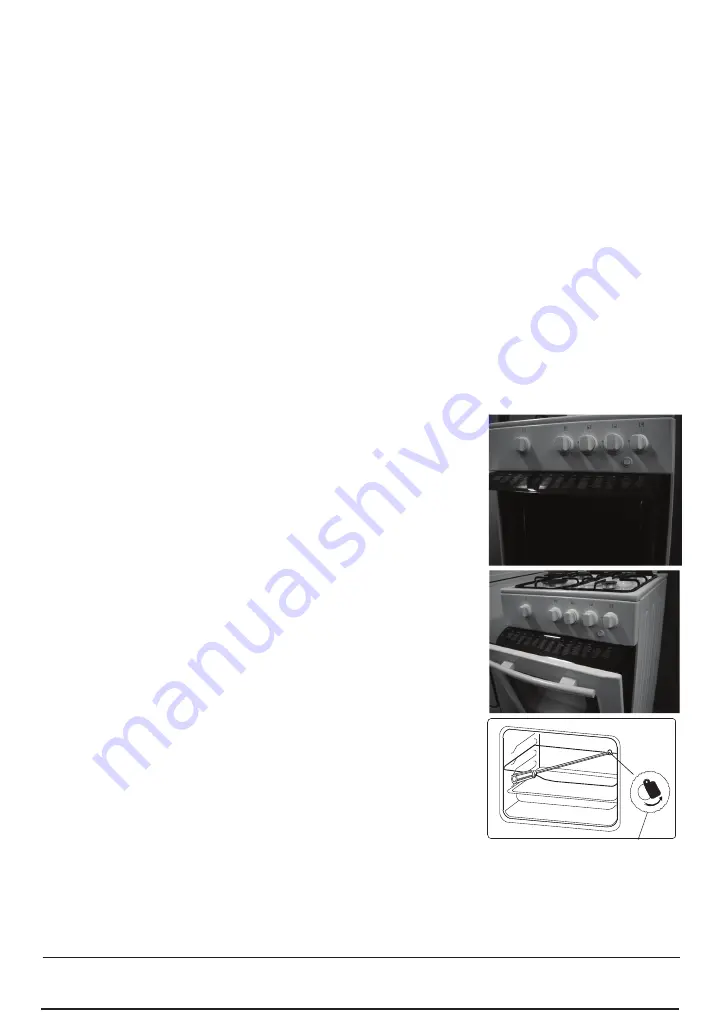
Position the turnspit support into the third runner of the oven and place the drip tray
underneath. Place the food on the spit and secure it with the two forks. Lay the spit with
the food on the support.
Fit the spit into the motor hole situated in the rear oven wall.
Remove the spit handle during cooking.
We suggest that you pour some water into the drip tray to reduce smoke and fat
spatters. Place the knob guard under the control panel.
Close the oven door until the knob guard is in contact with the cooker.
Switch the turnspit on pushing the button on the control panel.
Preheat the grill for 5 minutes.

Caution: Some parts become very hot when the grill is being used. Keep children
away.
If the grill is used only occasionally, it is advisable to turn it on for a few minutes
before use, in order to eliminate residuals of previously cooked food.

Never attempt to use the grill burner with the oven door closed.
If any burner fails to ignite for 60 secs, turn the valve and do not attempt to re-ignite
for 2 minutes. Likewise, if flame goes out on an operating gas burner, do not
attempt to re-ignite for 2 minutes. If such a case occurs in the oven burner, open
the oven door before re-ignition.

Minute Minder

The minute minder allows a time of between 1 and 90 minutes to be set. To set the minute minder, first turn it clockwise all the way
round and then set it to the desired time. Once the set time has elapsed, a signal sound will be emitted.

Lid (if available)

Summary of Contents for ACM 640 IX

Page 1: ...HE APPLIANCE PRECAUTIONS AND GENERAL ADVICE ENERGY SAVING TIPS OVEN ACCESSORIES CLEANING AND MAINTENANCE TROUBLESHOOTING GUIDE AFTER SALES SERVICE For best use of the oven carefully read the operating instructions and keep them for future consultation ACM 640 IX ...

Page 2: ... HOB a Rapid burner front left b Semirapid burner rear left c Semirapid burner rear right d Auxiliary burner front right 6 Lid 1 Control panel 2 Gas grill burner 3 Oven light 4 Gas oven burner 5 Oven door Knob guard Wire shelf Drip tray Turnspit 1 Minute minder 2 Oven function selector knob and thermostat knob 3 Rear left burner control knob 4 Front left burner control knob 5 Front right burner co...

Page 3: ...18 g h 127 g h 73 g h 204 g h 0 85 0 65 0 40 1 40 25 20 30 25 35 Type of gas used Total nominal heating power kW Appliance model Total nominal consumption Air necessary m3 for the combustion of 1 m3 of gas G20 20 mbar 10 3 G30 10 3 982 l h 749 g h 9 52 30 94 1R 2 SR 1 AUX oven 1R 2 SR 1 AUX oven NB Cooking times and temperatures are approximate CLASSESOFAPPLIANCES Thecookingappliancesdescribedonth...

Page 4: ...rame of the oven cavity and visible with the door open Adjustment conditions are given on a label on the packing Do not use the oven door for handling operations or for removing the appliance from the packing Type of appliance Single phase power supply 220V 60 HZ Gas hob with gas oven Philippines s plug and AWG wire AWG 16X 2 1 5mm2 grounding wire Section 3 x 1 mm Gas connection For information re...

Page 5: ...ovided their height does not exceed the hob level In selecting a position for the cooker make sure the appliance is not placed next to a refrigerator and that there are no flammable or combustible materials in the vicinity such as curtains etc which can quickly catch fire A minimum space of 20 mm between the metal rear cover of the cooker and the wall is required to ensure air circulation If the c...

Page 6: ...le must not touch hot parts of appliance Otherwise it may become damaged This situation could cause short circuiting The manufacturer declines any liability for damage and loss due to failure to comply with the following safety regulations If replacing the power cable the new one must have the same characteristics that are specified in this manual To replace the cable proceed as follows open the t...

Page 7: ... from the floor so as not to be obstructed on the inside or outside of the wall and not to hinder the correct combustion of the burners and the regular extraction of vitiated air and with a height difference of at least 180cm with respect to the outlet opening The quantity of air necessary for combustion must not be less than 2 m3 h for every kW of power see total power in kW on the appliance data...

Page 8: ...ons to change the hob injectors remove the pan supports remove the burners and burner caps see Fig 3 change the injector Fig 4 and replace it with one suitable for the new type of gas see table on the separate Product Sheet Replace the gas setting label with the new one included in the injector bag Refit everything by proceeding in reverse order making sure to correctly fit the burner cap on the b...

Page 9: ...eatment recovery and recycling of this product please contact your competent local authority the household waste collection service or the shop where you purchased the appliance Remove the accessories from the oven and heat it at 200 C for about two hours to eliminate the smell of protective grease and insulating materials Keep the window open during this operation Before use remove stickers locat...

Page 10: ... burners and turn the knobs from max to min position to check the stability of the flame AUTOMATIC ELECTRIC IGNITION To light a gas burner press the corresponding control knob and turn it anticlockwise to the large flame symbol The igniter clicks and a small spark can be seen igniting the gas If the burner fails to ignite after a few seconds release the control knob check that the burners and burn...

Page 11: ...the electric ignition if provided keeping it pressed for a few seconds to activate the safety thermocouple Check grill burner lighting and make sure the burner flame remains alight when the knob is released If it does not repeat the operation Close the oven door so that it touches the knob guard Turn food over about halfway through cooking USING THE TURNSPIT Open the oven door Position the turnspi...

Page 12: ...on Preheating at max minutes Runner position from bottom Cooking time minutes Lamb 200 15 2 70 80 Leg of lamb 190 15 2 60 70 Roast veal 220 15 2 80 100 Veal 210 230 15 2 70 80 Turkey 210 15 2 120 130 Chicken 220 15 2 90 100 Pastry 200 15 2 45 55 Fruit pie 200 15 2 30 35 Pizza 200 225 15 2 15 20 Czech cake 200 15 2 30 35 Sablés 180 15 2 12 16 Apple pie 200 15 2 50 60 Pies 180 15 2 50 60 Pastry with...

Page 13: ...ally during and immediately after use risk of injury packing bags polystyrene metal parts etc any appliance to be scrapped The appliance is not intended for use by children or persons with limited physical sensory or mental abilities or without experience and knowledge of it unless they are under the supervision of or instructed in its use by a person responsible for their safety Make sure the ele...

Page 14: ... runners in the oven Baking tray 2 For baking biscuits cakes and pizzas This tray can also be used for collecting fat and any scraps of food when placed under the grill pour a little water in the drip tray to prevent spatters of fat and smoke Flap panel depending on the model 3 To open accessory flap panel pull the upper part of the flap panel as illustrated Caution When the oven is in use the ins...

Page 15: ...ture reached during cooking Oven cleaning After cooking wait for the oven to cool then clean it to prevent the accumulation of cooking residuals For stubborn grime use a specific oven cleaning product following the instructions given on the package Clean the outside of the oven with a sponge and lukewarm water Do not use abrasive products or steel wool Clean the door glass with a liquid detergent ...

Page 16: ...twards NOTE Proceed in reverse order to refit the door Make sure the saddle brackets are lowered before closing the oven door Replacing the rear oven lamp 1 Disconnect the oven from the power supply 2 After the oven has cooled down unscrew anticlockwise the lamp cover A Fig 3 3 Replace the lamp see note 4 Refit the lamp cover 5 Reconnect the oven to the power supply Note Only use 25 W 230 V E 14 t...

Page 17: ...m on your own see Troubleshooting Guide 2 Switch the appliance off and on again to see if the problem persists If the fault persists after the above checks contact your nearest After Sales Service Specify the type of fault exact type and model of oven the After Sales Service number the number given after the word Service on the dataplate located at the bottom right of frame of the oven cavity and ...

Reviews: