background image

Summary of Contents for ACQ082XP0

Page 1: ...all 1 800 253 1301 In Canada call for assistance 1 800 461 5681 for installation and service call 1 800 807 6777 ACONDICIONADOR Si tiene preguntas respecto alas caracter sticas funcionamiento rendimiento pares accesorios o servicio tecnico Ilame al 1 800 253 1301 Table of Contents Jndice 2 1187360 ...

Page 2: ...In Canada 14 Accessories 14 SEGURIDAD DEL ACONDICIONADOR DE AIRE 15 REQUISITOS DE INSTALACION 15 Herramientas y piezas 15 Requisitos para la ubicaci6n 16 Requisitos electricos 16 INSTRUCCIONES DE INSTALACION 17 Desempaque el acondicionador de aire 17 Prepare el acondicionador de aire para la instalaci6n 17 Colocaci6n del acondicionador de aire 18 Complete la instalaci6n 19 COMO USAR SU ACONDICIONA...

Page 3: ... instructions are not followed IMPORTANT SAFETY INSTRUCTIONS WARN ING To reduce the risk of fire electrical shock or injury when using your air conditioner follow these basic precautions Plug into a grounded 3 prong outlet Do not use an extension cord Do not remove ground prong Unplug air conditioner before servicing Do not use an adapter Use two or more people to move and install air conditioner ...

Page 4: ...if you are not sure air conditioner is grounded A three wire single phase 60 Hz AC only electrical supply is required on a separate circuit A 15 amp time delay fuse or circuit breaker is required Copper wire 14 gauge is required The fuse size must not exceed the circuit rating specified on the model and serial number label The model and serial number label is located on the right hand side of the ...

Page 5: ...r with care 1 2 3 Be sure your air conditioner does not fall out of the opening during installation or removal The place where the power cord exits the air conditioner should be no more than 4 ft 122 cm from a grounded outlet Locate provided bags of screws Place the top channel on top of the air conditioner lining up the holes in top channel with the holes on top of air conditioner Using 3 10 x in...

Page 6: ...ce where the power cord exits the air conditioner should be no more than 4 ft 122 cm from a grounded outlet Do not block the louvers on the front panel Do not block the louvers on the outside of the air conditioner Excessive Weight Hazard Use two or more people to move and install air conditioner Failure to do so can result in back or other injury 1 Window sash 2 Feet on bottom of air conditioner ...

Page 7: ... head screws 1 8 x _ in round head screws 1 Lower window sash 2 Foam seal Electrical Shock Hazard Plug into a grounded 3 prong outlet Do not remove ground prong Do not use an adapter Do not use an extension cord Failure to follow these instructions can result in death fire or electrical shock 5 Plug into a grounded 3 prong outlet 1 Place window lock bracket on top of lower window and against upper...

Page 8: ...e AUTO COOL FAN ONLY or POWER SAVER Auto Cools room while it automatically controls fan speed You cannot change fan speed but you can adjust temperature by pressing the plus or minus button Cool Cools room You can select fan speed by pressing Fan Speed You can then adjust temperature by pressing the plus or minus button Fan Only Only the fan runs Display shows FO fan only NOTE Fan runs on Turbo sp...

Page 9: ...r light will flash 7 Press the plus or minus button to change delay time 1 to 24 hours 8 Press TIMER again or wait 10 seconds Indicator light will remain on To clear Timer delay program NOTE Air conditioner can be either on or off Press and hold TIMER for 3 seconds Indicator light will shut off To see the remaining time in hours 1 Press TIMER once after it has been programmed 2 While the display i...

Page 10: ...e 1 to 24 hours 4 Press TIMER again or wait 10 seconds Indicator light on air conditioner will remain on To set Timer to turn on air conditioner changing the previous settings 1 Turn on air conditioner 2 Adjust MODE to Auto Cool Fan Only or Power Saver 3 Adjust FAN SPEED to Turbo High or Low 4 Adjust temperature between 64 F 17 C and 86 F 30 C 5 Wait 3 seconds before turning off air conditioner 6 ...

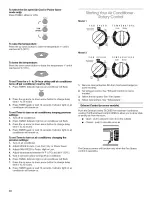
Page 11: ...t or left Rotate the whole cartridge to direct air up down or straight ahead J_ 1 Wheel Z 1 Cartridge Model 2 Turbo C001 FAN SPEED Wait t Ire_rli lu_s all r_ P0wer Saver Low Tu I C001 High cool Temperature Turn the TEMPERATURE control to a mid setting Adjust the air conditioner s performance by turning the Temperature control clockwise for maximum cooling For less cooling turn the TEMPERATURE cont...

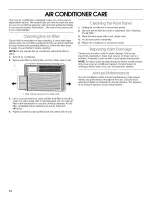
Page 12: ...anel with a soft damp cloth 4 Air dry front panel completely 5 Plug in air conditioner or reconnect power Check once or twice a year for paint damage This is very important especially in areas near oceans or where rust is a problem If needed touch up with a good grade enamel paint NOTE To reduce paint damage during the winter install a heavy duty cover over air conditioner cabinet For information ...

Page 13: ... the room being cooled Air conditioner cycles on and off too much or does not cool The MODE is set to POWER SAVER on some models Use Power Saver only when you are away from home or asleep since the fan does not circulate the room air continuously Use LOW HIGH or TURBO for your best comfort The air conditioner is not properly sized for your room Check the cooling capabilities of your room air condi...

Page 14: ... EST Our consultants provide assistance with Features and specifications on our full line of appliances Referrals to local dealers For further assistance If you need further assistance you can write with any questions or concerns at Customer Interaction Center 1901 Minnesota Court Mississauga Ontario L5N 3A7 Please include a daytime phone number in your correspondence Please record your model s in...

Page 15: ...URIDAD ADVERTENCIA Parareducir el riesgo de incendio choque electrico o lesiones personales al usar su acondicionador de aire siga estas precauciones basicas Conecte a un contacto de pared de conexi6n a tierra de No use un cable electrico de extensi6n 3 terminales Desconecte el acondicionador de aire antes de No quite el terminal de conexi6n a tierra darle servicio No use un adaptador Use dos o ma...

Page 16: ...U Si los c6digos Io permiten y se utiliza un alambre de puesta a tierra separado se recomienda que un electricista calificado determine si la trayectoria de la puesta a tierra es adecuada Consulte con un electricista calificado para asegurarse de que el acondicionador de aire esta debidamente puesto a tierra Se requiere un suministro electrico monofasico de tres alambres de 60 Hz s61o de CA en un ...

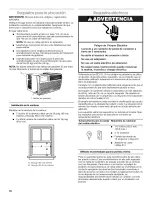
Page 17: ... productos de limpieza abrasivos para eliminar los restos de cinta o goma Estos productos pueden dafiar la superficie de su acondicionador de aire 1 2 rate el acondicionador de aire con cuidado AsegL_rese de que el acondicionador de aire no se caiga de la abertura durante la instalaci6n o al quitarlo La parte de donde sale el cord6n electrico del acondicionador de aire debe colocarse a no mas de 4...

Page 18: ...ara la cortina izquierda Trate el acondicionador de aire con cuidado AsegOrese de que el acondicionador de aire no se caiga de la abertura durante la instalaci6n o al quitarlo La parte de donde sale el cord6n electrico del acondicionador de aire debe colocarse a no mas de 4 pies 122 cm de un tomacorriente puesto a tierra No bloquee las rejillas que estan en el panel delantero Peligro de Peso Exces...

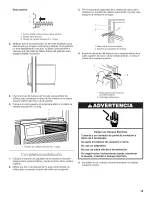
Page 19: ...or 1 4 Use una broca de barrena de 2 pulg para perforar los orificios para comenzar a trav_s de los orificios en la ranura superior dentro del marco de la ventana 5 Coloque el canal superior en la ventana utilice 2 tornillos de cabeza redonda 8 x 3 4pulg 1 Tornillos de cabeza redonda 8 x _ pulg I Coloque elsoportede seguridadde laventanaen laparte superior de laventanainferior ycontraelmarco de la...

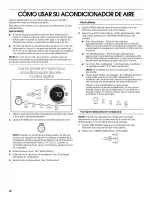
Page 20: ...laci6n 5 Selecccione la temperatura Vea Temperatura Mode Modo 1 2 Oprima MODE Modo hasta que se encienda la luz del indicador para la posici6n que usted desea Seleccione AUTO Automatico COOL Enfriamiento FAN ONLY S61o ventilaci6n o POWER SAVER Ahorro de energia Auto Automatico Enfria la sala mientras automaticamente controla la velocidad de ventilaci6n Usted no puede cambiar la velocidad de ventil...

Page 21: ...l acondicionador de aire 2 Oprima TIMER La luz del indicador se encendera intermitentemente 3 Oprima el bot6n de mas o menos para cambiar el tiempo de retardo de 1 a 24 horas 4 Oprima TIMER o espere 10 segundos La luz del indicador permanecera encendida Para programar el temporizador hasta que el acondicionador de aire se encienda para cambiar los ajustes previos 1 Encienda el acondicionador de ai...

Page 22: ...o POWER SAVER Ahorro de energia Auto Cool Enfriamiento automatico la velocidad de ventilacidn se ajusta automaticamente Fan Only 61o ventilacidn la velocidad de ventilacidn se ajusta automaticamente en Turbo Cool Enfriamiento o Power Saver Ahorro de energfa usted puede ajustar la velocidad de ventilacidn Auto Coo Cool Fan Only Power Saver Para seleccionar la velocidad de ventilacibn solamente en e...

Page 23: ...Velocidad de ventilaci6n a Turbo High or Low 4 Ajuste la temperatura entre 64 F 18 C y 86 F 30 C 5 Espere 3 segundos antes de apagar el acondicionador de aire 6 Oprima TIMER La luz del indicador en el acondicionador de aire se encendera intermitentemente 7 Oprima el bot6n con la flecha hacia arriba o abajo para cambiar el tiempo de retardo de 1 a 24 horas 8 OprimaTIMER o espere 10 segundos La luz ...

Page 24: ...r Modelo 1 FAN SPEED Modelo 2 Turbo Cool Power Savel ow Cool Cool High Cool Temperatura Gire el control de TEMPERATURE a un ajuste medio Ajuste el funcionamiento del acondicionador de aire girando el control de temperatura hacia la derecha para un enfriamiento maximo Para un menor enfriamiento gire el control de TEMPERATURE hacia la izquierda Experimente y busque el ajuste que mas le convenga TEMP...

Page 25: ...lugares que estan cerca de los oceanos o donde la herrumbre es un problema Si es necesario retoque con un esmalte de buena calidad NOTA Para reducir el daRo a la pintura durante el invierno instale una cubierta resistente sobre el gabinete del acondicionador de aire Para informaci6n sobre c6mo pedir una cubierta resistente vea la secci6n de Accesorios 1 El filtro puede quitarse de cualquiera de lo...

Page 26: ...an diseSados para enfriar varias habitaciones El filtro esta sucio u obstruido por desechos Limpie el filtro El evaporador interno y los serpentines del condensador externo estan sucios u obstruidos por desechos Limpie el evaporador interne y los serpentines del condensador externo Vea Mantenimiento Anual Hay demasiado calor o humedad se estb cocinando en recipientes abiertos duchas etc en la habi...

Page 27: ...Customer Interaction Center 553 Benson Road Benton Harbor MI 49022 2692 Favor de incluir un nQmero telef6nico de dfa en su correspondencia Por favor anote la informacibn sobre su modelo Siempre que Ilame para solicitar servicio del aparato necesitara saber el nt_mero del modelo y el nt_mero de serie completes Esta informaci6n la encuentra en la placa de nt mero del modelo y nt_mero de serie Vea la...

Page 28: ...1187360 2003 AIFrightsreserved Todos Ios derechos reservados 9 03 Printed in U SA Impreso en EE UU ...

Reviews: