background image

Summary of Contents for ACS102

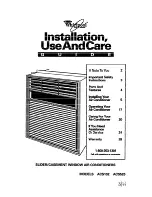
Page 1: ...Yw 2 IFZZ 3 Parts And Features 4 lnstallin Your Mordtioner 5 Operating Your Au conditioner 17 c i F 20 If You Need F 24 Warranty 28 laxw53 1301 cdlwllhqlbeslion8acommonts SLIDER CASEMENT WINDOW AIR CONDlTlONERS MODELS ACSIOZ ACS520 ...

Page 2: ...his symbol will help alert you to such dangers as personal injury burns fire and 1 electricalshock This symbol will help you avoid actions 1 1 product damage 1 scratches dents etc and damage to your Our Consumer Assistance Center number l 80 253 1301 is toll free 24 hours a day lf you ever have a question concerning your appliance s operation or if you need service first see If You Need Assistance...

Page 3: ...OR EXPLOSION SAVE THESE INSTRUCTIONS Help us help you Please l Install the air conditioner in a window that will hold the weight and secure it in accordance with the Installation Instructions l Connect the air conditioner only to the proper kind of outlet with the correct electrical supply and grounding See the Installation Instruc tions l Be sure the air conditioner is the correct size for the ar...

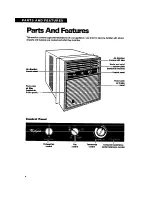
Page 4: ...strations of your appliance Use them to become familiar with where all parts and features are located and what they look like Air direction thumb wheel ROIlbOVdO air lilb behind air Intake panel FL I tisumu Asoistmco COIIBOI COlltTOl Centu lobphone number ...

Page 5: ...NOT use an extension cord with this appliance l Check with a qualified electrician if you are in doubt as to whether the appliance is properly grounded Failure to follow these instructions could resutt in electrical shock serious injury or death OBSERVE ALL LOCAL CODES AND ORDINANCES DO NOT UNDER ANY CIRCUMSTANCES REMOVE THE POWER SUPPLY CORD GROUNDING PRONG NOTE lf codes permit and a separate gro...

Page 6: ...ch wide opening Fasten frame securely and seal it into the window opening For brick or cement bulkflng conetruction It may be necessary to provide a wood stool strip under the air conditioner for mounting purposes Tools required l Flat head screwdriver l Phillips head screwdriver l Carpenter s level l Tape measure l Fine tooth saw l Electric or hand drill l inch drill bit l inch drill bit Pereonel...

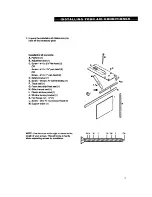
Page 7: ...x 1 pan head 2 D Safety bracket 1 E Screw 8 32 x o 4 self threading 7 F Track seal 1 G Foam seal strip Sash seal 1 H Side channel seal 1 I Plastic window panel 1 J Window locking bracket 1 K Hex flange nut l 4 1 L Screw 8 x W round wood head 8 M Support brace 1 NOTE Use the scale at the right to measure the length of your screws This will come in handy when separating screws for installation 7 ...

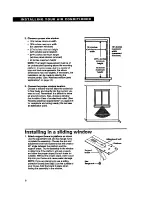
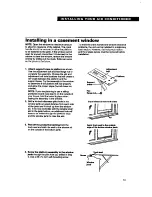
Page 8: ...omers Also choose a window that is within 8 feet of an electrical outlet See Meeting electrical requirements on pages 5 6 for receptacle and wiring needs Do not we en extension cord 15 inch08 4 minimum D Width 16 in w maximum Width cwemannt windows 20 KI illcha minimum height 46 inchw maximum haight I 4 I 1 Installing in a sliding window 1 Attach support brece to platform as shown Use the adjustme...

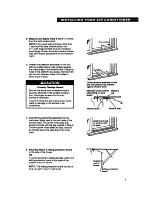
Page 9: ...construc tion Use longer screws into the sub framing ff necessary Failure to follow the above precaution could result in damage to the window or air conditioner 4 Peel off the protecthro backing from the track seal Apply seal to the room side of the window track The center of the seal strip should coincide with the line marked in Step 2 The two screw holes drilled in Step 3 should be directly abov...

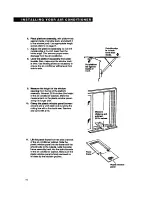
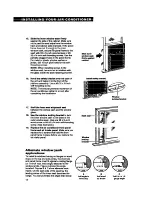
Page 10: ...e top of the platform assembly Subtract 20 inches the height of the air conditioner cabinet Mark this measurement on the plastic window paneC along the longer side 10 Clamp the plaetic window panel between a board and a work table and cut along the cutting line with a fine tooth saw Remove any burrs with a file 11 Lift the panel frame from the side channels of the air conditioner cabinet Slide the...

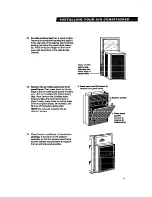
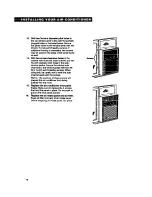
Page 11: ...ame First press down on the top remove front penal fmmo edge of the air intake panel and tilt it toward you Lit it up to release the bottom spring clips Next remove the 2 Phillips head screws holding the front panel frame in place Finally press down on the top edge of the front panel frame tilt lt forward and lift it up off the bottom spring clips NOTE Do not push or pull on the air direction louv...

Page 12: ...t after completing the installation Stuff the foam aeal l trip aaah real between the vertical sash and the window glass UK the window locking brmket to lock the inner window sash to the base of the outer window sash Use one It8 x inch wood screw or 8 32 x inch self threading screw See illustration Replete the air conditioner front panel frame and air intake panel Make sure you replace the 2 screws...

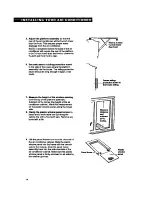
Page 13: ...the platform and the support brace Try the assembly in the window to determine if the platform will rest properly and allow the proper elope inch lower on outside NOTE lf you are planning to use a skfing protection board see step 5 on the outside of your house hold the board in place when testing the assembly in the window 2 Drill a Wclnch diameter pikt hole in the window jamb an equal distance fr...

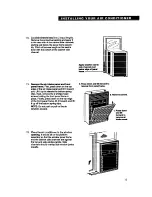
Page 14: ...rom the top of the platform assembly Subtract 20 inches the height of the air conditioner cabinet Mark this measurement on the plastic window panel along the longer side 6 Clamp the pleetlc window penel between a board and a work table and cut along the cutting line with a fine tooth saw Remove any burrs with a file 9 Lii the panel frame from the side channels of the air conditioner cabinet Slide ...

Page 15: ... bottom spring clips Next remove the 2 phillips head screws holding the front panel frame in place Finally press down on the top edge of the front panel frame tilt it forward and lift it up off the bottom spring clips NOTE Do not push or pull on the air direction louvers 12 Piece the air conditioner in the window opening It should sit on the platfom r assembly so that the window panel frame and th...

Page 16: ... holes in the side window jambs Secure the cabinet side channels to the window jambs wfth two t8 32 x inch self threading screws When doing this be careful not to twist the side channel seals with the screws NOTE The insertion of these screws will prevent the air conditioner from being pushed into the room 15 Replete the air conditioner front panel frame Make sure to replace the 2 screws that hold...

Page 17: ...oom air when no cooling is desired 3 Turn the Thermostat Control to the desired setting You can adjust the air conditioner s cooling performance by turning the Thermo stat Control clockwise for more cooling or counterclockwise for less cooling You will need to experiment to find the setting which suits you best Electrical Shock Hazard l Plug unit only into grounded electrical outlet l Do not use a...

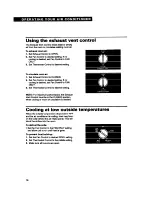
Page 18: ... 3 Set Thermostat Control to desired setting NOTE For maximum performance the Exhaust Vent Control must be in the CLOSED position when cooling or room air circulation is desired Cooling at low outside temperatures When the outside temperature drops below 70 F and the air conditioner is cooling frost may form on the coils behind the air intake panel This will block the airflow into the room To defr...

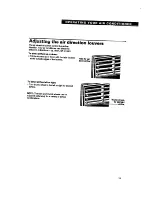
Page 19: ...ns up down left or right To direct airflow up or down l Tilt the louvers up or down with the tabs located at the outside edges of the louvers To direct airflow left or right l Turn thumb wheel to the left or right for desired airflow NOTE The tabs and thumb wheels can be adjusted separately for a variety of airflow combinations ThhXup down aim0w 19 ...

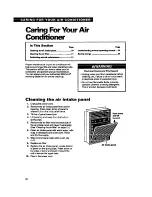
Page 20: ...s abrasive cleaners or strong detergents Fire or product damage could resuft Cleaning the air intake panel 1 Unplug the power cord 2 Remove the air intake panel from unit for cleaning Press down at top of panel to release it from the front panel frame 3 Tilt top of panel toward you 4 Lii panel up and away from the bottom spring clips 5 Remove the air filter from the back side of the air intake pan...

Page 21: ...l Check fan and fan motor The compressor and fan motor are sealed and need no oiling Expense of annual inspection is the customer s responsibility OR lf you are familiar wfth electrical appliances you can do the cleaning and maintenance yourseff ff you choose to do so follow these steps Electrical Shock Product Damage and Penonal Injury Hazard l Unplug power cord from receptacle before performing ...

Page 22: ...ther liquids get inside Water or other liquids could damage the insulation and cause serious mechanical problems 9 Clean and hose out the base coils and condensate pans Clean air conditioner at least once a year or more often if the condenser coils and pans collect dirt sand leaves insects or algae Also clean the air conditioner if you detect an odor coming from it 10 Remove plastic film from the ...

Page 23: ...ing area Saving energy You can help save energy by following the tips below l Improve your home s insulation Seal all doors and windows Close the fireplace flue l Close all blinds and drapes on sunny sides of the house Add window awnings l Keep the air filter clean l Do not block the airflow with drapes or furniture l Ventilate the attic High temperatures in the attic add to the air conditioner s ...

Page 24: ...l is not Set the Thermostat Control to a setting set correctly cooler than the room temperature A household fuse has blown or Replace fuse or reset circuit breaker a circuit breaker has tripped The local power has failed Wait for power to be restored Unit blowe A time delay fuse is not being Replace fuse with a time delay fuse of household fuoaa used the correct capacity or trlpr circuit bretaker ...

Page 25: ...nce Center telephone number see Step 2 or look in your telephone directory Yellow Pages under 4 If you need FSP replace ment parts FSP is a registered trademark of Whirlpool Corporation for quality parts Look for this symbol of quality whenever you need a replacement part for your Whirlpool appliance FSP replacement parts will fit right and work right because they are made to the same exacting spe...

Page 26: ...tioner if it is installed in an overhead or other inaccessible location or not installed in accordance with published installation instructions E Repairs to parts or systems caused by unauthorized modifications made to the appliance co Service under the full warranties must be provided by an authorized Whirlpool service company WHIRLPOOL CORPORATION SHALL NOT BE LIABLE FOR INCIDENTAL OR CONSEQUENT...

Reviews: