background image

GB 

-5-

Switch 

off the appliance Everything o.k. ...

W

a

sh cycle

Sel

e

ct p

rogr

a

m

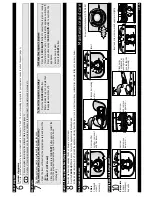
6

7

8

Ex

ercise 

caution wh

en opening 

the doo

r: beware 

of 

hot s

team.

Press the 

CANCEL/Off

 but

ton once t

o

 turn the appliance 

into 

Standby 

mod

e

.

All the indi

cator

 la

mps switch 

o

ff. Unl

o

ad 

the 

appliance, starting from 

the

 lo

wer ra

ck in order

 to 

avoid any 

residual drips 

of 

w

ater 

falling onto

 crockery below.

Maintenance and care

Maintenan

ce and care

Ov

erv

iew of programs

T

h

e max. poss

ible number of 

pr

ogr

ams is il

lustr

at

e

d in the cha

pter “Chart”. 

The corresponding programs 

for 

your 

appliance can b

e

 found on the panel 

(page 1).

Choose 

program acco

rding to

 the attached 

table 

of 

programs (

p

age 

1).

Duration 

of the program 

depend

s on 

the external 

cond

it

ions

 in 

the apartment, 

temperat

ure and 

pressure etc.

The dishwasher door must

 be closed 

and the water tap 

open.

T

o

 pause the 

program 

(e.g. if 

yo

u w

a

nt

 t

o

 i

n

se

rt a

n

 i

tem

):

-

O

pen the 

door 

with caution (the

 program pauses) 

and insert 

the 

item/s

,

(b

e

w

ar

e o

f H

O

T

 s

team!

).

-

Close the 

door 

and press the 

START

 butto

n

 again 

to

 restart 

th

cycle 

(the 

program resumes the cycle from where 

it was 

interrupted).

T

o

 Canc

el

 t

h

pro

g

ra

on r

u

n

n

in

g

:

-P

re

ss

 t

h

e

 C

A

NCEL/Off

 button.

-

(Water 

drains 

for up to 

1 minute then 

the appliance 

sw

itch

es off).

T

o

 change 

th

e program in progress:

-

P

ress the 

C

A

NCEL/Off

 button 

to can

cel the program on running.

-

(Water drains for 

up to 1 minute 

th

en th

e applia

nc

e switches off).

-

P

ress 

any button except 

CANCE

L

/Off

 button to 

switch 

on the 

app

liance.

-

Select 

a new program.

-

P

ress th

START

 button.

R

e

ctifying 

minor faults yourself 

...

10

9

Fi

lte

rs

Check and 

clean if 

necessary

Unscrew f

ilter 

cyli

nder

, remove it 

and fine

 sie

ve...

Rinse under 

running 

water ...

Sc

re

w

 o

n

 fi

lter

 c

yli

nder

 N

O

TE

 M

A

R

K

!

Unscrew 

and remove 

upp

e

r arm 

...

Spray arms 

Re

m

o

ve

blockages

/

depos

its.

Insert

Clean spray 

nozzles under 

running water

(us

e

 toothpicks 

if ne

cessary) 

...

Insert and screw on 

lower and 

upper arms tightly

.

Unsc

rew 

and re

move 

lower arm 

...

Summary of Contents for ADP 5300

Page 1: ...0 Lenzburg www bauknecht ch Verkauf Telefon 0848 801 002 Fax 0848 801 017 verkauf bauknecht ch Kundendienst Telefon 0848 801 001 Fax 0848 801 003 service bauknecht ch Ersatzteile Telefon 0848 801 005 Fax 0848 801 004 ersatzteilverkauf bauknecht ch Instructions for use ADP 5300 ...

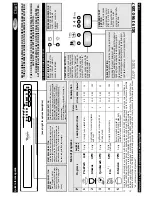
Page 2: ... Glasses 40 C Delay Light soiling for example glasses and cups X 10 0 0 85 100 3 Quickwash 45 C Delay Lightly soiled crockery with no dried on food X 11 0 0 80 30 4 Eco 2 50 C Delay Half load Normally soiled crockery X 12 0 1 05 150 5 Intensive 70 C Delay Recommended program for heavily soiled crockery especially suitable for pans and saucepans X 14 0 1 55 155 5019 396 01857 BEFORE USING THE APPLI...

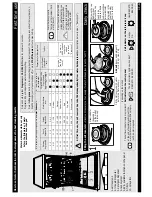
Page 3: ...ss level falls within category soft no salt is required Salt indicator on the control panel Salt indicator on the salt reservoir cap The indicator lamp lights up when SALT NEEDS TO BE ADDED orange OK clear NEEDS TO BE ADDED Daily check Filling the salt reservoir Dissolve limescale not necessary if water hardness level is set to soft Press and hold together Programs and CANCEL Off buttons for minim...

Page 4: ...y be a problem if necessary use powder detergent Detergents with rinse aid incorporated tend to form excess suds Daily use Adding detergent Use only detergent specifically for dishwashers in accordance with the supplier s recommendations Open the cover A press the dedicated button Only fill the detergent dispenser prior to starting a wash program Shut the cover by pressing dedicated ribs Insert de...

Page 5: ... or bring it down to load long stem glasses Grasp and take out the two lateral handles D they must be on the same level and lift up or take down the upper rack Arrange crockery so that water does not collect in cavities ensuring that the spray arms turn freely Only use dishwasher proof crockery and dishes Do not use the dishwasher for washing wooden items aluminium tin silver cutlery or decorated ...

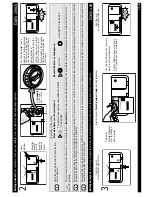
Page 6: ...ou want to insert an item Open the door with caution the program pauses and insert the item s beware of HOT steam Close the door and press the START button again to restart the cycle the program resumes the cycle from where it was interrupted To Cancel the program on running Press the CANCEL Off button Water drains for up to 1 minute then the appliance switches off To change the program in progres...

Page 7: ...ean the filters Kinked drain hose The drain hose must not be kinked Syphon hose connection closed The closure disk of the syphon hose connection must be removed After taking the above course of action the fault message must be reset In the majority of cases the fault is thus eliminated RESET Press the CANCEL Off button Close the door Water drains automatically for up to 1 minute The appliance is n...

Page 8: ...ergent is recommended as it allows slightly higher doses to be used for improved whitening Programs with higher wash temperatures should be used opaque glasses etc Dishes unsuitable for washing in dishwashers porcelain Only use dishwasher proof crockery and dishes removable deposits on glasses Usage of incorrect programs for glasses Dishes should be put together to avoid touching each other Do not...

Page 9: ... be arranged horizontally in the upper rack with the sharp end facing away from the front of the appliance Before cleaning or carrying out maintenance disconnect the mains plug and turn off the water tap also in the event of any malfunction Repairs and technical modifications must be carried out exclusively by a qualified technician 7 Resistance to frost If the appliance is placed in surroundings ...

Reviews: