background image


Instruction AGS 646-WP- rev9 english 


ed.05


Page 11 di 15


PRECAUTIONS IF NOT USING FOR LONG PERIODS 


-

  If not using for long periods, clean the appliance thoroughly and remove any residues, 

then dry perfectly.  

-

  We recommend leaving the door slightly open to allow air to circulate inside the oven and 

preserve the lining. 

-

  You can use the protective substances commonly available on the market to protect the 

stainless steel parts. 

-

  Disconnect the appliance from the power supplies. 

-

  The room should be kept dry and well ventilated. 


PRECAUTIONS IN THE EVENT OF A MALFUNCTION 


-

  If any malfunctions occur while the oven is in use, switch off immediately and disconnect 

all power supplies. 

-

  Call technical support. 

IMPORTANT: the manufacturer cannot accept liability or claims under warranty for any 
damage to property resulting from failure to observe the safety regulations, or from 
incorrect installation.This also applies where the appliance is used by the operator for 
purposes other than those for which it was designed. 


Summary of Contents for AGS 646/WP

Page 1: ...Instruction AGS 646 WP rev9 english ed 05 Page 1 di 15 ELECTRIC OVEN AGS 646 WP Installation user and maintenance instruction ...

Page 2: ...ion and equipotential bonding pag 6 Commissioning test and putting into service pag 7 Maintenance of the appliance pag 7 USING AND CLEANING THE APPLIANCE Pag 7 User information and safety instructions pag 7 USER INSTRUCTIONS Pag 8 Control panel pag 8 Switching on pag 8 Setting and using the timer pag 8 Setting the temperature pag 9 Interior light pag 9 Cooking pag 10 Care and cleaning of the appli...

Page 3: ...The appliance must be used exclusively for the specific purpose for which it is intended Use for any other purpose may be dangerous Be especially careful when the appliance is in use the external surfaces can also become very hot Disconnect the appliance if there is a fault or malfunction If maintenance or repairs are necessary please contact an authorized service centre All the important informat...

Page 4: ...s are to be observed especially during the installation work current legal regulations applicable health safety standards applicable to cooking environments local and or regional building regulations and fire prevention requirements current accident prevention regulations IEE recommendations regarding electrical safety requirements of the electricity provider any other local requirements SPECIAL C...

Page 5: ...ment marked with the symbol shown in Fig A on the adhesive label featuring the technical specifications applied on the actual product the label also giving the serial number This symbol indicates that the product is classified according to the regulations in force as an item of electrical and electronic equipment and conforms to EU Directive 2002 96 EC WEEE meaning that at the end of its service l...

Page 6: ...the oven on the left 3 Fig 3 compromising its regular functioning DO NOT ENCASE THE OVEN INSIDE FURNITURE OR IN WALL RECESSES DO NOT PLACE UNDERNEATH ENCLOSED TABLES OR UNDER BENCHES Use a spirit level when installing Any level differences must be compensated using the adjusting feet turning the screws to raise or lower Substantial level differences can have a negative effect on the functioning of...

Page 7: ... confirm acceptance by signing The warranty period begins from the date of signing MAINTENANCE OF THE APPLIANCE CAUTION All maintenance work must be carried out exclusively by qualified service personnel To maintain the efficiency of the appliance maintenance should be performed once per year including a check on the condition of all parts subject to wear electrical components etc It is advisable ...

Page 8: ...ton 1 displays 3 10 and 11 come on The appliance is now ready for you to set the temperatures and the timer see paragraphs SETTING AND USING THE TIMER and SETTING THE TEMPERATURE If you press the ON OFF button again the orange LED indicator 2 comes on and the oven begins to heat SETTING AND USING THE TIMER fig 2 Switch on the oven see paragraph Switching on The display 3 shows the time on 3 fields...

Page 9: ...e of the upper zone and one for the lower zone from 0 C heating element off up to 450 C Use the buttons 7 to set the temperature in the upper zone the temperature is then indicated on display 10 Use buttons 8 to set the temperature in the lower zone the temperature is then indicated on display 11 Three seconds after the temperatures have been set the display changes automatically from temperature ...

Page 10: ...ther dishes Insert the grid holders before switching the oven on Oven AGS 646 WP is suitable for cooking all types of food Set the desired temperature and insert the food when the oven is hot IMPORTANT For even cooking and to protect the appliance over time temperature should not go over 300 C when cooking on a pan or grid without the PIZZA cylinders CLEANING AND CARING FOR THE APPLIANCE Do not us...

Page 11: ...stainless steel parts Disconnect the appliance from the power supplies The room should be kept dry and well ventilated PRECAUTIONS IN THE EVENT OF A MALFUNCTION If any malfunctions occur while the oven is in use switch off immediately and disconnect all power supplies Call technical support IMPORTANT the manufacturer cannot accept liability or claims under warranty for any damage to property resul...

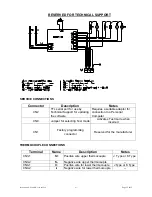
Page 12: ...or for connection to a Personal Computer CN9 Jumper for selecting Test mode Activates Test mode when inserted CN1 Factory programming connector Reserved for the manufacturer THERMOCOUPLE CONNECTIONS Terminal Name Description Notes CN3 1 S Positive wire upper thermocouple J Type or K Type CN3 2 S Negative wire upper thermocouple CN4 1 I Positive wire for lower thermocouple J Type or K Type CN4 2 I ...

Page 13: ... V and from serial no 205280400 TEST MODE AND THERMOCOUPLE CONFIGURATION AUTO TEST Short circuit contact CN9 on the back of the circuit board using a jumper The following functions will be available while CN9 is short circuited The relays will be activated cyclically one at a time The parts of the display will be lit up one at a time Press button 8 fig 2 for the upper zone temperature SW1 to light...

Page 14: ...te that the J type thermocouple is selected You can now change from J type to K type by pressing the buttons 8 fig 2 for upper zone temperature SW1 and SW2 To save the selected type press button 9 fig 2 for lower zone temperature SW3 Reset by removing the power supply Resetting the thermocouple offset Go into analog channel display mode by inserting and removing the jumper at CN9 Upper and lower z...

Page 15: ...r printing errors They also reserve the right to make any modifications to the product that they consider useful or necessary without changing the essential specifications The manufacturer will not accept any liability whatsoever if the regulations and instructions described in this manual are not strictly observed WHIRLPOOL EUROPE S r l V le Guido Borghi 27 I 21025 Comerio VA ...

Reviews: