Instruction AGS 646-WP- rev9 english
ed.05
Page 14 di 15
-
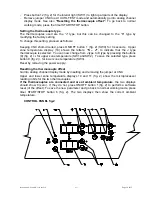
Press button 12 (fig. 2) for the interior light (SW11) to light up all parts of the display.
-
Remove jumper CN9 to exit AUTO-TEST mode and automatically go into analog channel
display mode. See also
“Resetting the thermocouple offset”.
To go back to normal
working mode, press the timer START/STOP button.
Setting the thermocouple type
The thermocouples used are the “J” type, but this can be changed to the “K” type by
modifying the factory setting
To change this setting, proceed as follows:
Keeping CN9 short-circuited, press ON/OFF button 1 (fig. 2) (SW9) for 3 seconds. Upper
zone temperature display (10) shows the letters:
“S – J”
, to indicate that the J type
thermocouple is selected. You can now change from J type to K type by pressing the buttons
(8) (fig. 2) +/- for upper zone temperature (SW1 and SW2). To save the selected type, press
button 9 (fig. 2) + for lower zone temperature (SW3).
Reset by removing the power supply.
Resetting the thermocouple offset
Go into analog channel display mode by inserting and removing the jumper at CN9.
Upper and lower zone temperature displays 10 and 11 (fig. 2) show the microprocessor
reading in bits for the two thermocouples.
If the thermocouples are connected and are at ambient temperature
, the two displays
should show 0 (zero). If they do not, press ON/OFF button 1 (fig. 2) to perform a software
reset (of the offset). To save the new parameter and go back to normal working mode, press
timer START/STOP button 6 (fig. 2). The two displays then show the correct ambient
temperature.
CONTROL PANEL fig.2


