background image

5019 318 33259

Maintenance
Important! Always disconnect the hood before 

cleaning or carrying out maintenance by unplugging it 

or switching off the power supply.

Grease filter maintenance

Retains fat particles produced during cooking.

Wash the metal grease filter once a month (or when the filter 

saturation system indicates cleaning is necessary) with a mild 

detergent, by hand or in a dishwasher using a low 

temperature and a short wash cycle.
Cleaning in a dishwasher may cause the metal grease filter to 

discolour, but this in no way affects its filtering efficiency.

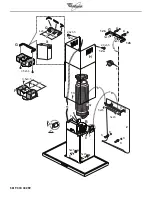
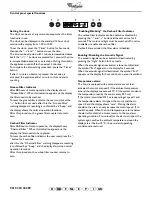
Remove the grease filter - Fig. 2

Remove the grease filter by turning the knobs 

(g)

 that secure 

it to the hood through 90°, then remove downwards.
To refit the grease filter proceed in reverse order.

Carbon filter maintenance

Retains any unpleasant odours produced during 

cooking.

Unlike traditional carbon filters, this carbon filter can be 

washed and reactivated.
With normal hood use, the filter should be cleaned once a 

month. The best way to clean the filter is in a dishwasher at 

the highest temperature possible, using a normal dishwasher 

detergent. To avoid particles of food or dirt settling on the 

filter during washing and giving rise to unpleasant smells, it is 

advisable to wash the filter on its own. After washing, dry the 

filter in the oven at 100°C for 10 minutes to reactivate it.
The filter will retain its odour-absorbing capacity for three 

years, after which it must be replaced.

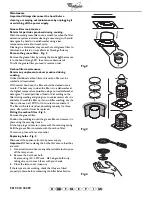
Fitting the carbon filter - Fig. 3

Remove the grease filter.
Position the wadding around the grease filter and secure it in 

place using the securing device.
Fit the top plug and secure in place with the retaining spring.
Refit the grease filter complete with the carbon filter.
To remove, proceed in reverse order.

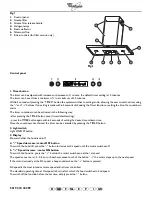
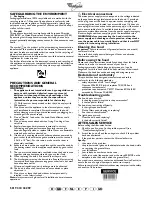
Replacing bulbs - Fig. 4

Disconnect the appliance from the power supply.

Important! 

When replacing the bulbs, first ensure that they 

are cold.

1.

Use a small screwdriver or any other suitable tool to prise 

off the lamp cover.

2.

Remove the burnt-out bulb.

Replace using 12V -20W max - G4 halogen bulbs only, 

taking care not to touch them with your hands.

3.

Close the lamp cover (snap-on).

If the lamps are not working, check that they are fitted 

properly in place before contacting the After Sales Service.

Fig.2

Fig.3

Fig.4

I

F

NL

E

P

GB

D

GR

Summary of Contents for AKR 968

Page 1: ...persons FICHE D INSTALLATION La distance minimum entre la surface de support des récipients sur le dispositif de cuisson et la partie la plus basse de la hotte ne doit pas être inférieure à 50 cm pour les cuisinières électriques et à 65 cm pour les cuisinières à gaz ou mixtes Si les instructions d installation du dispositif de cuisson à gaz indiquent une distance supérieure il est nécessaire de la...

Page 2: ...do exaustor devem ser feitas por pelo menos duas ou mais pessoas SCHEDA INSTALLAZIONE La distanza minima fra la superficie di supporto dei recipienti sul dispositivo di cottura e la parte più bassa della cappa da cucina deve essere non inferiore a 50 cm in caso di cucine elettriche e di 65 cm in caso di cucine a gas o miste Se le istruzioni di installazione del dispositivo di cottura a gas specifi...

Page 3: ...5019 318 33259 X X G 10 13 12a 12a B H 7 8 7 8 8 7 9 9 6 6 2 3 1 3 3 3 3 12b 12b 5 G 4 4 4 11 G F X F 5x45 5x45 2 9x6 5 2 9x6 5 4x8 5x45 5x45 5x45 5x45 3 5x6 5 3 5x6 5 ...

Page 4: ...ge of the hood 3 Place the lower support bracket on the hole diagram so that it matches the dotted rectangle mark the two external holes and drill Note Drill all the holes indicated on the template the top 2 holes are for hanging the hood and the bottom holes generally 1 central or 2 side holes are for fixing it securely to the wall Remove the hole diagram insert the wall plugs and fix the hood su...

Page 5: ...setting press the TIMER button again within 5 seconds of setting the desired countdown time Once the countdown has started the timer can be cancelled by pressing the TIMER button 2 Light switch Light ON OFF button 3 Display Shows whether the hood is on off 4 Speed decrease motor OFF button To switch the hood off press the button to decrease the speed until the motor switches off 5 Speed increase m...

Page 6: ...r this the Charcoal Filter warning disappears resetting is confirmed by a beep and the display shows the normal operation functions After this procedure the carbon filter counter returns to zero Enabling Disabling the Carbon Filter Indicator The carbon filter indicator can be enabled or disabled by pressing the and buttons at the same time for 5 seconds The motor and light must be switched off in ...

Page 7: ...the highest temperature possible using a normal dishwasher detergent To avoid particles of food or dirt settling on the filter during washing and giving rise to unpleasant smells it is advisable to wash the filter on its own After washing dry the filter in the oven at 100 C for 10 minutes to reactivate it The filter will retain its odour absorbing capacity for three years after which it must be re...

Page 8: ... air discharge must be observed 10 The hood is not a shelf therefore do not overload or place objects on it 11 Do not use or leave the hood without its lamps correctly installed risk of electric shock Note always wear work gloves for all installation and maintenance operations Electrical connections The mains power supply must correspond to the voltage indicated on the appliance rating plate locat...

Reviews: