background image

GB14

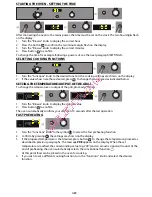
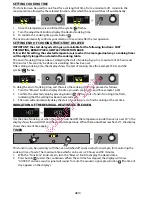
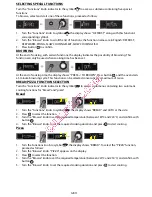
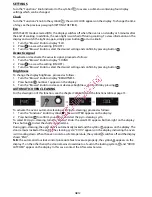
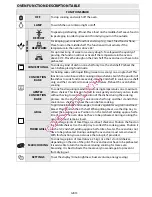
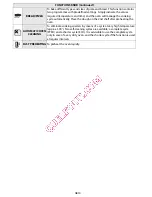
BREAD/PIZZA

To bake different types and sizes of pizza and bread. This function contains 
two programmes with predefined settings. Simply indicate the values 
required (temperature and time) and the oven will manage the cooking 
cycle automatically. Place the dough on the 2nd shelf after preheating the 
oven.

AUTOMATIC OVEN 

CLEANING

To eliminate cooking spatters by means of a cycle at very high temperature 
(approx. 500°). Two self-cleaning cycles are available: a complete cycle 
(PYRO) and a shorter cycle (ECO). It is advisable to use the complete cycle 
only in case of a very dirty oven, and the shorter cycle if the function is used 
at regular intervals.

FAST PREHEATING

To preheat the oven rapidly.

FUNCTIONS KNOB (Continued)

Summary of Contents for AKZ 483

Page 1: ...User and maintenance manual Manuel d utilisation et d entretien AKZ 483 ...

Page 2: ......

Page 3: ...ucted in its use by those responsible for their safety The accessible parts of the appliance may become very hot during use Young children should be kept away from the appliance and supervised to ensure that they do not play with it During and after use do not touch the heating elements or interior surfaces of the appliance risk of burns Do not allow the appliance to come into contact with cloths ...

Page 4: ...MMENDATIONS Before use Remove cardboard protection pieces protective film and adhesive labels from accessories Remove the accessories from the oven and heat it at 200 for about an hour to eliminate the smell and fumes from the insulating materials and protective grease During use Do not place heavy objects on the door as they could damage it Do not cling to the door or hang anything from the handl...

Page 5: ... Wait until it unlocks automatically see paragraph Cleaning cycle of ovens with pyrolysis function The electronic programmer does not work If the display shows the letter followed by a number contact your nearest After sales Service Specify in this case the number that follows the letter Before calling the After Sales Service 1 See if you can solve the problem yourself with the help of the suggest...

Page 6: ...which could damage the catalytic surface and ruin its self cleaning properties Operate the oven empty with the fan assisted function at 200 C for about one hour Next leave the appliance to cool down before removing any food residue with a sponge Cleaning cycle of ovens with pyrolysis function if present This function burns off spatters produced inside the oven during cooking at a temperature of ap...

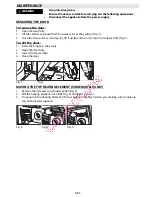
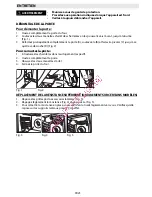
Page 7: ...the two catches 4 Close the door MOVING THE TOP HEATING ELEMENT SOME MODELS ONLY 1 Remove the side accessory holder grilles Fig 3 2 Pull the heating element out a little Fig 4 and lower it Fig 5 3 To reposition the heating element lift it up pulling it slightly towards you making sure it comes to rest on the lateral supports MAINTENANCE WARNING Use protective gloves Ensure the oven is cold before ...

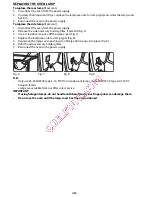
Page 8: ... a screwdriver to prise off the lamp cover Fig 7 4 Replace the lamp see note for lamp type Fig 8 5 Reposition the lamp cover pushing it on firmly until it snaps into place Fig 9 6 Refit the side accessory holder grilles 7 Reconnect the oven to the power supply N B Only use 25 40W 230V type E 14 T300 C incandescent lamps or 20 40W 230 V type G9 T300 C halogen lamps Lamps are available from our Afte...

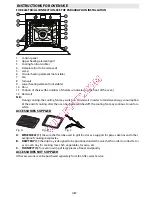
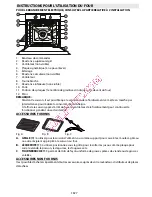
Page 9: ...nergy consumption At the end of cooking after the oven has been switched off the cooling fan may continue to run for a while ACCESSORIES SUPPLIED A WIRE SHELF 1 the wire shelf can be used to grill food or as a support for pans cake tins and other ovenproof cooking receptacles B DRIP TRAY 1 the drip tray is designed to be positioned under the wire shelf in order to collect fat or as an oven tray fo...

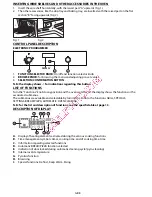
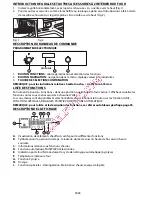
Page 10: ...sition and the oven switches on the display shows the functions or the associated submenus The submenus are available and selectable by turning the knob to the functions GRILL SPECIALS SETTINGS BREAD PIZZA AUTOMATIC OVEN CLEANING N B for the list and description of functions see the specific table at page 13 DESCRIPTION OF DISPLAY A Display of heating elements activated during the various cooking ...

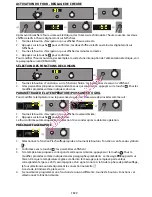
Page 11: ... change the temperature or output of the grill proceed as follows 1 Turn the Browse knob to display the desired value 2 Press button to confirm The oven automatically confirms your selection 10 seconds after the last operation FAST PREHEATING 1 Turn the Functions knob to the symbol to select the fast preheating function 2 Confirm by pressing the settings are shown on the display 3 If the proposed ...

Page 12: ... example 15 45 and the symbol flashes To delay the end of cooking time and thus also the cooking start time proceed as follows 1 Turn the Browse knob to display the time you wish cooking to end for example 16 00 2 Confirm the selected value by pressing button the two dots of end of cooking time flash indicating that the setting has been made correctly 3 The oven will automatically delay the start ...

Page 13: ...inute browning cycle This function can be selected consecutively a maximum of twice BREAD PIZZA FUNCTION SELECTION Turn the Functions knob indicator to the symbol to access a submenu containing two automatic cooking functions for bread and pizza Bread 1 Turn the Functions knob to symbol the display shows BREAD and AUTO at the side 2 Press to select the function 3 Turn the Browse knob to set the re...

Page 14: ...e knob to display BRIGHTNESS 2 Press button number 1 appears on the display 3 Turn the Browse knob to increase or decrease brightness and confirm by pressing AUTOMATIC OVEN CLEANING For the description of this function see the chapter CLEANING and the functions table at page 13 To activate the oven s automatic cleaning cycle pyro cleaning proceed as follows 1 Turn the Functions knob to symbol the ...

Page 15: ...ing medium low cooking temperatures on a maximum of two shelves This function is used to cook gently and slowly on two levels without having to switch the position of the dishes during the cooking process Use the 2nd shelf to cook on one shelf only and the 1st and 4th to cook on two shelves Preheat the oven before cooking GRILL To grill steak kebabs and sausages to cook vegetables au gratin and to...

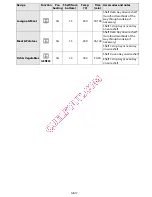
Page 16: ...e dough on the 2nd shelf after preheating the oven AUTOMATICOVEN CLEANING To eliminate cooking spatters by means of a cycle at very high temperature approx 500 Two self cleaning cycles are available a complete cycle PYRO and a shorter cycle ECO It is advisable to use the complete cycle only in case of a very dirty oven and the shorter cycle if the function is used at regular intervals FAST PREHEAT...

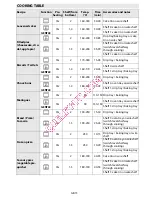
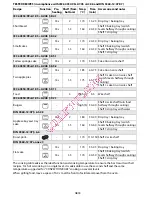
Page 17: ...es 2 180 200 30 40 Drip tray baking tray GENTLE Yes 1 4 180 190 35 45 Shelf 4 oven tray on wire shelf Shelf 1 drip tray baking tray Meringues Yes 2 90 110 150 Drip tray baking tray GENTLE Yes 1 4 90 130 150 Shelf 4 oven tray on wire shelf Shelf 1 drip tray baking tray Bread Pizza Focaccia Yes 2 190 250 15 50 Drip tray baking tray Yes 1 3 190 250 25 45 Shelf 3 oven tray on wire shelf switch levels ...

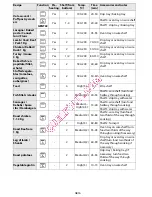
Page 18: ...elf Fish fillets steaks 4 Medium 2 20 35 Shelf 4 wire shelf turn food halfway through cooking Shelf 3 drip tray with water Sausages Kebabs Spare ribs Hamburgers 4 Medium High 2 3 15 40 Shelf 4 wire shelf turn food halfway through cooking Shelf 3 drip tray with water Roast chicken 1 1 3 Kg 2 Medium 2 50 65 Shelf 2 wire tray turn food two thirds of the way through cooking 2 High 3 60 80 Shelf 2 Turn...

Page 19: ...f Meat Potatoes Yes 1 3 200 45 100 Shelf Oven tray on wire shelf turn food two thirds of the way through cooking if necessary Shelf 1 drip tray or oven tray on wire shelf Fish Vegetables GENTLE Yes 1 4 180 30 50 Shelf 4 oven tray on wire shelf Shelf 1 drip tray or oven tray on wire shelf Recipe Function Pre heating Shelf from bottom Temp C Time min Accessories and notes ...

Page 20: ...es 1 3 160 20 30 Shelf 3 baking tray switch levels halfway through cooking Shelf 1 drip tray IEC 60350 99 A1 05 A2 08 8 5 1 Fatless sponge cake Yes 2 170 35 45 Cake tin on wire shelf IEC 60350 99 A1 05 A2 08 8 5 2 Two apple pies Yes 2 185 60 75 Cake tin on wire shelf Yes 1 3 175 65 75 Shelf 3 cake tin on wire shelf switch levels halfway through cooking Shelf 1 cake tin on wire shelf IEC 60350 99 A...

Page 21: ...For sweets with moist fillings cheesecake or fruit pies use the CONVECTION BAKE function If the base of the cake is soggy lower the shelf and sprinkle the bottom of the cake with breadcrumbs or biscuit crumbs before adding the filling Meat Use any kind of oven tray or pyrex dish suited to the size of the piece of meat being cooked For roast joints it is best to add some stock to the bottom of the ...

Page 22: ...e ou d un réglage erroné des commandes Les personnes y compris les enfants qui en raison de leurs capacités physiques sensorielles ou mentales de leur inexpérience ou de leur méconnaissance ne sont pas en mesure d utiliser l appareil en toute sécurité doivent se servir de l appareil uniquement sous la surveillance ou en se conformant aux instructions d une personne responsable Les parties accessib...

Page 23: ...staller l appareil et éliminez soigneusement les copeaux et la sciure de bois On ne doit plus pouvoir accéder à la partie inférieure du four une fois l installation terminée Afin de garantir le bon fonctionnement de l appareil veillez à ne pas obstruer l ouverture minimale prévue entre le plan de travail et la partie supérieure du four BRANCHEMENT DE L APPAREIL Vérifiez que la tension figurant sur...

Page 24: ...t la fin du temps de cuisson réglé En cas d aliments nécessitant un temps de cuisson relativement long ceux ci continueront néanmoins à cuire en utilisant la chaleur résiduelle du four Ce four qui est destiné à entrer en contact avec des denrées alimentaires est conforme au règlement n 1935 2004 Il a été conçu fabriqué et commercialisé conformément aux exigences de sécurité de la directive Basse T...

Page 25: ...ou de détergents abrasifs Si l un de ces produits entre en contact avec le four essuyez le immédiatement à l aide d un chiffon humide Nettoyez les surfaces à l aide d un chiffon humide Si celles ci sont particulièrement sales utilisez une solution d eau additionnée de quelques gouttes de détergent à vaisselle Essuyez à l aide d un chiffon doux Enceinte du four REMARQUE IMPORTANTE évitez l emploi d...

Page 26: ...de une fois que le four est froid Il n est pas nécessaire de procéder à un nettoyage par pyrolyse après chaque cuisson mais seulement si le degré de salissure est important en présence de fumées et d odeurs désagréables tant en phase de préchauffage qu en phase de cuisson Si le four est installé sous une table de cuisson vérifiez que les brûleurs ou les plaques chauffantes sont éteints avant de la...

Page 27: ...lètement la porte 3 Abaissez les deux manettes d arrêt 4 Fermez la porte du four DÉPLACEMENTDELARÉSISTANCESUPÉRIEURE UNIQUEMENTSURCERTAINSMODÈLES 1 Déposez les grilles porte accessoires latérales Fig 3 2 Dégagez légèrement la résistance Fig 4 et abaissez la Fig 5 3 Pour remettre la résistance en place soulevez la en la tirant légèrement vers vous Vérifiez qu elle repose sur les supports latéraux p...

Page 28: ...rûlée par une ampoule neuve voir Remarque pour connaître le type Fig 8 5 Réinstallez le capot de l ampoule en le poussant contre la paroi de façon à l accrocher correctement Fig 9 6 Remontez les grilles porte accessoires latérales 7 Rebranchez le four REMARQUE Utilisez uniquement des ampoules à incandescence de 25 40W 230V type E 14 T300 C ou des ampoules halogènes de 20 40W 230 V type G9 T300 C C...

Page 29: ...ergie À la fin de la cuisson après l arrêt du four le ventilateur de refroidissement peut continuer de fonctionner pendant un certain temps ACCESSOIRES FOURNIS A GRILLE 1 à utiliser pour la cuisson d aliments ou comme support pour casseroles moules à gâteau ou autre récipient approprié à la cuisson au four B LÈCHEFRITE 1 à utiliser positionnée sous la grille pour récolter les jus ou comme plaque p...

Page 30: ...ition quelconque le four s active l afficheur visualise les fonctions ou les sous menus associés à chacune d elles Les sous menus sont disponibles et sélectionnables en positionnant le bouton sur les fonctions GRIL FONCTIONS SPÉCIALES RÉGLAGES PAIN PIZZA NETTOYAGE AUTOMATIQUE REMARQUE pour la liste et la description des fonctions se référer au tableau spécifique page 33 DESCRIPTION DE L AFFICHAGE ...

Page 31: ... DE LA TEMPÉRATURE PUISSANCE DU GRIL Pour modifier la température ou la puissance du gril il est nécessaire de procéder comme suit 1 Tournez le bouton Navigation pour afficher la valeur désirée 2 Appuyez sur la touche pour confirmer Le four confirme automatiquement la sélection 10 secondes après la dernière opération PRÉCHAUFFAGE RAPIDE 1 Sélectionnez la fonction Préchauffage rapide en tournant le...

Page 32: ...e de fin cuisson par exemple 15 45 et le symbole clignote Pour retarder la fin de la cuisson en retardant l allumage du four procédez comme suit 1 Tournez le bouton Navigation jusqu à la visualisation de l heure à laquelle vous désirez terminer la cuisson par exemple 16 00 2 Confirmez la valeur choisie avec la touche les deux points de l heure de fin de cuisson clignotent pour indiquer que le para...

Page 33: ...che le four lance la phase de Dorage pendant 5 minutes Cette fonction ne peut être effectuée que deux fois SÉLECTION FONCTION PAIN PIZZA En positionnant l indicateur du bouton Fonctions en face du symbole on accède à un sous menu contenant deux fonctions automatiques de cuisson pour pain et pizza Pain 1 Tournez le bouton Fonctions sur le symbole l afficheur visualise BREAD pain avec à côté AUTO 2 ...

Page 34: ...an procédez comme suit 1 Tournez le bouton Navigation jusqu à ce que l inscription BRIGHTENESS s affiche 2 Appuyez sur la touche le numéro 1 apparaît sur l écran 3 Tournez le bouton Navigation pour augmenter ou diminuer la luminosité et confirmez avec la touche NETTOYAGE AUTOMATIQUE DU FOUR Pour la description de cette fonction voir le chapitre NETTOYAGE et le tableau des fonctions page 33 Pour la...

Page 35: ...empératures de cuisson moyenne basse La fonction permet de cuire déli catement et progressivement sur deux gradins sans devoir inverser la posi tion des aliments pendant la cuisson Utilisez le 2e gradin pour les cuissons sur un seul gradin le 1er et le 4ème pour les cuissons sur deux gradins Pré chauffez le four avant d y introduire les aliments GRIL Pour cuire les entrecôtes les brochettes les sa...

Page 36: ...iveau après préchauffage NETTOYAGE AUTOMATIQUE Pour éliminer les salissures engendrées au cours de la cuisson au moyen d un cycle à très haute température environ 500 Il est possible de sélec tionner parmi deux cycles de nettoyage automatique un cycle complet PYRO et un cycle réduit ECO Nous suggérons d utiliser le cycle complet uniquement en cas de four très sale et le cycle réduit si l on utilis...

Page 37: ...te plaque à pâtisse rie DÉLICATE Oui 1 4 160 170 20 45 Grad 4 grille Grad 1 lèchefrite plaque à pâtisserie Choux ronds Oui 2 180 200 30 40 Lèchefrite plaque à pâtisse rie DÉLICATE Oui 1 4 180 190 35 45 Grad 4 plaque sur grille Grad 1 lèchefrite plaque à pâtisserie Meringues Oui 2 90 110 150 Lèchefrite plaque à pâtisse rie DÉLICATE Oui 1 4 90 130 150 Grad 4 plaque sur grille Grad 1 lèchefrite plaqu...

Page 38: ...arcis tomates courget tes aubergines Oui 2 180 200 50 60 Plaque sur grille Pain grillé 4 Haut 3 3 5 Grille Filets darnes de poisson 4 Moyen 2 20 35 Grad 4 grille tourner l ali ment à mi cuisson Grad 3 lèchefrite avec eau Saucisses Brochet tes Pointes de porc Hamburger 4 Moyen Haut 2 3 15 40 Grad 4 grille tourner l ali ment à mi cuisson Grad 3 lèchefrite avec eau Poulet rôti 1 1 3 Kg 2 Moyen 2 50 6...

Page 39: ...lle Viande Pommes de terre Oui 1 3 200 45 100 Grad 3 Plaque sur grille tourner l aliment après 2 3 de la cuisson si nécessaire Grad 1 lèchefrite ou plaque sur grille Poissons Légu mes DÉLICATE Oui 1 4 180 30 50 Grad 4 plaque sur grille Grad 1 lèchefrite ou plaque sur grille Recette Fonction Pré chauffage Gradin du bas Temp C Durée min Accessoires et notes ...

Page 40: ...sserie Oui 1 3 160 20 30 Grad 3 plaque à pâtisserie inver ser les gradins à mi cuisson Grad 1 lèchefrite IEC 60350 99 A1 05 A2 08 8 5 1 Gênoise sans matières grasses Fatless sponge cake Oui 2 170 35 45 Moule à gâteau sur grille IEC 60350 99 A1 05 A2 08 8 5 2 Deux tartes aux pommes Two apple pies Oui 2 185 60 75 Moule à gâteau sur grille Oui 1 3 175 65 75 Grad 3 moule à gâteau sur grille inverser l...

Page 41: ... le gâteau pourrait ne pas lever de manière homogène sur le pourtour Si le gâteau se dégonfle durant la cuisson la fois suivante utilisez une température inférieure vous pouvez également réduire la quantité de liquide et mélanger plus délicatement la pâte La pâtisserie avec farce juteuse gâteaux au fromage ou avec des fruits requiert la fonction CONVECTION FORCÉE Si le fond de la tarte est trop hu...

Page 42: ... après 2 3 de la cuisson Fonction levage de la pâte Il est conseillé de couvrir la pâte avec un torchon humide avant de la mettre au four Les temps de levage dans cette fonction diminuent d environ un tiers par rapport aux temps de levage à température ambiante 20 25 C Le temps de levage pour 1 k g de pâte à pizza est d environ une heure ...

Page 43: ......
Page 44: ...Printed in Italy 12 2011 5019 310 01368 Whirlpool is a registered trademark of Whirlpool USA GB FR ...

Reviews: