39
INSTALLING INDOOR UNIT
Installing Wall-Mount Frame
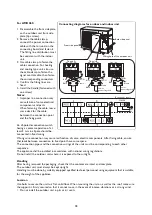
1. Level with plumb line or spirit level. As the drain outlet is on the left side, it is better for the left side to
be lower when adjusting the wall-mounted board;
2. Use screws to secure the wall-mount frame on the wall;
3. After installation is completed, manually pull the wall-mount frame to check that it is secured. The
mounted frame must be able to withstand the weight of an adult (60kg) and the fastening screws
should have relatively even stress.
Wall Opening and Wall Pipe Installation
1. After deciding the position of the pipe according
to the above Figure, drill a tapered hole (Ø 55);
2. To prevent the fitting pipe and the cable passing
through the wall from being harmed and also to
protect the hollow wall from rats, it is necessary
to install a wall pipe.
Installing Drainage Pipe
1. The flexible drainage pipe must be tilted
downward to allow the water to drain;
2. Make sure not to kink, hump or distort drainage
pipe in the layout and not to immerse the outlet
in water;
3. Extended part of flexible drainage pipe passing
through the indoor unit must be wrapped in
thermal insulation material.
Indicated at the middle position
Level Meter
Wall
More than 150 mm
from the wall
More than 150mm
from the wall
Left Side Ø 55 mm
Right Side Ø 55 mm
Wall Hole for Rear Exit-Tube
Wall Hole for Rear Exit-Tube
Indoor
Outdoor
Wall Pipe
Sealing Paste
Ø 55
Ridge
Twist
Do not immerse in water
Wall


