background image

18

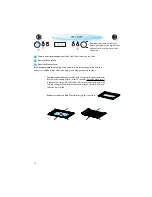
C

O

NVENTI

O

NAL + MW

  T

URN


THE


MULTIFUNCTION


KNOB


 to the conventional position

.

  T

URN


THE


ADJUST


KNOB


 to the conven MW position

.

  P

RESS


THE

 OK 

BUTTON


 to confirm your selection

.

 You will automatically be taken to the next 

settin

g

 (default temperature is displayed

).

  T

URN


THE


ADJUST


KNOB


 to set the temperature

.

  P

RESS


THE

 OK 

BUTTON


 to confirm your selection

.

 You will automatically be taken to the next 

settin

g

 (default power level is displayed

).

  T

URN


THE


ADJUST


KNOB


 to set the microwave power level

.

  P

RESS


THE

 OK 

BUTTON


 to confirm your selection

.

 You will automatically be taken to the next 

settin

g

 (default cookin

g

 time is displayed

).

  T

URN


THE


ADJUST


KNOB


 to set the cookin

g

 time

.

  P

RESS


THE

 S

TART


BUTTON

U

SE


THIS


FUNCTION


 to bake fruit 

cakes, tin bread and frozen con-
venience food

.



 

C

O

NVENTI

O

NAL + MW

P

O

WER

S

UGGESTE

D


USE

:

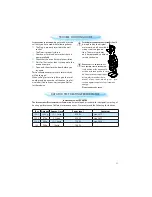
350 W

C

OOKING


 frozen convenience 

food

160 W

C

OOKING


 fruit cake

  90 W

B

AKING


 Cakes, bread

SHELF LEVEL

L

EVEL

S

UGGESTE

D


USE

:

3

F

ROZEN


CONVENIENCE


FOOD

2

F

RUIT


CAKE

1

C

AKES

BREAD

ke

f

ru

it

Summary of Contents for AMW 696

Page 1: ...HELYEZÉS RÖVID KEZDÉSI ÚTMUTATÓ INSTALACE NÁVOD VE ZKRATCE INSTALACJA SKRÓCONA INSTRUKCJA OBSŁUGI УСТАНОВКА КРАТКОЕ СПРАВОЧНОЕ РУКОВОДСТВО INŠTALÁCIA ÚVODNÁ PRÍRUČKA INSTALLATION DÉMARRAGE RAPIDE AUFSTELLUNG KURZANLEITUNG INSTALLAZIONE GUIDA RAPIDA INICIO RÁPIDO PARA LA INSTALACIÓN INSTALAÇÃO GUIA DE INICIAÇÃO RÁPIDA INSTALLATION SNABBGUIDE ...

Page 2: ...b serve these instructions DO NOT OPERATE THIS APPLIANCE if it has a damaged mains cord or plug if it is not working proper ly or if it has been damaged or dropped Do not immerse the mains cord or plug in water Keep the cord away from hot surfaces Electri cal shock fire or other hazards may result ENSURE the oven cavity is empty before mount ing CHECK THAT THE VOLTAGE on the rating plate corre spo...

Page 3: ...ST USE TURN THE MULTIFUNCTION KNOB until you find the Pre Heat function TURN THE ADJUST KNOB to set the temperature to 250 C PRESS THE START BUTTON WHEN THE TEMPERATURE IS REACHED the oven keeps the set temperature for 10 minutes before switching off LET THE OVEN COOL TO ROOM TEMPERATURE WIPE AND CLEAN THE OVEN cavity with a damp kitchen paper ...

Page 4: ...that the child is able to use the appliance in a safe way and understands the hazards of improper use THIS APPLIANCE IS NOT INTENDED FOR use by persons including children with reduced physical sensory or mental capabilities unless used under the supervision of a person responsible for their safety WARNING ACCESSIBLE PARTS MAY BECOME HOT during use young children should be kept away DO NOT USE YOUR...

Page 5: ...d let the teaspoon remain in the container 3 After heating allow standing for a short time stirring again before carefully re moving the container from the oven CAREFUL ALWAYS REFER to a microwave cookbook for de tails Especially if cooking or reheating food that contains alcohol AFTER HEATING BABY FOOD or liquids in a baby bottle or in a baby food jar always stir and check the temperature before ...

Page 6: ...il the interior of the oven ALWAYS USE THE GLASS DRIP TRAY when using mi crowaves It shall be placed on shelf level 1 Avoid placing vessels directly on the oven bot tom WIRE SHELF USE THE WIRE SHELF with all cooking methods ex cept when using the Microwave function only The Wire shelf allows hot air circulation around the food and can be placed with the high end up or down to adjust the distance f...

Page 7: ...E DONENESS can only be set or altered during the first 20 seconds of operation THIS IS DONE BY SELECTING A DONENESS LEVEL with the adjust knob right after you have pressed the Start button START PROTECTION KEY LOCK THIS AUTOMATIC SAFETY FUNCTION IS ACTIVATED ONE MINUTE AFTER the oven has returned to stand by mode The oven is in stand by when the 24 hour clock is displayed or if the clock has not b...

Page 8: ...ches off au tomatically WHEN USING SOME OF THE AUTO FUNCTIONS the oven may stop depending on the chosen program and food class and prompt you to STIR FOOD or TURN FOOD STIR OR TURN FOOD AUTO FUNCTIONS ONLY FOOD CLASSES AUTO FUNCTIONS ONLY TO CONTINUE COOKING Open the door Stir or turn the food Close the door and restart by pressing the Start button FOR FOOD NOT LISTED IN THE TABLES and if the weig...

Page 9: ...st Clock Sound ECO Brightness PRESS THE STOP BUTTON TO EXIT the settings function and save all your changes when you are done PRESS THE OK BUTTON The left right hand digits hours flicker TURN THE ADJUST KNOB to set the hours PRESS THE OK BUTTON The two right hand digits minutes flicker TURN THE ADJUST KNOB to set the minutes PRESS THE OK BUTTON again to confirm the change THE CLOCK IS SET AND IN O...

Page 10: ... ADJUST KNOB to turn the ECO setting ON or OFF PRESS THE OK BUTTON again to confirm the change WHEN ECO IS ON the display will automatically turn off after a while to save energy It will automatically light up again when a button is pressed or the door is opened WHEN OFF IS SET the display will not turn off and the 24 h clock will always be visible CHANGING SETTINGS ...

Page 11: ... OK BUTTON You will automatically be taken to the next setting TURN THE ADJUST KNOB to set the Cooking End Time PRESS THE OK BUTTON again Delayed Start is automatically activated and the oven starts when the time left to ready time equals the cooking time set DELAYED START WORKS WITH THESE FUNCTIONS CONVENTIONAL GRILL TURBO GRILL CONVECTION BAKE CHANGING SETTINGS BRIGHTNESS PRESS THE OK BUTTON TUR...

Page 12: ...OB to the zero position The clock is displayed if it has been set else the display will be blank PRESS THE OK BUTTON to invoke setting mode TURN THE ADJUST KNOB TO SET THE TIME to measure THE KITCHEN TIMER AUTOMATICALLY STARTS the countdown after 3 seconds Press the Start button to if you wish to start sooner AN ACOUSTIC SIGNAL will be heard when the timer has finished to count down PRESSING THE S...

Page 13: ...RESSING THE BUTTON you may return to where you can change cooking time and power level Both can be altered with the adjust knob during cooking USE THIS FUNCTION for normal cook ing and reheating such as vege tables fish potatoes and meat ALWAYS USE THE GLASS DRIP TRAY when using this function MICROWAVES ONLY POWER SUGGESTED USE 850 W REHEATING OF BEVERAGES water clear soups coffee tea or other foo...

Page 14: ...n is in standby mode when you begin you may go directly to step 3 THIS FUNCTION IS USED for quick re heating of food with a high water content such as clear soups cof fee or tea THIS FUNCTION AUTOMATICALLY STARTS with maximum microwave power level and the cooking time set to 30 seconds Each additional press increases the time with 30 seconds You may also alter the time by turning the adjust knob t...

Page 15: ...ist ties THE SHAPE OF THE PACKAGE alters the de frosting time Shallow packets defrost more quickly than a deep block SEPARATE PIECES as they begin to defrost Individual slices defrost more easily SHIELD AREAS OF FOOD with small pieces of aluminum foil if they start to become warm e g chicken legs and wing tips BOILED FOOD STEWS AND MEAT SAUCES defrost better if stirred during defrosting time WHEN ...

Page 16: ...reheating in the oven It will be burned from the intense heat DURING THE HEATING PROCESS the current oven temperature is displayed and rising until the set temperature is reached ONCE THE HEATING PROCESS has been started the temperature can easily be adjusted by turning the adjust knob WHEN THE SET TEMPERATURE IS REACHED The oven then keeps the set tem perature for 10 minutes before switching off ...

Page 17: ...e taken to the next setting default cooking time is displayed TURN THE ADJUST KNOB to set the cooking time PRESS THE START BUTTON NOTE If time is not set this function will run until you open the door or press the Stop button If you don t interrupt this function it will automatically shut off after 4 hours WHEN COOKING FOOD IN DISHES place the dishes on the Wire shelf USE BAKING PLATE for rolls an...

Page 18: ...ext setting default power level is displayed TURN THE ADJUST KNOB to set the microwave power level PRESS THE OK BUTTON to confirm your selection You will automatically be taken to the next setting default cooking time is displayed TURN THE ADJUST KNOB to set the cooking time PRESS THE START BUTTON USE THIS FUNCTION to bake fruit cakes tin bread and frozen con venience food CONVENTIONAL MW POWER SU...

Page 19: ...unction it will automatically shut off after 4 hours DO NOT LEAVE THE OVEN DOOR OPEN for long periods when the Grill is in operation as this will cause a drop in temperature FOR FOOD LIKE cheese toast steaks and sausages Preheat the grill el ement for 3 min for best result Place food on the wire shelf and place the wire shelf in the Glass Drip Tray to collect the juices ENSURE THAT THE UTENSILS us...

Page 20: ...ting TURN THE ADJUST KNOB to set the Grill power level PRESS THE OK BUTTON to confirm your selection You will automatically be taken to the next setting TURN THE ADJUST KNOB to set the Microwave power level PRESS THE OK BUTTON to confirm your selection You will automatically be taken to the next setting TURN THE ADJUST KNOB to set the cooking time PRESS THE START BUTTON THE MAX POSSIBLE microwave ...

Page 21: ...THE OK BUTTON to confirm your selection You will automatically be taken to the next setting TURN THE ADJUST KNOB to set the cooking time PRESS THE START BUTTON NOTE If time is not set this function will run until you open the door or press the Stop button If you don t interrupt this function it will automatically shut off after 4 hours USE THIS FUNCTION TO cook such food as stuffed vegetables chic...

Page 22: ...yed TURN THE ADJUST KNOB to set the microwave power level PRESS THE OK BUTTON to confirm your selection You will automatically be taken to the next setting TURN THE ADJUST KNOB to set the cooking time PRESS THE START BUTTON THE MAX POSSIBLE microwave power level when using the Turbo Grill MW is limited to a factory preset level USE THIS FUNCTION TO cook such food as Gratin s Lasagne Poultry and Ba...

Page 23: ...ection You will automatically be taken to the next setting default cooking time is displayed TURN THE ADJUST KNOB to set the cooking time PRESS THE START BUTTON NOTE If time is not set this function will run until you open the door or press the Stop button If you don t interrupt this function it will automatically shut off after 4 hours WHEN COOKING FOOD IN DISHES place the dishes on the Wire shel...

Page 24: ... automatically be taken to the next setting default power level is displayed TURN THE ADJUST KNOB to set the microwave power level PRESS THE OK BUTTON to confirm your selection You will automatically be taken to the next setting default cooking time is displayed TURN THE ADJUST KNOB to set the cooking time PRESS THE START BUTTON USE THIS FUNCTION to cook fruit pies cakes and frozen quiches CONVECT...

Page 25: ...HIS FUNCTION to maintain the food at serving temperature 60 C for any length of time DOUGH PROVING TURN THE MULTIFUNCTION KNOB to the Keep Warm position TURN THE ADJUST KNOB to select Dough Proving PRESS THE OK BUTTON to confirm your selection You will automatically be taken to the next setting default Dough proving time is displayed TURN THE ADJUST KNOB to set the Dough proving time PRESS THE STA...

Page 26: ...e next setting default weight is displayed TURN THE ADJUST KNOB to set the weight PRESS THE OK BUTTON to confirm your selection The oven presents you with the recommend ed vessel to use PRESS THE OK BUTTON The oven presents you with the recommended accessory to use PRESS THE START BUTTON ENSURE the oven is at room temperature before using this function in order to obtain the best result SOME FOOD ...

Page 27: ...rator or plating a meal for reheating arrange the thicker denser food to the out side of the plate and the thinner or less dense food in the middle ALWAYS COVER FOOD when using this function ex cept when reheating chilled soups in which case a cover is not needed IF THE FOOD IS PACKAGED in such way that it already have a cover the package should be cut with 2 3 scores to allow for excess pressure ...

Page 28: ...H THE DEFROSTING PROCESS the oven stops and prompts you to TURN FOOD Open the door Turn the food Close the door and restart by pressing the Start button AT THE END OF THE DEFROSTING PROCESS the oven automatically switches to manual defrost mode and waits for you to set a time for further defrosting If no further defrosting is required at this time press the Stop button open the door and remove the...

Page 29: ...icrowaves and choose 160 W when defrosting AUTO DEFROST FOOD HINTS MEAT 100g 2 0Kg Minced meat cutlets steaks or roasts TURN FOOD when oven prompts POULTRY 100g 3 0Kg Chicken whole pieces or fillets TURN FOOD when oven prompts FISH 100g 2 0Kg Whole steaks or fillets TURN FOOD when oven prompts VEGETABLES 100g 2 0Kg Mixed vegetables peas broccoli etc TURN FOOD when oven prompts BREAD 100g 2 0Kg Loa...

Page 30: ...detergent or a paper towel with spray glass cleaner Apply spray glass cleaner to a paper towel DO NOT SPRAY directly on the oven AT REGULAR INTERVALS especially if spill overs have occurred remove the turntable the turntable support and wipe the base of the oven clean THIS OVEN IS DESIGNED to operate with the turnta ble in place DO NOT operate the microwave oven when the turntable has been removed...

Page 31: ...d by the original mains cord which is available via our service organiza tion The mains cord may only be replaced by a trained service technician SERVICE ONLY TO BE CARRIED OUT BY A TRAINED SERVICE TECHNICIAN It is hazardous for anyone oth er than a trained person to carry out any service or repair oper ation which involves the re moval of any cover which gives pro tection against exposure to micr...

Page 32: ... of this product THE SYMBOL on the product or on the docu ments accompanying the product indicates that this appliance may not be treated as household waste Instead it shall be handed over to the applicable collection point for the recycling of electrical and electronic equipment DISPOSAL must be carried out in accordance with lo cal environmental regula tions for waste disposal FOR MORE DETAILED ...

Reviews: