background image

9

COOKING FOOD

CLING FILM AND BAGS

RECOMMENDED USE AND TIPS

r

emove


wire


TwisT

-

Ties

 from paper or plastic bags 

before placing the bag in the microwave oven 
cavity.

c

ling


film


shoulD


be


scoreD

 or pricked with a fork 

to relieve the pressure and to prevent bursting 
because steam builds up during cooking.

s

ince


microwaves

 penetrate the food to a limited 

depth, if there are a number of pieces to cook at 
once, arrange the pieces in a circle to create 
more outside pieces.

s

mall


pieces

 cook more quickly than large pieces.

c

uT


fooD


into pieces of equal size for uniform 

cooking.

m

oisTure


evaporaTes

 during microwave cooking.

microwave

-

proof


cover

 on the container helps 

reduce moisture loss.

m

osT


fooDs


will


conTinue

 to cook after microwave 

has finished cooking it. Therefore, always allow 
for standing time to complete the cooking.

s

Tirring


is


usually


necessary


during microwave 

cooking. When stirring, bring the cooked 
portions on the outside edges towards the 
centre and the less-cooked centre portions 
towards the outside.

p

lace


Thin


slices


of


meaT


on top of each other or 

interlace them. Thicker slices such as meat loaf 
and sausages have to be placed close to each 
other.

LIQUIDS

l

iquiDs


may


overheaT


beyond boiling point 

without visibly bubbling. This could cause hot 
liquids to suddenly boil over.

T

o


prevenT


This


possibiliTy

:

q

  Avoid using straight-sided containers with 

narrow necks.

w

  Stir the liquid before placing the container 

in the microwave oven cavity and leave 
the teaspoon in the container.

e

  After heating, stir again before carefully 

removing the container from the 
microwave oven.

BABY FOOD

a

fTer


heaTing


baby


fooD

 or liquids in a baby bottle 

or in a baby food jar, always stir and check the 
temperature before serving.

T

his


will


ensure

 that the heat is evenly 

distributed and avoid the risk of scalding or 
burns.

e

nsure

 that the lid and the teat are removed 

before heating.

FROZEN FOOD

f

or


besT


resulTs

we recommend defrosting 

directly on the glass turntable. If needed, it is 
possible to use a light-plastic container that is 
suitable for microwave.

b

oileD


fooD

stews and meat sauces defrost 

better if stirred during the defrosting time.

s

eparaTe


pieces

 as they begin to defrost. 

Individual slices defrost more easily.

HOW TO READ THE COOKING TABLE

T

he


Table


inDicaTes


The


besT


funcTions

 to use for any 

given food. Cooking times, where indicated, 
start from the moment when food is placed in 
the microwave oven cavity, excluding pre-
heating (where required).

c

ooking


seTTings


anD


Times

 are purely for 

guidance and will depend on the amount of 

food and type of accessory used. Always cook 
food for the minimum cooking time given and 
check that is it cooked through.

T

o


obTain


The


besT


resulTs

,

 carefully follow the 

advice given in the cooking table regarding the 
choice of accessories (if supplied) to be used (if 
present).

Summary of Contents for AMW 850

Page 1: ... RÖVID KEZDÉSI ÚTMUTATÓ INSTALACE NÁVOD VE ZKRATCE INSTALACJA SKRÓCONA INSTRUKCJA OBSŁUGI УСТАНОВКА КРАТКОЕ СПРАВОЧНОЕ РУКОВОДСТВО INŠTALÁCIA ÚVODNÁ PRÍRUČKA INSTALLATION DÉMARRAGE RAPIDE AUFSTELLUNG KURZANLEITUNG INSTALLAZIONE GUIDA RAPIDA INICIO RÁPIDO PARA LA INSTALACIÓN INSTALAÇÃO GUIA DE INICIAÇÃO RÁPIDA INSTALLATION SNABBGUIDE AMW 850 ...

Page 2: ......

Page 3: ...romimproperuse oftheappliance Carefullyob servethefollowinginstructions Keep these instructions close at hand for future reference Use protective gloves to perform all unpacking and installation operations The appliance must be han dled and installed by two or more persons The appliance must be discon nected from the power supply before carrying out any instal lation work Installationandmaintenanc...

Page 4: ...ients in hotels motels and other residential environ ments Bed and breakfast type environments No other type of use is per mitted e g heating rooms or outdoor use The Manufacturer declines any liability for injury to per sons or animals or damage to property if these advices and precautions are not respected This appliance is intended to be used built in Do not use it freestanding or in a cabinet ...

Page 5: ...stible materials Fire could result Do not leave the appliance unattended especially when using paper plastic or other combustible materials in the cooking process Paper can char or burn and some plastics can melt if used when heating foods Use containers suitable for use in a microwave oven only Overheating the liquid beyond boiling point can occur with out evidence of bubbling This could result i...

Page 6: ...ning equipment Do not use harsh abrasive cleaners or sharp metal scrap ers to clean the appliance door glass since they can scratch the surface which may result in shattering of the glass Do not use corrosive chemi cals or vapors in this appli ance This type of appliance is specifically designed to heat or cook food It is not designed for industrial or laboratory use Do not remove any cover The do...

Page 7: ...ctronic Equipment WEEE By ensuring this product is disposed of correctly you will help prevent potential negative consequences for the environment and human health which could otherwise be caused by inappropriate waste handling of this product The symbol on the product or on the accompanying documentation indicates that it should not be treated as domestic waste but must be taken to an appropriate...

Page 8: ... other hazards may result If the power supply cord is too short have a qualified electrician or serviceman installer an outlet near the appliance The power supply cord must be long enough for connecting the appliance once fitting in its housing to the main power supply For installation to comply with current safety regulations an omnipolar switch with minimum contact gap of 3 mm must be utilized A...

Page 9: ...this possibility q Avoid using straight sided containers with narrow necks w Stir the liquid before placing the container in the microwave oven cavity and leave the teaspoon in the container e After heating stir again before carefully removing the container from the microwave oven BABY FOOD After heating baby food or liquids in a baby bottle or in a baby food jar always stir and check the temperat...

Page 10: ...arting the oven CRISP HANDLE Use the supplied special Crisp handle to remove the hot Crisp plate from the oven CRISP PLATE Place the food directly on the Crisp plate Always use the Glass turn table as support when us ing the Crisp plate Do not place any utensils on the Crisp plate since it will quickly be come very hot and is likely to cause damage to the utensil The Crisp plate may be preheated b...

Page 11: ... hinder chil dren from using the oven unat tended When the lock is active all buttons are non responsive 19 30 q Press tht BACK and OK buttons simultaneously and keep pressed until two beeps are heard 3 seconds Please note These buttons only work in conjunction when the oven is turned OFF A confirmation message is displayed for 3 seconds be fore returning to the previous view The Key Lock is deact...

Page 12: ... lev el with the Up Down buttons before pressing the Start button 400g WEIGHT Light DONENESS Fruit Pie 300g WEIGHT Normal DONENESS 8 AMOUNT Extra DONENESS Rolls MESSAGES When using some of the functions the oven may stop and prompt you to perform an action or simply advice on which accsessoire to use When a message appear ɳ ɳ Open the door if needed ɳ ɳ Perform the action if needed ɳ ɳ Close the d...

Page 13: ...con sists of 10 empty positions marked shortcut As you use the oven over time it will automat ically fill in the list with shortcuts to your most frequently used functions When you enter the shortcut menu the function you have been using mostly will be pre select ed and positioned as shortcut 1 Note the order of functions presented in the shortcut menu will automatically change ac cording to your ...

Page 14: ... languages e Press the OK button again to confirm the change ON OFF The appliance is turned ON or OFF using the On Off button When the appliance is turned ON all but tons function normally and the 24 hour clock is not displayed When the appliance is turned OFF all but two buttons are non responsive I E The Start but ton see Jet Start and the OK button see Kitchen Timer The 24 hour clock is display...

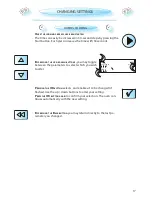
Page 15: ...ns Medium Volume has been set CLOCK SETTING PRESS THE OK BUTTON The left right hand digits hours flicker USE THE UP DOWN BUTTONS to set the 24 hour clock PRESS THE OK BUTTON again to confirm the change THE CLOCK IS SET AND IN OPERATION CHANGING SETTINGS SOUND SETTING PRESS THE OK BUTTON USE THE UP DOWN BUTTONS to set the volume on high medium low or mute PRESS THE OK BUTTON again to confirm the ch...

Page 16: ...set the level of brightness suitable to your preference PRESS THE OK BUTTON again to confirm your selection CHANGING SETTINGS ECO PRESS THE OK BUTTON USE THE UP DOWN BUTTONS to turn the ECO setting ON or OFF PRESS THE OK BUTTON again to confirm the change WHEN ECO IS ON the display will automatically dim down after a while to save energy It will automatically light up again when a button is presse...

Page 17: ...s CHANGING SETTINGS BY PRESSING THE UP OR DOWN BUTTONS you may toggle between the parameters to select which you wish to alter PRESSING THE OK BUTTON selects and enables it to be changed it flashes Use the up down buttons to alter your setting PRESS THE OK BUTTON AGAIN to confirm your selection The oven con tinues automatically with the new setting BY PRESSING THE BACK BUTTON you may return direct...

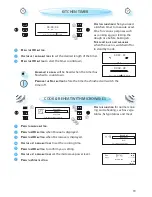
Page 18: ... KITCHEN TIMER PRESS THE OK BUTTON USE THE UP DOWN BUTTONS to set the desired length of the timer PRESS THE OK BUTTON to start the timer countdown AN ACOUSTIC SIGNAL will be heard when the timer has finished to count down PRESSING THE STOP BUTTON before the timer has finished will switch the timer off COOK REHEAT WITH MICROWAVES PRESS THE MENU BUTTON PRESS THE OK BUTTON when Manual is displayed PR...

Page 19: ... KITCHEN TIMER PRESS THE OK BUTTON USE THE UP DOWN BUTTONS to set the desired length of the timer PRESS THE OK BUTTON to start the timer countdown AN ACOUSTIC SIGNAL will be heard when the timer has finished to count down PRESSING THE STOP BUTTON before the timer has finished will switch the timer off COOK REHEAT WITH MICROWAVES PRESS THE MENU BUTTON PRESS THE OK BUTTON when Manual is displayed PR...

Page 20: ...ontent If the food contains egg or cream choose a lower power 750 W COOKING OF VEGETABLES meat etc 650 W COOKING OF fish 500 W MORE CAREFUL COOKING e g high protein sauces cheese and egg dishes and to finish cook ing casseroles 350 W SIMMERING STEWS melting butter chocolate 160 W DEFROSTING Softening butter cheeses 90 W SOFTENING Ice cream 0 W WHEN USING the Timer only ...

Page 21: ... full microwave power level and the cooking time set to 30 seconds Each additional press increases the time with 30 seconds THIS FUNCTION IS USED for quick re heating of food with a high water content such as clear soups cof fee or tea THIS FUNCTION IS ONLY AVALIABLE when the oven is switched off or in standby mode ...

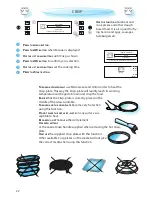
Page 22: ... eggs sausages hamburgers etc THE OVEN AUTOMATICALLY use Microwaves and Grill in order to heat the Crisp plate This way the Crisp plate will rapidly reach its working temperature and begin to brown and crisp the food ENSURE that the Crisp plate is correctly placed in the middle of the Glass turntable THE OVEN AND THE CRISP PLATE become very hot when using this function DO NOT PLACE THE HOT CRISP P...

Page 23: ...confirm your setting USE THE UP DOWN BUTTONS set the Grill power level PRESS THE START BUTTON USE THIS FUNCTION TO quickly give a pleasant brown surface to food FOR FOOD LIKE CHEESE TOAST STEAKS AND SAUSAGES place the food on the High wire rack PLACE FOOD on the wire rack ENSURE THAT THE UTENSILS used are heat resistant and ovenproof before grilling with them DO NOT USE PLASTIC utensils when grill...

Page 24: ... the cooking time PRESS THE OK BUTTON to confirm your setting USE THE UP DOWN BUTTONS to set the Grill power level PRESS THE OK BUTTON to confirm your setting USE THE UP DOWN BUTTONS set the Microwave power level PRESS THE START BUTTON THE MAX POSSIBLE microwave power level when using the Grill Combi is limited to a factory preset level PLACE FOOD on the wire rack or on the glass turntable USE THI...

Page 25: ...ll is shown PRESS THE OK BUTTON to confirm your selection USE THE UP DOWN BUTTONS set the cooking time PRESS THE OK BUTTON to confirm your setting USE THE UP DOWN BUTTONS to set the Grill power level setting PRESS THE START BUTTON PLACE FOOD on the wire rack ENSURE THAT THE UTENSILS used are heat resistant and ovenproof before grilling with them DO NOT USE PLASTIC utensils when grilling They will ...

Page 26: ...ESS THE OK BUTTON to confirm your setting USE THE UP DOWN BUTTONS to set the Grill power level PRESS THE OK BUTTON to confirm your setting USE THE UP DOWN BUTTONS to set the Microwave power level PRESS THE START BUTTON THE MAX POSSIBLE microwave power level when using the Turbo Grill Combi is limited to a factory preset level TURBO GRILL COMBI USE THIS FUNCTION TO cook such food as stuffed vegetab...

Page 27: ...PRESS THE START BUTTON USE THIS FUNCTION TO PREHEAT the empty oven PREHEATING is always done with the oven empty just like you would in a conventional oven be fore cooking or baking DO NOT PLACE FOOD BEFORE OR DURING preheating in the oven It will be burned from the intense heat Once the heating process has been started the temperature can easily be adjusted with the Up Down buttons WHEN THE SET T...

Page 28: ...END TIME COOK TIME 5 0 0 0 c 5 7 1 19 00 Forced Air FORCED AIR PRESS THE MENU BUTTON PRESS THE OK BUTTON when Manual is displayed USE THE UP DOWN BUTTONS until Forced Air is shown PRESS THE OK BUTTON to confirm your selection USE THE UP DOWN BUTTONS set the cooking time PRESS THE OK BUTTON to confirm your setting USE THE UP DOWN BUTTONS to set the temperature PRESS THE START BUTTON USE THIS FUNCTI...

Page 29: ... ROAST PORK 1 3 1 5Kg DISH on wire rack 160 170 C 70 80 MIN WHOLE CHICKEN 1 0 1 2Kg DISH on wire rack 210 220 C 50 60 MIN SPONGE CAKE heavy CAKE DISH on wire rack 160 170 C 50 60 MIN SPONGE CAKE light CAKE DISH on wire rack 170 180 C 30 40 MIN COOKIES BAKING PLATE 170 180 C PREHEATED OVEN 10 12 MIN BREAD LOAF BAKING DISH on wire rack 180 200 C PRE HEATED OVEN 30 35 MIN ROLLS BAKING PLATE 210 220 C...

Page 30: ...your setting USE THE UP DOWN BUTTONS to set the temperature PRESS THE OK BUTTON to confirm your setting USE THE UP DOWN BUTTONS to set the Microwave Power Level PRESS THE START BUTTON USE THIS FUNCTION TO cook roast meats poultry and jacket pota toes frozen convenience foods sponge cakes pastry fish and puddings ALWAYS USE THE LOW WIRE RACK to put food on to allow the air to circulate properly aro...

Page 31: ... of the plate and the thinner or less dense food in the middle ALWAYS COVER FOOD when using this function IF THE FOOD IS PACKAGED in such way that it al ready have a cover the package should be cut with 2 3 scores to allow for excess pressure to escape during reheating PLACE THIN SLICES of meat on top of each other or interlace them THICKER SLICES such as meat loaf and sausages have to be placed c...

Page 32: ...ist ties THE SHAPE OF THE PACKAGE alters the de frosting time Shallow packets defrost more quickly than a deep block SEPARATE PIECES as they begin to defrost Individual slices defrost more easily SHIELD AREAS OF FOOD with small pieces of aluminum foil if they start to become warm e g chicken legs and wing tips BOILED FOOD STEWS AND MEAT SAUCES defrost better if stirred during defrosting time WHEN ...

Page 33: ...ST USE THIS FUNCTION TO quickly de frost and heat prebaked Rolls Ba guettes Croissants The oven will automatically select cooking method time and power needed ENSURE that the Crisp plate is correctly placed in the middle of the Glass turntable THE OVEN AND THE CRISP PLATE become very hot when using this function DO NOT PLACE THE HOT CRISP PLATE on any surface sus ceptible to heat BE CAREFUL NOT TO...

Page 34: ...atic is shown PRESS THE OK BUTTON to confirm your selection USE THE UP DOWN BUTTONS until Jet Defrost is shown PRESS THE OK BUTTON to confirm your selection USE THE UP DOWN BUTTONS to select the food PRESS THE OK BUTTON to confirm your selection USE THE UP DOWN BUTTONS to set the weight PRESS THE START BUTTON USE THIS FUNCTION for defrosting Meat Poultry Fish Vegetables and Bread Jet Defrost shoul...

Page 35: ...THAN RECOMMENDED WEIGHT Follow the procedure for Cook Reheat with microwaves and choose 160 W when defrosting JET DEFROST S T N I H D O O F MEAT 100g 2 0Kg MINCED MEAT cutlets steaks or roasts POULTRY 100g 3 0Kg CHICKEN WHOLE pieces or fillets FISH 100g 2 0Kg WHOLE STEAKS or fillets VEGETABLES 100g 2 0Kg MIXED VEGETABLES peas broccoli etc BREAD 100g 2 0Kg LOAF buns or rolls FOR FOOD NOT LISTED IN ...

Page 36: ... PRESS THE OK BUTTON to confirm your selection PRESS THE START BUTTON USE THIS FUNCTION to maintain the food at serving temperature 60 C for a set length of time THE KEEP WARM FUNCTION CAN be interrupted at any time by opening the door It will pause while you check the food TO CONTINUE close the door and press start button again THE NET WEIGHT shall be kept within 250 600 g when using this func ti...

Page 37: ...onfirm your selection USE THE UP DOWN BUTTONS until 6th Sense Crisp is shown PRESS THE OK BUTTON to confirm your selection USE THE UP DOWN BUTTONS to select the food PRESS THE OK BUTTON to confirm your selection PRESS THE START BUTTON USE THIS FUNCTION TO quickly reheat your food from frozen to serving temperature AUTO CRISP IS USED ONLY for frozen ready made food Only use the supplied Crisp plate...

Page 38: ...ZA thin crust 250g 500g FOR PIZZAS with thin crust PAN PIZZA 300g 800g FOR PIZZAS with thick crust BUFFALO WINGS 300g 600g FOR CHICKEN NUGGETS oil the crisp plate and cook with donness set to Light FOR FOOD NOT LISTED IN THIS TABLE and if the weight is lesser or greater than recommended weight you should follow the procedure for manual crisp function ...

Page 39: ...e lid and set the time SOFT VEGETABLES such as broccoli and leek re quire 2 3 minutes cooking time HARDER VEGETABLES such as carrots and potatoes require 4 5 minutes cooking time COOKING RICE USE THE RECOMMENDATIONS ON THE PACKAGE regard ing the cooking time the amount of water rice PLACE THE INGREDIENTS IN THE BOTTOM PART cover with the lid and set the time VESSELS VESSELS USED SHOULD NOT be more...

Page 40: ...N to confirm your selection USE THE UP DOWN BUTTONS until Recipes is shown PRESS THE OK BUTTON to confirm your selection USE THE UP DOWN BUTTONS to select one of the recipes PRESS THE OK BUTTON to confirm your selection USE THE UP DOWN BUTTONS to select one of the foods PRESS THE OK BUTTON to confirm your selection USE THE OK UP DOWN BUTTONS to navigate among and carry out the needed settings PRES...

Page 41: ...ISH ON LOW RACK SLICE raw potatoes and interlace with on ion Season with salt pepper and garlic and pour over cream Sprinkle cheese on top FROZEN FRENCH FRIES 300G 600G CRISP PLATE SPRINKLE with salt WEDGES 300G 800G PEEL and cut in wedg es Season and light ly oil the crisp plate drizzle oil on top Stir when oven prompts FOR FOOD NOT LISTED IN THIS TABLE and if the weight is lesser or greater than...

Page 42: ...800G CRISP PLATE LIGHTLY GREASE the crisp plate Add and turn food when oven prompts BOIL HOT DOG 4 8PCS STEAMER BOTTOM WITHOUT COVER PLACE in steamer bot tom and cover food with water FROZEN HAMBURGERS 100G 500G CRISP PLATE LIGHTLY GREASE the crisp plate Add meat when crisp plate is preheat ed Turn food when oven prompts BACON 50G 150G ADD FOOD when crisp plate is preheated and turn when oven prom...

Page 43: ...in bottom and cover with lid FILLETS FRY 300G 1KG CRISP PLATE LIGHTLY GREASE the crisp plate Season and add fillets when crisp plate is preheated Turn food when oven prompts PIECES 500G 1 2KG SEASON the pieces and place on crisp plate with the skin side up wards FOR FOOD NOT LISTED IN THIS TABLE and if the weight is lesser or greater than recommended weight you should follow the procedure for Cook...

Page 44: ...RY 300G 800G CRISP PLATE LIGHTLY GREASE the crisp plate Season and add food when crisp plate is preheated Turn food when oven prompts STEAM 300G 800G STEAMER SEASON and place in steam grid Add 100ml water in bottom and cover with lid FROZEN GRATIN 600G 1 2KG MICROWAVE AND OVEN PROOF DISH ON TURN TABLE COATED FILLETS 200G 600G CRISP PLATE LIGHTLY GREASE the crisp plate Add food when crisp plate is ...

Page 45: ... with lid FRY 200G 500G CRISP PLATE LIGHTLY OIL the crisp plate Add food cut in pieces when crisp plate is preheated Sea son and drizzle with oil Stir food when oven prompts EGG PLANT 300G 800G CUT IN HALVES and sprin kle with salt and let stand for a while Light ly oil the crisp plate and add food when crisp plate is preheated Turn when oven prompts SQUASH STEAM 200G 500G STEAMER PLACE IN STEAM G...

Page 46: ... 1 2KG MICROWAVE AND OVEN PROOF DISH ON TURN TABLE RICE BOILED RICE 100ML 400ML STEAMER BOT TOM AND LID SET RECOMMENDED cook time for rice Add water and rice in bottom part and cover with lid PORRIDGE RICE 2 4 PORTIONS PLACE RICE AND WATER into the steamer bottom Cover with lid Add milk when the oven prompts and continue the cook ing OAT 1 2 PORTIONS MICROWAVE SAFE PLATE WITHOUT COVER MIX OAT FLAK...

Page 47: ...is preheated QUICHE LORRAINE 1 BATCH PREPARE THE PASTRY 250g flour 150 g butter 2 tblsp water and line the crisp plate with the pastry Prick it Pre bake the pastry When oven prompts to add the stuffing place 200g of ham 175g of cheese and pour over a mix of 3 eggs and 300 ml cream Place into the oven and continue the cooking FROZEN 200G 800G REMOVE package FOR FOOD NOT LISTED IN THIS TABLE and if ...

Page 48: ...AKE MICROWAVE AND OVEN PROOF CAKE DISH ON LOW RACK MIX A RECIPE with the to tal weight of 700 800g Add the cake when oven is preheated MUFFINS BAKING PLATE MAKE A BATTER for 16 18 pcs and fill in pa per moulds Add food when oven is preheated COOKIES PLACE ON BAKING PA PER and add when the oven is preheated MERINGUES MAKE A BATCH of 2 egg whites 80g sugar and 100g desiccatedcoconut Seasonwith vanil...

Page 49: ...ry and fill with 700 800g sliced apples mixed with sugar and cinnamon FROZEN 300G 800G REMOVE package BAKED APPLES 4 8PCS MICROWAVE AND OVEN PROOF DISH ON TURNTABLE REMOVE THE PIPES and fill with marzipan or cin namon sugar and but ter FRUIT COMPOTE 300G 800ML STEAMER PLACE IN STEAM GRID Add 100ml water in the bot tom and cover with lid SOUFFLÉ 2 6 PORTIONS OVEN PROOF DISH ON LOW RACK PREPARE A SO...

Page 50: ...VEN IS DESIGNED to operate with the turnta ble in place DO NOT operate the microwave oven when the turntable has been removed for cleaning USE A MILD DETERGENT water and a soft cloth to clean the interior surfaces front and rear of the door and the door opening DO NOT ALLOW GREASE or food particles to build up around the door DO NOT USE STEAM CLEANING APPLIANCES when cleaning your microwave oven A...

Page 51: ...re is power available Check that the oven has ample ventilation Wait for 10 minutes then try to operate the oven once more Open and then close the door before you try again THIS IS TO AVOID unnecessary calls for which you will be charged When calling for Service please give the serial number and type number of the oven see Ser vice label Consult your warranty booklet for further advice IF THE MAIN...

Page 52: ...ainer 12 3 1 1000 g 12 13 min 650 W Pyrex 3 227 12 3 2 475 g 5 min 650 W Pyrex 3 827 12 3 3 900 g 13 14 min 750 W Pyrex 3 838 12 3 4 1100 g 28 30 min Forced air 190 ºC 350 W Pyrex 3 827 12 3 5 700 g 28 30 min Forced air 175 ºC 90 W Pyrex 3 827 12 3 6 1000 g 30 32 min Forced air 210 ºC 350 W Pyrex 3 827 13 3 500 g 10 min 160 W Test Approx time Temperature Preheated oven Accessories 8 4 1 30 35 min ...

Page 53: ...GB Whirlpool is a registered trademark of Whirlpool USA 400010876985 ...

Reviews: