background image


2

Power Supply 

230V~50Hz 

Power Consumption (Microwave) 

1200W 

Power Consumption (Grill) 

1000W 

Microwave Power Output 

800W 

Operation Frequency 

2450MHz 

Outside Dimensions 

316mm(H) 464mm(W)×340mm(D) 

Oven Cavity Dimensions 

219mm(H) ×298mm(W) ×325mm(D) 

Oven Capacity 

20Litres 

Cooking Uniformity 

Turntable System 

Net Weight 

Approx. 13.6kg 

If the oven fails to operate: 

1. 

Check  to  ensure  that  the  oven  is  plugged  in securely.  If it  is  not,  remove  the  plug  from  the  outlet,  wait  10 
seconds, and plug it in again securely. 

2. 

Check for a blown circuit fuse or a tripped main circuit breaker. If these seem to be operating properly, test 
the outlet with another appliance. 

3. 

Check to ensure that the control panel is programmed correctly and the timer is set. 

4. 

Check  to  ensure  that  the  door  is  securely  closed  engaging  the  door  safety  lock  system.  Otherwise,  the 
microwave energy will not flow into the oven. 

IF NONE OF THE ABOVE RECTIFY THE SITUATION, THEN CONTACT A QUALIFIED TECHNICIAN. DO NOT 
TRY TO ADJUST OR REPAIR THE OVEN YOURSELF. 

1. 

Make sure that all the packing materials are removed from the inside of the door. 

2. 

WARNING:  Check  the  oven  for  any  damage,  such  as  misaligned  or  bent  door,  damaged  door  seals  and 
sealing surface, broken or loose door hinges and latches and dents inside the cavity or on the door. If there 
is any damage, do not operate the oven and contact qualified service personnel.   

3. 

This microwave oven must be placed on a flat, stable surface to hold its weight and the heaviest food likely 
to be cooked in the oven.   

4. 

Do not place the oven where heat, moisture, or high humidity are generated, or near combustible materials. 

5. 

For correct operation, the oven must have sufficient airflow. Allow 20cm of space above the oven, 10cm at 
back and 5cm at both sides. Do not cover or block any openings on the appliance. Do not remove feet. 

6. 

Do not operate the oven without glass tray, roller support, and shaft in their proper positions.   

7. 

Make sure that the power supply cord is undamaged and does not run under the oven or over any hot or 
sharp surface. 

8. 

The socket must be readily accessible so that it can be easily unplugged in an emergency. 

9. 

Do not use the oven outdoors. 


S

S

P

P

E

E

C

C

I

I

F

F

I

I

C

C

A

A

T

T

I

I

O

O

N

N

S

S

*

*


B

B

E

E

F

F

O

O

R

R

E

E


Y

Y

O

O

U

U


C

C

A

A

L

L

L

L


F

F

O

O

R

R


S

S

E

E

R

R

V

V

I

I

C

C

E

E


I

I

N

N

S

S

T

T

A

A

L

L

L

L

A

A

T

T

I

I

O

O

N

N


Summary of Contents for CB2068

Page 1: ... Please read these instructions carefully before installing and operating the oven Record in the space below the SERIAL NO found on the nameplate on your oven and retain this information for future reference SERIAL NO ...

Page 2: ...he door open since open door operation can result in harmful exposure to microwave energy It is important not to defeat or tamper with the safety interlocks 2 Do not place any object between the oven front face and the door or allow soil or cleaner residue to accumulate on sealing surfaces 3 Do not operate the oven if it is damaged It is particularly important that the oven door close properly and...

Page 3: ...removed from the inside of the door 2 WARNING Check the oven for any damage such as misaligned or bent door damaged door seals and sealing surface broken or loose door hinges and latches and dents inside the cavity or on the door If there is any damage do not operate the oven and contact qualified service personnel 3 This microwave oven must be placed on a flat stable surface to hold its weight an...

Page 4: ...Move the microwave oven away from the receiver 5 Plug the microwave oven into a different outlet so that microwave oven and receiver are on different branch circuits When using electrical appliance basic safety precautions should be followed including the following WARNING To reduce the risk of burns electric shock fire injury to persons or exposure to excessive microwave energy 1 Read all instruc...

Page 5: ...s protection against exposure to microwave energy 17 This product is a Group 2 Class B ISM equipment The definition of Group 2 which contains all ISM Industrial Scientific and Medical equipment in which radio frequency energy is intentionally generated and or used in the form of electromagnetic radiation for the treatment of material and spark erosion equipment For Class B equipment is equipment s...

Page 6: ...ook 5 Narrow strips of aluminum foil may be used to prevent overcooking of exposed areas But be careful don t use too much and keep a distance of 1 inch 2 54cm between foil and cavity The list below is a general guide to help you select the correct utensils COOKWARE MICROWAVE GRILL COMBINATION Heat Resistant Glass Yes Yes Yes Non Heat Resistant Glass No No No Heat Resistant Ceramics Yes Yes Yes Mi...

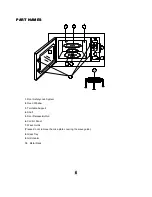
Page 7: ...Window 3 Turntable Support 4 Shaft 5 Door Release Button 6 Control Panel 7 Wave Guide Please do not remove the mica plate covering the wave guide 8 Glass Tray 9 Grill Heater 10 Metal Rack P PA AR RT T N NA AM ME ES S 5 6 8 7 3 4 2 1 10 9 ...

Page 8: ... heat beverage GRILL COMBI Touch to set a combination cooking with grilling and microwave CLOCK Use to set clock function MENU Use to cook 7 popular kinds of food with weight or serving inputed STOP Press to cancel setting or reset the oven before setting a cooking program Press once to temporarily stop cooking or twice to cancel cooking altogether START EXPRESS Use to start program or setting qui...

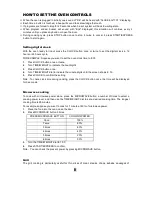
Page 9: ...tton once 4 Turn TIME WEIGHT dial to indicate the minute digits until the screen shows 8 30 5 Press CLOCK to confirm the setting Note To check clock time during cooking press the CLOCK button once the time will be displayed for 3 seconds Microwave cooking To cook with microwave power alone press the MICROWAVE button a number of times to select a cooking power level and then use the TIME WEIGHT dia...

Page 10: ...cooking 45 for grillcooking Use for puddings omelettes baked potatoes and poultry FOR EXAMPLE Suppose you want to set combination 2 cooking for 12 minutes 1 Place the food into the oven close the door 2 Press GRILL COMBI button 3 times 3 Turn TIME WEIGHT dial to 12 00 4 Press START EXPRESS to confirm Note You can check the present combination power by pressing GRILL COMBI Button Speed Defrost The ...

Page 11: ...rm Multi stage cooking This function allows the oven to start with at most 2 stage cooking programs FOR EXAMPLE You want to set follow program Microwave cooking Grill cooking 1 Place the food into the oven close the door 2 Press MICROWAVE button several times to input desired power level 3 Turn TIME WEIGHTdial to input desired cooking time 4 Press GRILL COMBI button once 5 Turn the TIME WEIGHT to ...

Page 12: ... cook 200g of rice 1 Place food into oven and close it 2 Press MENU button several times to select you desired food in menu 3 Turn TIME WEIGHTdial to input weight or serving 4 Press START EXPRESS to cofirm Auto Cook Menu Code Food cooking mode 1 The result of auto cooking depends on factors such as the shape and size of food your personal preference as to the doneness of certain foods and even how...

Page 13: ...ller ring and oven floor should be cleaned regularly to avoid excessive noise Simply wipe the bottom surface of the oven with mild detergent The roller ring may be washed in mild sudsy water or dishwasher When removing the roller ring from cavity floor for cleaning be sure to replace in the proper position 9 Remove odors from your oven by combining a cup of water with the juice and skin of one lem...

Reviews: