44
Using your
Product
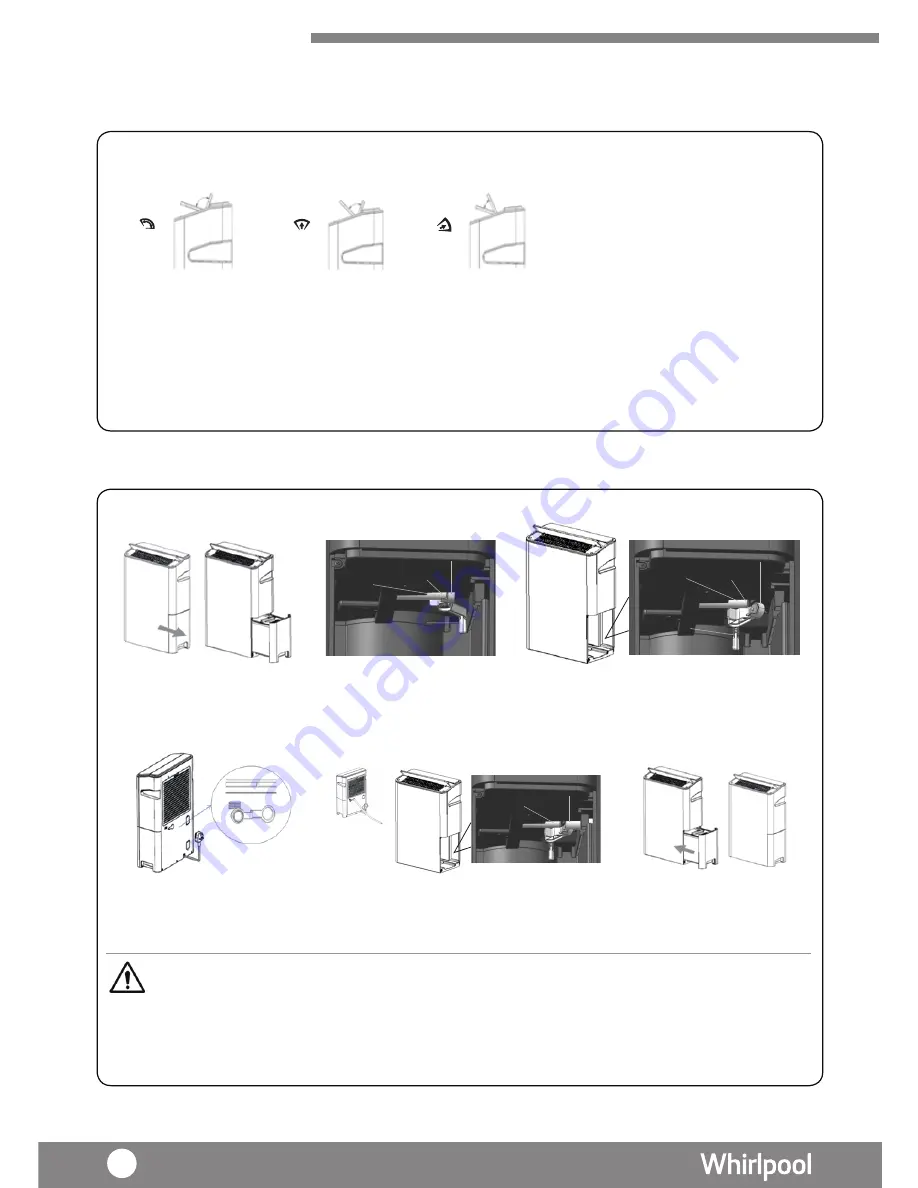
Louver Setting
1.
Press “SWING” key to select the vertical louver swing angle.
2.
Press “SWING” until
the
light
is
off, the louver will stop at the angle
as is
.
3. For
h
orizontal louver, it
can be
operate
d
manual
ly
by adjust
ing
the horizontal louver slide
to left or
r
ight.
Remarks: When choosing
d
ifferent angle of the louver, louver will
be
swing to the largest angle
for
10 seconds
first,
and then
move to
the selected option.
Vertical
louver swing
in wide angle
Vertical
louver swing
forward angle
Vertical
louver swing
forwards
CONTINUOUS DRAINAGE
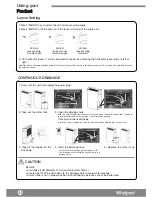
1. Power off the
unit
and unplug the power plug
2.
Take
out the water tank
3.
Open the drainage hole
hold the small handle (lower part of valve) and move toward left hand side. Then push
the small handle and fix the position. The valve will be opened.
Cancel continuous drainage
return the valve to original position, by pull the small handle towards to your side.
4. Take off the stopper on the
backside
6.
Replace
the water tank
5.
Insert the drainage hose
•
inside the machine through the stopper hold.
•
The drainage hose should be connected to the
drainage hole.
Remark:
•
Drain hose inner diameter 14mm (outer diameter 18mm)
•
Ensure tight fit of the drain hose to the drainage hole to avoid water leakage
.
•
If water tank is not
in proper position
, dehumidifying operation cannot be performed.
CAUTION
Drainage Hose
Drainage
hole
Not open Situation
Drainage
hole
Spill proof
plastic
Spill proof's Valve
Small handle
Drainage
hole
Spill proof
plastic
Spill proof's Valve
Small handle

