background image

Summary of Contents for ECKMF-281

Page 1: ...CLAMP 11 488645 SCREW 12 841707 TUBE INSERT 13 488366 CLAMPS 14 939033 GROMMET 15 488649 SCREWS 16 488500 SCREWS 17 627709 PLASTIC TUBE ASSEMBLY 18 941593 COPPER TUBE ASSEMBLY 19 939009 CLAMP USED IN QUANTITY STEP NUMBER 1 3 5 1 4 1 4 9 1 5 1 5 2 5 3 5 6 1 6 10 11 1 6 1 7 3 7 14 15 1 7 2 15 1 9 1 11 1 12 1 7 13 1 14 1 16 Tools and Other Items You Will Need TOOLS NEEDED MATERIALS NEEDED l Phillips ...

Page 2: ... And Shield Place SHIELD 5 939025 over 3 holes in srde sail of freezer AHach clap 6 536533 and screw 7 469069 through each of lop 2 holes rn shield Leave screws loose must be on lop ernstall INTERIOR TUBE COVER WIRING ASSEMBLY about 4 5 Inches 01 wrrrng assembly should be rn the freezer compartment CL up 1untrl ICE MAKER IS i ace on SHIELD Slip TUBE over WATER INLET INLET TUBE I WARNING DO NOT PIN...

Page 3: ...and install SCREW ll 488645 13 16 Remdve SCREW Install CLAMP 19 939009 Reuse SCREW NATER VALVE PLUG CONNECT ICE MAKER TO WATER SUPPLY YOU WILL NEED ENOUGH INCH O D COPPER TUBING TO CONNECT REFRIGERATOR TO WATER SOURCE SEE STEP 2 ON NEXT PAGE P PO WAYS TO CONNECTTO WATER SUPPLY Tti130 0 m20 TO BASEMENT COLD WATER PIPE WATER PIPE CAUTI ICE MAKEI BE INSTALLED WHEF FALL BELOW FREEZI UNDER SINK TO COLD...

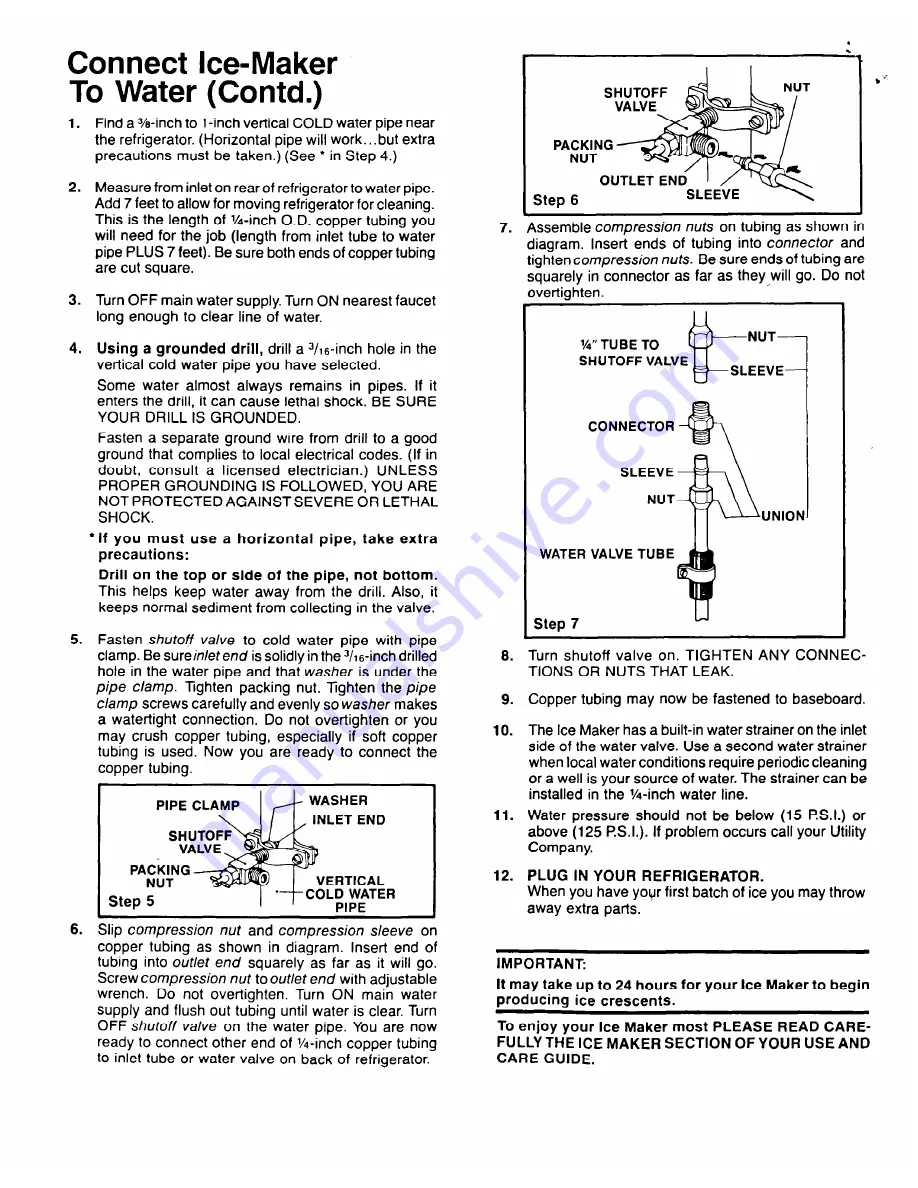
Page 4: ...akes a watertight connection Do not overtighten or you may crush copper tubing especially if soft copper tubing is used Now you are ready to connect the copper tubing Slip compression nut and compression sleeve on copper tubing as shown in diagram Insert end of tubing into out et end squarely as far as it will go Screw compression nut to outlet end with adjustable wrench Do not overtighten Turn ON...

Reviews: