23
5 CONTROLS
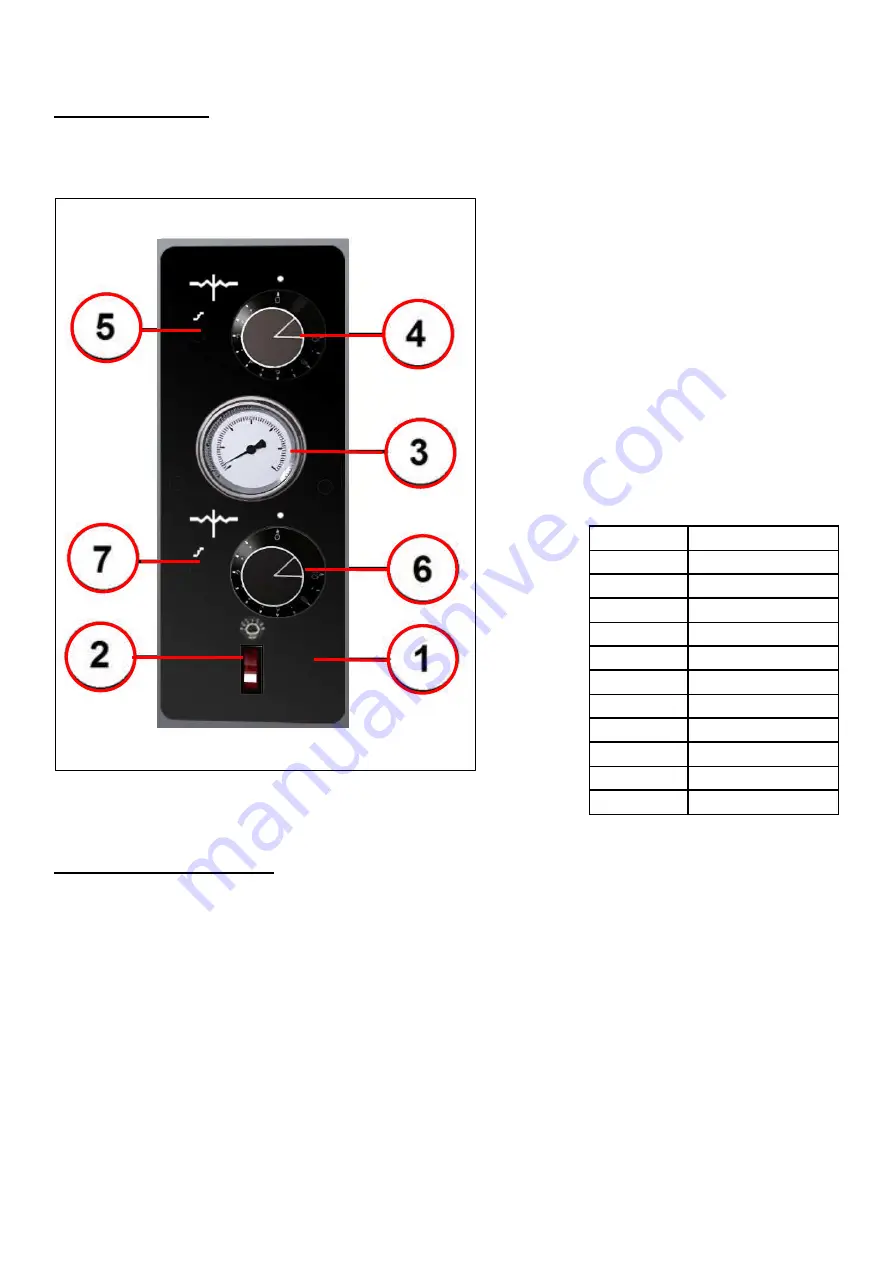
Diagram of the control panel
1.
Comand label;
2.
Cooking chamber light
switch ;
3.
Analogic thermometer;
4.
Top thermostat;
5.
Pilot light TOP;
6.
Bottom thermostat;
7.
Pilot light thermostat;
6 METHOD OF USE
Functional check
Before switching the oven on check:
•
You have removed the protective film, if provided;
•
The plug is properly inserted into the power supply wall socket;
•
That the system supply voltage, frequency and power are compatible with the values provided on the label affixed
on the right side of the oven;
Switching on the oven for the first time
The first time the appliance is used it is recommended to heat the oven when empty to eliminate bad smells caused by the
evaporation of moisture content of the refractory stones, in the insulating material and the metallic parts inside.
Follow the procedure below:
•
leave the oven working (empty) for at least 8 hours at the temperature of 150° before proceeding to the first baking.
Graduation Temperature (°C)
0
0
1
80
2
100
3
150
4
200
5
250
6
280
7
300
8
350
9
400
10
450
Summary of Contents for ENTRY BASIC
Page 2: ...2 ...
Page 7: ...7 Schemi elettrici POM4 PZ POM6 PZ 400V 3Ph N T ...
Page 15: ...15 ...
Page 20: ...20 Wiring diagrams POM4 PZ POM6 PZ 400V 3Ph N T ...
Page 32: ...32 Schémas de câblage POM4 PZ POM6 PZ 400V 3Ph N T ...
Page 40: ...40 ...
Page 45: ...45 Schaltpläne POM4 PZ POM6 PZ 400V 3Ph N T ...
Page 53: ...53 ...
Page 58: ...58 Esquemas eléctricos POM4 PZ POM6 PZ 400V 3Ph N T ...
Page 66: ...66 ...
Page 71: ...71 Электрические схемы POM4 PZ POM6 PZ 400V 3Ph N T ...
Page 80: ...80 EXPLODED VIEW and SPARE PARTS LIST ...
Page 81: ...81 ...


