background image

29

C

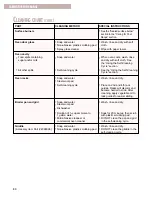
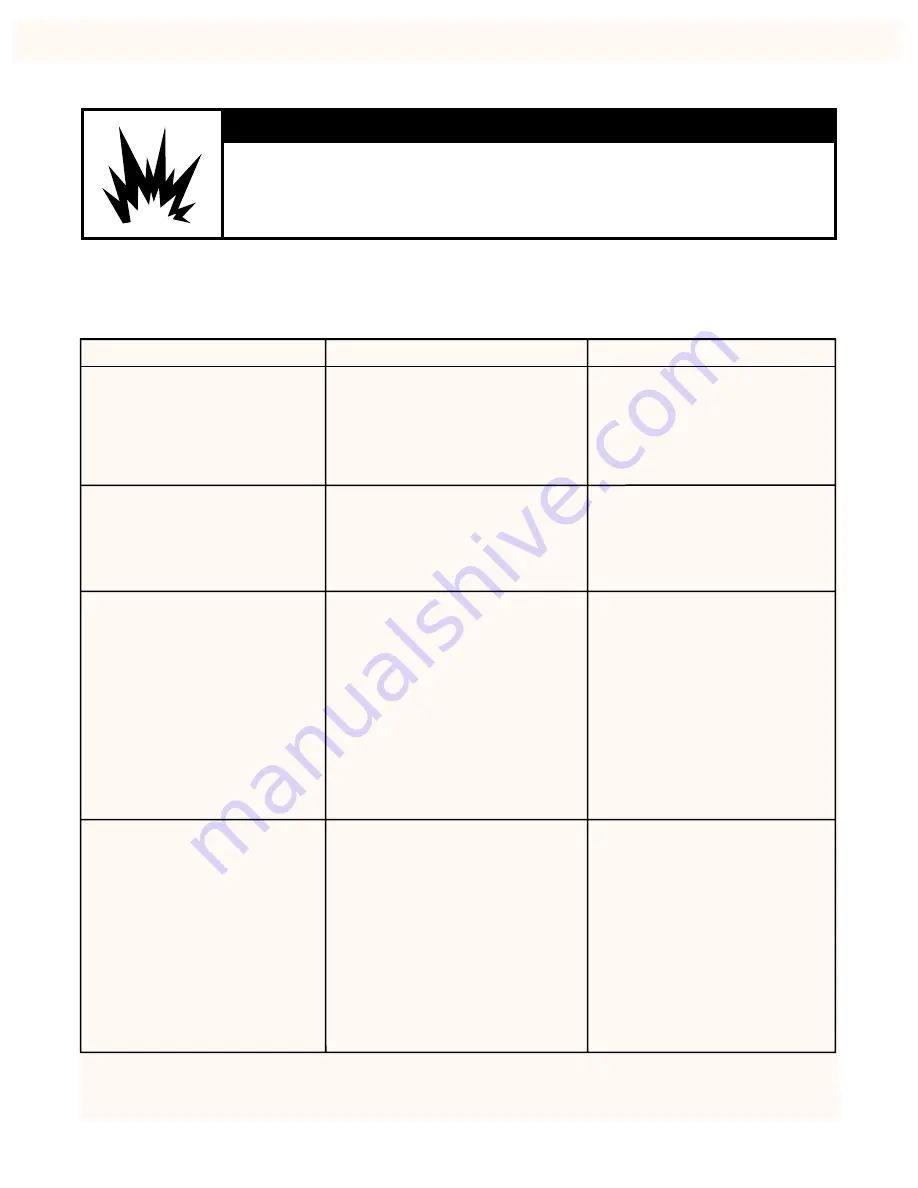
LEANING CHART

Before cleaning, always make sure all controls are off and the range is cool. Refer to instructions on all
cleaning products before using them to clean your range.

w

WARNING

Explosion Hazard

Do not store flammable materials such as gasoline near this appliance.

Doing so can result in death, explosion, or fire.

C

ARING FOR

Y

OUR

R

ANGE

PART

CLEANING METHOD

SPECIAL INSTRUCTIONS

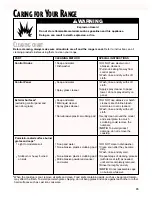
Control Knobs

 Soap and water

 Dishwasher

 DO NOT use steel wool or 

   abrasive cleaners.

 Pull knobs straight away from 

   control panel.

 Wash, rinse and dry with soft 

   cloth.

Control Panel

 Soap and water

 Wash, rinse and dry with soft 

   cloth.

Exterior Surfaces*
(excluding control panel and 
oven door glass)

 Soap and water

 Mild liquid cleaner

 Spray glass cleaner

 DO NOT use abrasive or harsh 

   cleaners like chlorine bleach, 
   ammonia or oven cleaners.

 Wash, rinse and dry with soft 

   cloth.

 Spray glass cleaner

 Apply spray cleaner to paper 

   towel; do not spray directly on 
   panel.

 Gently clean around the model 

   and serial plate, too much 
   scrubbing could remove the 
   numbers.

 Non-abrasive plastic scrubbing pad

Porcelain-coated surface burner
grates and caps*
  

 Light to moderate soil

 Soap and water

 Non-abrasive plastic scrubbing pad

 DO NOT clean in dishwasher.

 Clean soon after they become 

   dirty.

 Wash, rinse and dry well.

 Repeat steps of cleaning process 

  (with items at left) as needed, 
  until soil is completely removed.

 Rinse thoroughly and dry.

 NOTE: Do not reassemble caps 

   on burners while wet.

 Non-abrasive plastic scrubbing pad

 Mild abrasive powdered cleanser 

   and water

 Stubborn or heavy burned 

   on soils

 NOTE: To avoid product 

   damage, do not remove the 
   cooktop.

*When the cooktop is cool, remove all spills and clean. Food spills containing acids, such as vinegar and tomato, 
  may affect the finish. To avoid porcelain grate chipping, do not bang grates and caps against each other or other
  hard surfaces such as cast iron cookware.

Summary of Contents for F195LEH

Page 1: ... Troubleshooting 35 Requesting Assistance or Service 37 Index 39 Warranty 40 1 800 253 1301 Call our Consumer Assistance Center with questions or comments TO THE INSTALLER PLEASE LEAVE THIS INSTRUCTION BOOK WITH THE UNIT TO THE CONSUMER PLEASE READ AND KEEP THIS BOOK FOR FUTURE REFERENCE 4 65 Cubic Foot Oven MODEL SF195LEH 8273161 with ACCUBAKE System ...

Page 2: ...afe place for future reference It is important for you to save your sales receipt showing the date of purchase Proof of purchase will as sure you of in warranty service OurConsumerAssistanceCenternumberistollfree 2 WARNING If the information in this manual is not followed exactly a fire or explosion may result causing property damage personal injury or death Do not store or use gasoline or other f...

Page 3: ... tell you how to reduce the chance of injury and tell you what can happen if the instructions are not followed wWARNING Tip Over Hazard A child or adult can tip the range and be killed Connect anti tip bracket to rear range foot Reconnect the anti tip bracket if the range is moved See the installation instructions for details Failure to follow these instructions can result in death or serious burn...

Page 4: ...rong from this plug IMPORTANT SAFETY INSTRUCTIONS Disconnect the electrical supply before servicing the appliance Never Use the Range for Warming or Heating the Room Injuries may result from the misuse of appliance doors or drawers such as stepping leaning or sitting on the doors or drawers Maintenance Keep range area clear and free from combustible materials gasoline and other flammable vapors an...

Page 5: ...rage drawer Storage drawer p 24 Other features not shown Griddle p 7 PARTS AND FEATURES Electronic oven control p 11 23 Control panel pp 5 29 Automatic oven light switch p 34 Left front control knob POWER Burner Right front control knob Right rear control knob Left rear control knob Surface burner marker shows which burner you are setting CONTROL PANEL ...

Page 6: ...sh cooking wWARNING Fire Hazard Do not let the burner flame extend beyond the edge of the pan Turn off all controls when not cooking Failure to follow these instructions can result in death or fire SETTING LIGHT POWER Burner left front burner HIGH Mid range between HIGH and LOW LOW Burnerheatsettings Use the following chart as a guide Usingthecontrolknobs Your range comes with electric ignition El...

Page 7: ...ckly and evenly the pan heats When using glass or ceramic cookware check to make sure it is suitable for use on surface burners To avoid tipping make sure pots and pans are centered on the grates USING THE GRIDDLE ACCESSORY ITEM PART 4396096 IMPORTANT Always use oven mitts when handling a hot griddle Before using a griddle for the first time wash it in hot soapy water rinse and dry On gas cooktops...

Page 8: ... for slow cooking Can be coated with porcelain enamel Ceramic or ceramic glass Heats slowly and unevenly Use on low to medium settings Follow manufacturer s instructions Copper Heats very quickly and evenly Used as a core or base in cookware to provide even heating Earthenware Can be used for cooktop cooking if recommended by the manufacturer Use on low settings Porcelain enamel on steel or enamel...

Page 9: ...nes To avoid spillage remove food before pulling out the rack Tilt the rack up at the front before pulling it over the door Use an adequate amount of liquid in the pan meat juices or water so your food does not get overdone Extra oven rack position USING THE OVEN Where to place pans WHEN YOU HAVE 1 pan 2 pans 3 or 4 pans PLACE In center of the oven rack Side by side or slightly staggered In opposi...

Page 10: ...ace in the bottom third of oven May need to increase baking time Stainless steel May need to increase baking time Crisp crusts Stoneware Follow manufacturer s instructions Light golden crusts Uneven browning BEST USED FOR GUIDELINES USING ALUMINUM FOIL Do not line the oven bottom with any type of foil liners or cookware Permanent damage will occur to the oven bottom finish Do not block the oven bo...

Page 11: ...en showing the time of day the display will show the hour and minutes When you are using the minute timer the display will show minutes and seconds in the following sequence For settings from 1 59 minutes the display will count down each second For settings one hour or over the display will count down each minute When you are using COOK TIME and or STOP TIME the display will show hours and minutes...

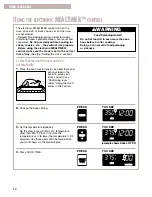
Page 12: ...SS YOU SEE example for 5 30 TIME HR MIN PRESS YOU SEE START ENTER 5 SEC CLOCK OR USING THE ELECTRONIC MINUTE TIMER The minute timer does not start or stop the oven It works like a kitchen timer It can be set in hours and minutes up to 12 hours 59 minutes The minute timer will display minutes and seconds for settings under 1 hour You will hear four 1 second tones when the set time is up 1 Press TIM...

Page 13: ...ove the reminder tones press and hold TIMER SET for 5 seconds To bring back the tones follow the same step You will see OFF when the tones are turned off and on when they are turned on 4 Turn off the minute timer Tocanceltheminutetimer Press TIMER OFF USING THE ELECTRONIC MINUTE TIMER CONT PRESS YOU SEE R TIME display counts down START ENTER 5 SEC YOU SEE R TIME PRESS YOU SEE TIMER OFF time of day...

Page 14: ...he bake setting 3 Set the temperature optional Do this step if you want to set a temperature other than 350 F Press to raise the temperature or to lower the temperature in 5 F amounts Use these pads until the desired temperature shows on the small display 4 When roasting put your food in the oven You do not have to preheat the oven when roasting unless your recipe recommends it NOTE The oven will ...

Page 15: ...places PrE on the display and the time of day reappears You will hear a 1 second tone indicating the oven is ready to use The ACCUBAKE system electronically regulates the preheat time and temperature to maintain a precise temperature range for the best cooking results The preheat and set temperatures may be different at the end of the countdown This is normal NOTES When the oven temperature is gre...

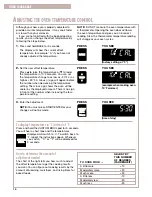
Page 16: ...isplaytemperaturesin Cinsteadof F Press and hold the CUSTOM BROIL pad for 5 seconds You will hear a short tone and the temperatures displayed will switch to C To switch back to F repeat the instructions above Whenever you switch C or F will be displayed for 5 seconds Howtodeterminetheamountof adjustmentneeded The chart at the right tells you how much to adjust the offset temperature to get the coo...

Page 17: ...ter of the oven rack 4 Press CUSTOM BROIL 5 Start the oven You the can change the temperature setting any time before or after pressing START ENTER To change the setting see To custom broil at a lower temperature later in this section After changing the setting you do not have to press START ENTER again 6 After broiling turn off the oven PRESS YOU SEE CUSTOM BROIL PRESS YOU SEE START ENTER 5 SEC O...

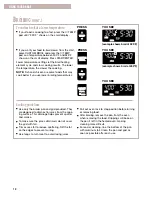
Page 18: ...AKE BROIL CUSTOM BROIL example shows broil at 400 F PRESS YOU SEE ON BROIL HEAT START ENTER 5 SEC YOU SEE TEMP Broilingguidelines Use only the broiler pan and grid provided They are designed to drain extra juices from the cook ing surface This drainage helps prevent spatter and smoke To make sure the juices drain well do not cover the grid with foil Trim excess fat to reduce spattering Slit the fa...

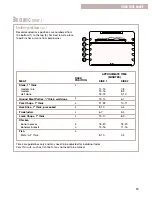
Page 19: ... MEAT Steak 1 thick medium rare medium well done Ground Meat Patties 3 4 thick well done Pork Chops 1 thick Ham Slice 1 2 thick precooked Frankfurters Lamb Chops 1 thick Chicken bone in pieces boneless breasts Fish fillets 1 4 1 2 thick RACK POSITION 4 4 4 4 4 4 3 4 4 SIDE 1 14 15 15 16 18 19 13 14 21 22 8 10 6 7 15 17 18 20 12 16 8 10 Times are guidelines only and may need to be adjusted for indi...

Page 20: ...t your food in the oven To place your racks correctly see Positioning racks under Using the Oven earlier in this section 2 Choose the bake setting 3 Set the temperature optional Do this step if you want to set a temperature other than 350 F Press to raise the temperature or to lower the temperature in 5 F amounts Use these pads until the temperature you want shows on the small display 4 Press COOK...

Page 21: ...s You will also hear four 1 second tones every minute until you press OFF CANCEL NOTE To remove the end of cycle tones press and hold COOK TIME for 5 seconds To bring back the tones repeat this step You will see oFF when the tones are turned off and on when they are turned on Refer to Using the Electronic Minute Timer Step 3 to remove the reminder tones 8 Turn off the oven NOTE You can do this ste...

Page 22: ...an 350 F Press to raise the temperature or to lower the temperature in 5 F amounts Use these pads until the temperature you want shows on the small display 4 Press COOK TIME 5 Set the cook time Press the up s or down t pad s until the correct time shows on the display 6 Press DELAY START TIME PRESS YOU SEE BAKE F BAKE PRESS YOU SEE F BAKE example shows bake at 375 F TEMP PRESS YOU SEE COOK TIME F ...

Page 23: ... 1 hour 10 When baking roasting is done The oven will turn off by itself and beep 4 times You will also hear four 1 second tones every minute until you press OFF CANCEL NOTE To remove the end of cycle tones press and hold COOK TIME for 5 seconds To bring back the tones repeat this step You will see oFF when the tones are turned off and on when they are turned on Refer to Using the Electronic Minut...

Page 24: ...ty the drawer before you remove it Pull the drawer straight out to the first stop The stops are small round objects formed in the slide rail They keep the drawer from sliding all the way out Then lift the front of the drawer and pull it out to the second stop 2 Lift the back of the drawer slightly and slide it all the way out Replacingthestoragedrawer 1 Position the drawer so that the lower drawer...

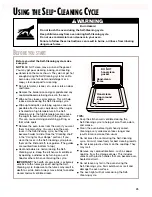
Page 25: ... odors are normal during the Self Cleaning cycle Keep the kitchen well ventilated by opening a window or by turning on a vent hood or other kitchen vent during the cycle IMPORTANT The health of some birds is extremely sensitive to the fumes given off during the Self Cleaning cycle Exposure to the fumes may result in death to certain birds Always move birds to another closed and well ventilated roo...

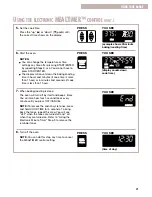
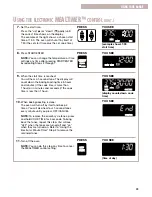
Page 26: ... between 21 2 41 2 hours shows on the display Use 21 2 hours for light soil Use 31 2 41 2 hours for average to heavy soil 3 Start the oven Make sure the door is closed all the way If the door is open even a little it will not lock Press the door closed if needed If the door is closed it will lock as soon as you press START ENTER 4 After the Self Cleaning cycle ends LOCKED goes off and the door unl...

Page 27: ... s until the correct time shows on the display The oven will automatically come up with the stop time by adding the set cleaning time to the set start time 5 Press START ENTER The door will lock as soon as you press START ENTER 6 After the Self Cleaning cycle starts 7 After the Self Cleaning cycle ends LOCKED goes off and the door unlocks NOTE The stop time will be the start time plus the cleaning...

Page 28: ...ning cycle uses very high heat to burn away soil and grease During the cycle the oven gets much hotter than it does for normal baking or broiling This high heat breaks up the soil or grease and burns it away Your oven is automatically preset for a 31 2 hour Self Cleaning cycle The graph at the right shows you what happens in a 31 2 hour Self Cleaning cycle Notice that the heating stops 1 2 hour be...

Page 29: ... with soft cloth Spray glass cleaner Apply spray cleaner to paper towel do not spray directly on panel Gently clean around the model and serial plate too much scrubbing could remove the numbers Non abrasive plastic scrubbing pad Porcelain coated surface burner grates and caps Light to moderate soil Soap and water Non abrasive plastic scrubbing pad DO NOT clean in dishwasher Clean soon after they b...

Page 30: ... and water Steel wool pad Wash rinse and dry Self cleaning cycle Place on 2nd and 4th rack guides Racks will discolor and become harder to slide After cleaning apply vegetable oil to rack guides for easier sliding Solution of 1 2 cup ammonia to 1 gallon water Mild abrasive cleanser or commercial oven cleaner Soak for 20 minutes then scrub with plastic scrubbing pad DO NOT clean the pan and grid in...

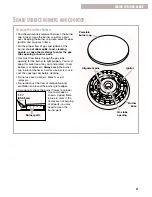
Page 31: ...e opening for the burner to light properly You must keep this area free of any soil and protect it from boilovers or spillovers Always keep the burner cap in place whenever a surface burner is in use Let the cooktop cool before cleaning Do not use oven cleaners bleach or rust removers Do not obstruct the flow of combustion and ventilation air around the burner grate edges Occasionally check the bu...

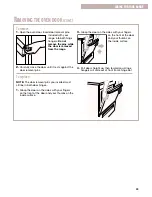
Page 32: ... distort the port Do not use a wooden tooth pick If the burner needs to be adjust ed call a qualified technician for ser vice 6 Turn on the burner to see if it will light If the burner does not light after you have cleaned it recheck cap alignment or contact a designated service technician Do not service the sealed burner yourself REMOVING THE OVEN DOOR For normal use of your range you do not need...

Page 33: ... on the front of the door and your thumbs on the inside surface 2 Carefully close the door until it rests against the door removal pins Toreplace NOTE The door removal pins you inserted must still be in both door hinges 1 Grasp the door on the sides with your fingers on the front of the door and your thumbs on the inside surface CARING FOR YOUR RANGE 4 Pull door straight up then toward you Hinge h...

Page 34: ...e Range Front frame hinge slot 2 Hold oven door so that the top edge of each hinge hanger is horizontal Insert hinge hangers into the front frame hinge slots 3 Tilt top of door toward range Slide hinge hangers down onto front frame support pins NOTE Make sure the hinge hangers are fully seated and engaged on the support pins 4 Insert the door stop clip with the angular surface at the top of the fr...

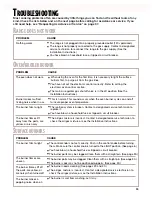
Page 35: ...9 and 30 The air gas mixture is incorrect Contact a designated service technician to check the air gas mixture or see the Installation Instructions The burner is wet from washing Let it dry PROBLEM The burner fails to light The burner flames are uneven The burner flames lift off the ports are yellow or are noisy when turned off The burner makes a popping noise when on SURFACE BURNERS OVEN BROILER ...

Page 36: ...ookware Choose cookware the same size or slightly larger than the burner flame The oven temperature seems too low or too high Adjust the oven temperature control See Adjusting the Oven Temperature Control section Slow baking or roasting Preheat oven to selected temperature before placing food in oven Choose bakeware that will allow 2 inches of air space around all sides Position rack higher in ove...

Page 37: ...rts will fit right and work right because they are made to the same exacting specifications used to build every new WHIRLPOOL appliance To locate FSP replacement parts in your area call our Consumer Assistance Center telephone number or your nearest Whirlpool designated service center FORFURTHERASSISTANCE If you need further assistance you can write to Whirlpool with any questions or concerns at W...

Page 38: ...38 NOTES ...

Page 39: ...ers 5 Tips 6 TROUBLESHOOTING 35 36 WARRANTY 40 INDEX TOPIC PAGE ANTI TIP BRACKET 3 ASSISTANCE 37 BAKING ACCUBAKE system 14 15 Aluminum foil 10 Bakeware 10 Pans 8 9 Preheat conditioning 15 Racks 9 14 Setting cycle 14 Tips 15 BROILING Grid 18 Guidelines 18 19 Pan 17 18 Rack positions 19 Setting cycle 17 CLEANING Broiler pan and grid 30 Control knobs 29 Control panel 29 Exterior surfaces 29 Griddle 3...

Page 40: ...l or consequential damages so this exclusion or limitation may not apply to you This warranty gives you specific legal rights and you may also have other rights which vary from state to state Outside the 50 United States this warranty does not apply Contact your local Whirlpool dealer to determine if another warranty applies If you need service first see the Troubleshooting section of this book Af...

Reviews: