background image

Page 4

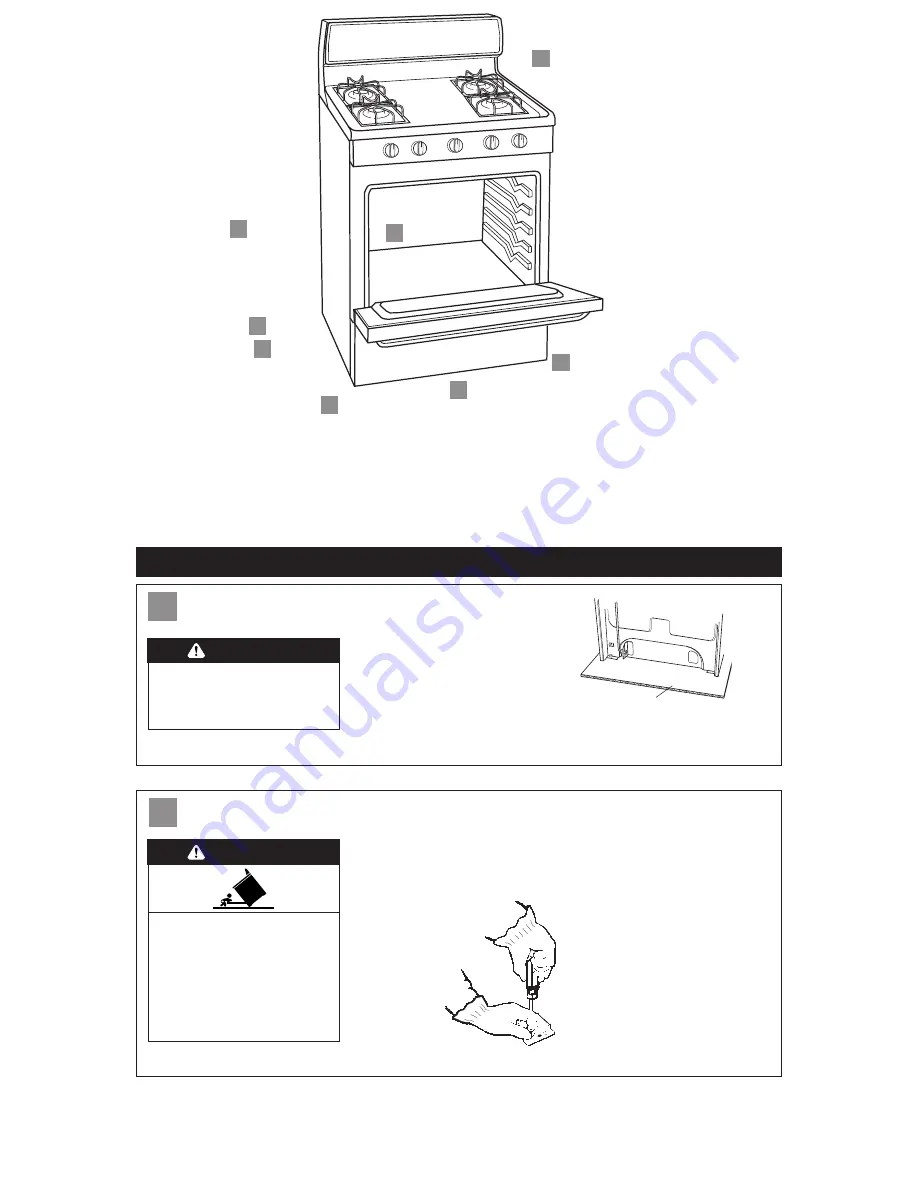
Installation steps

1.

Put on safety glasses and gloves. Do Not

use oven door handle to lift or move the range. 

Preparation

A

2.

Remove oven racks and parts package

from inside oven. Remove shipping materials,
tape and protective film from range.

Anti-tip bracket installation

B

B

E

Check cooktop
burners for
proper flame

D

Close broiler
door

C

Secure range
with anti-tip
bracket

Remove oven
racks and parts
package.

A

Remove shipping
material. 

C

Level range

D

Make proper
gas connection

E

Check burner
operation

Install anti-
tip bracket

3.

Keep cardboard shipping base under

range to prevent damage to floor covering.

cardboard 
shipping base

Excessive Weight Hazard

Use two or more people to move and
install range.
Failure to follow this instruction can
result in back or other injury.

WARNING

Tip Over Hazard

A child or adult can tip the range and
be killed.

Connect anti-tip bracket to rear range
foot.

Reconnect the anti-tip bracket, if the
range is moved.

Failure to follow these instructions
can result in death or serious burns
to children and adults.

WARNING

Contact a qualified floor covering installer for
the best procedure for drilling mounting holes
through your type floor covering.

4.

Use the anti-tip bracket

template/instruction sheet to install
the anti-tip bracket. 

Anti-tip bracket must be
anchored securely to the
sub floor.

Depending on the
thickness of your
flooring, longer
screws may be
needed to anchor
the bracket to the
sub floor. Longer
screws are available from
your local hardware store.

Summary of Contents for FGP300JN0

Page 1: ...about range installation or operation Need to obtain the name and number of an authorized service company When you call you will need The range model number The range serial number Both numbers are listed on the model serial rating plate located on the frame behind the broiler door Before you start Product dimensions Cabinet dimensions requirements Gas supply requirements Installation steps Gas co...

Page 2: ... cabinet supplier to make sure that the materials used will not discolor delaminate or sustain other damage Mobile home installation The installation of this range must conform with the Manufactured Home Construction and Safety Standard Title 24 CFR Part 3280 formerly the Federal Standard for Mobile Home Construction and Safety Title 24 HUD Part 280 or when such standard is not applicable the Stan...

Page 3: ... gas pressure regulator supplied with this range must be used The inlet pressure to the regulator should be as follows for proper operation NATURAL GAS Minimum pressure 5 inches WCP Maximum pressure 14 inches WCP L P GAS Minimum pressure 11 inches WCP Maximum pressure 14 inches WCP Contact local gas supplier if you are not sure about the inlet pressure Line pressure testing above 1 2 psi gauge 14 ...

Page 4: ...eight Hazard Use two or more people to move and install range Failure to follow this instruction can result in back or other injury WARNING Tip Over Hazard A child or adult can tip the range and be killed Connect anti tip bracket to rear range foot Reconnect the anti tip bracket if the range is moved Failure to follow these instructions can result in death or serious burns to children and adults W...

Page 5: ...burner grates burners and screws Lift cooktop Note There is no cooktop support rod 14 Light the burner pilots 1 Remove burner grates 2 Place a lit match through the small pilot holes in the cooktop located between front and rear burners 3 After lighting you must see a pilot flame in each pilot hole Note The pilot flames should be 1 2 to 5 8 inch high rear leveling leg front leveling leg manual shu...

Page 6: ... 350 F temperature 20 Check the oven burner for proper flame The flame should be 1 2 long with inner cone of bluish green and outer mantle of dark blue and should be clean and soft in character No yellow tips blowing or lifting of flame should occur If oven flame needs adjusting Locate the air shutter near rear wall of broiler area Loosen shutter screw and adjust the air shutter until the proper f...

Page 7: ... orifice spuds using a 3 8 combination wrench Install L P gas orifice spuds to replace the Natural gas orifice spuds Place Natural gas orifice spuds in plastic parts bag for future use and keep with literature package Reinstall burner tube and bracket assemblies Do not lower cooktop orifice spuds NAT L P L R L F R R R F gas manifold notches pressure regulator burner screw pressure regulator burner...

Page 8: ... selector key 5 Locate Natural gas orifice spuds in literature package included with the range All Natural gas spuds are stamped with 145 Remove L P gas orifice spuds using a 3 8 combination wrench Install Natural gas orifice spuds to replace the L P gas orifice spuds Place L P gas orifice spuds in plastic parts bag for future use and keep with literature package Reinstall burner tube and bracket ...

Page 9: ...range model number The range serial number Both numbers are listed on the model serial rating plate located on the frame behind the broiler door Part No 98007134 Rev A 2000 Whirlpool Corporation Printed in U S A Moving the range When moving range slide range onto cardboard or hardboard to prevent damaging the floor covering If removing the range is necessary for cleaning or maintenance 1 Shut off ...

Reviews: