background image

Summary of Contents for FGP315E W

Page 1: ...our Range 16 Troubleshooting 22 Requesting Assistance or Service 24 Index 27 Warranty 28 Call us with questions or comments TO THE INSTALLER PLEASE LEAVE THIS INSTRUCTION BOOK WITH THE UNIT TO THE CONSUMER PLEASE READ AND KEEP THIS BOOK FOR FUTURE REFERENCE MODELS FGP315E FGP325E FGP335E PART NO 3199295 Rev B Home Appliances 7194 ...

Page 2: ...ith your appjiance The card helps us notify you about any new information on your appliance Please recordyourmodel sinformation Whenever you call to request service for your appli ance you need to know your complete model number and serial number You can find this information on the model and serial number plate see the diagram on page 6 for the location of the plate Also record the other informat...

Page 3: ...E INSTRUCTIONS Gas ranges have been thoroughly tested for safe and efficient operation However as with any appliance there are specific installation and safety precautions which must be followed to ensure safe and satisfactory operation WARNING If the information in this manual is not followed exactly a fire or explosion may result causing property damage personal injury or death Do not store or u...

Page 4: ...on and They could be burned or injured or fire hazard 0 Do not operate the range if it is damaged or not 0 Do not use the oven for storage working properly l Do not use aluminum foil to line area around 0 Do not use the range for warming or heating the burners oven bottom or any other part of the room Persons could be burned or injured or a range fire could start 0 Never use a match or other flame...

Page 5: ...ce any part of the range unless specifically recommended in this manual All other servicing should be referred to a qualified technician Anyadditions changes or conversions required in order for this appliance to satisfactorily meet the application needs must be made by a Roper service company or Qualified Agency Disconnectthe electrical supply and the gas supply at the shutoff valve near the rang...

Page 6: ... you are interested in Model FGP335E shown Oven vent P 14 Surface burners and grates PP 7 16 Anti tip bracket P 15 Model and serial number plate behind left side of broiler door Broiler door PP 13917 CONIROL PANEL X Clock minute timer Model FGP335E only Pm 10 Control padel PP 7 16 Surface burner marker shows which burner you are setting Left rear Left front control knob Right front control knob Ri...

Page 7: ...rner with the control knob turned to LIGHT is the one that will ignite Burnerheatsettings Use the following chart as a guide SETTING RECOMMENDED USE LIGHT 0 To light the burner HIGH 0 To start foods cooking 0 To bring liquids to a boil Between 0 To hold a rapid boil HIGH 0 To fry chicken or pancakes and LOW 0 For gravy pudding and icing 0 To cook large amounts of vegetables LOW 0 To keep food warm...

Page 8: ... will build up and will damage the cooktop 0 Start with hot water This reduces the time the control is set on high Reduce the heat setting to the lowest position needed to keep the water boiling 0 Referto your canner manual for specific instructions POSITIONING RACKS AND PANS General guidelines Follow this section carefully to get the best cooking results 0 Before turning on the oven place oven ra...

Page 9: ...e the recom mended baking times so test for doneness before removing from the oven 0 When using ovenproof glassware or dark bake ware reduce the oven temperature by 25 F but use the same baking time Because these pans absorb heat producing darker bottom browning and crispier crusts place the rack in the center of the oven When baking pies and bread you can use the temperature suggested in the reci...

Page 10: ...ck setting will change if youpush in the knob when turning The minute timer does not start or stop the oven It works like a kitchen timer Set it in minutes up to an hour You will hear a buzzer when the set time is up NOTE Do not push in the knob when setting the minute timer Pushing in and turning the minute timer knob changes the clock setting 1 Without pushinq it in turn the minute timer knob US...

Page 11: ...ting I 4 After baking roasting turn the oven temperature I I control knob clockwise to OFF Enerpy savings tips 0 Oven peeking can make cooking times longer and affect food quality 0 Rely on a timer to keep track of cooking time 0 Plan your meals for the most efficient use of the oven by cooking more than one food at a time 0 If possible plan to bake while the oven is still hot after cooking 0 You ...

Page 12: ...as your oven cycles 1 Make sure the oven temperature control knob is turned to the off position Pull the knob straight off and flip it over 2 Loosen the locking screws inside the control knob Notches Locking Note the position of the notches 3 Adjust the temperature 0 To lower the temperature hold the knob handle firmly and turn the skirt clockwise to move the tooth a notch to the G on the COOLER a...

Page 13: ...oiler door Then pull out the broiler pan and grid 2 Place the broiler pan and grid so grease can drain down into the lower part of the broiler pan 3 Before the broiler is turned on place your food on the broiler pan Then place the pan on the broiler bottom or one of the two ledges 4 Close the broiler door 5 Push in and turn the oven temperature control knob counterclockwise to BROIL The broiler wi...

Page 14: ... 13 6 7 Pork Chops 1 thick 0 19 21 9 10 Ham Slice l z thick precooked 1 6 8 3 4 Frankfurters 1 5 6 2 3 Chicken bone in pieces 0 15 17 15 17 boneless breasts 1 11 13 11 13 Fish l 2 3 4 thick fillets 1 7 8 3 4 Times are guidelines only and may need to be adjusted to individual tastes A THE OVEN VENT Hot air and moisture escape from the oven through I T a vent that s near the middle of the backguard ...

Page 15: ...eed a flashlight Check that a leveling foot is positioned under the bracket 0 See the Installation Instructions for further details THE ANTI TIP BRACKET Tip Over Hazard Connect anti tip bracket to the range Reconnect anti tip bracket if the range is moved Do not push down on the open oven door Follow the Installation Instructions Do not let children climb onto the oven door Failure to follow these...

Page 16: ...ith a sponge and warm soapy water Wipe the panel with clean water and dry it well Do not use steel wool or gritty cleansers which can damage the finish OR 0 Wash the panel with a paper towel and spray glass cleaner Do not spray the cleaner directly on the panel Apply the cleaner to the paper towel Exterior surfaces other than control panel 0 Wash with a sponge and warm soapy water Wipe with clean ...

Page 17: ...steel wool pad and warm soapy water Rinse and dry well OR l Wash the pan and grid in a dishwasher Broiler 1 Make sure the broiler is cool before cleaning 2 After each use wipe the interior with a warm damp sponge For heavily soiled areas use a soapy steel wool pad Oven racks l Wash with a steel wool pad and warm soapy water Rinse and dry well Oven door glass Models FGP325E and FGP335E 0 Wash with ...

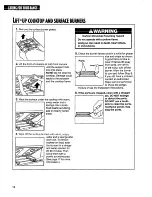
Page 18: ... scrubbing pad See page 17 for more information Carbon Monoxide Poisoning Hazard Do not operate with a yellow flame Doing so can result in death heart attack oi convulsions 5 Check the burner flames once in a while for proper size and shape as shown Ports A good flame is blue in color If flames lift away from ports are yellow or are noisy turn off the burner Allow the burner to cool and follow Ste...

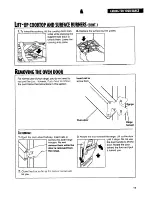
Page 19: ...the instructions in this section Insert nail or screw here Oven Hinge hanger Toremove 1 Open the door about halfway Insert nails or screws into both hinge hangers Do not remove them while the door is removed from the range 3 Rotate the door toward the range Lift up the door until it stops Do not use the door handle to lift the door Rotate the door toward the floor and pull it toward you 2 Close th...

Page 20: ... Position the door with the hinge hanger slots almost parallel to the front frame 4 Push up and in until the hinge hanger slots become fastened to the range Lower the door and rotate it slightly from the front to the back until the slots are fully fastened The hinge hanger will be close to the bottom of the front frame slot 5 Pull door open about halfway and remove the nails or screws 6 Close the ...

Page 21: ...d down screws at the rear of the oven If the screws are too tight to remove by hand use a screwdriver 4 Place your fingers in the slots in the bottom panel and lift the rear of the panel up and back until the lip at the front of the panel is clear of the front frame of the oven cavity 5 Lift the bottom up and out Toreplace Reverse the steps above 21 ...

Page 22: ... tripped a circuit breaker l The control knob is not set correctly Push in the control knobs before turning them PROBLEM CAUSE The oven does not work l You have not turned the oven temperature control knob to a temperature setting l The main or regulator gas shutoff valve is in the off position Seethe Installation Instructions The burner fails to light l The ignitor is broken Contact an authorized...

Page 23: ...oo low or too high See Adjusting the oven temperature control on page 12 to adjust the oven temperature l You did not preheat the oven before baking if called for in the recipe l The recipe you are using may need to be altered to improve the taste or appearance of the food l You are using a pan that is not the correct type or size Refer to a reliable cookbook or recipe for the recommended pan type...

Page 24: ...lso look in your telephone directory Yellow Pages I FYOU NEED REPLACEMENT PARTS If you need to order replacement parts we recommend that you only use FSP factory authorized parts FSP replacement parts will fit right and work right because they are made to the same exacting specifications used to build every new ROPER appliance To locate FSP replacement parts in your area call our Consumer Assistan...

Page 25: ... Oven door glass 17 Oven racks 17 Surface burners 17 l 9 Surface burner grates 16 CLOCK 10 CONTROL PANEL Burner heat settings 7 Control knobs 7 Surface burner markers 6 COOKWARE Canning 8 Tips 8 FEATURES 6 LIFT UP COOKTOP 18 MINUTE TIMER 10 MODEL AND SERIAL NUMBER 2 OVEN Bottom 21 Door 19 OVEN TEMPERATURE Adjusting 12 Setting 11 OVEN VENT 14 PANS 9 PARTS 6 RACKS 8 9 ROASTING Pans 9 Racks 8 9 Setti...

Page 26: ...horized modifications made to the appliance 7195 THIS ROPER APPLIANCE IS WARRANTED BY WHIRLPOOL CORPORATION UNDER NO CIRCUM STANCES SHALL IT BE LIABLE UNDER THIS WARRANTY FOR INCIDENTAL OR CONSEQUENTIAL DAMAGES Some states do not allow the exclusion or limitation of incidental or consequential damages so this exclusion or limitation may not apply to you This warranty gives you specific legal right...

Reviews: