background image

Summary of Contents for GH9115XE

Page 1: ... Microwave Oven 8 Microwave Cooking 26 Convection Cooking 48 Combination Cooking 59 Caring for Your Microwave Oven 67 Cooking Guide 72 Questions and Answers 77 If You Need Assistance or Service 78 Warranty 84 1 800 253 I 301 Call us with questions or comments Mlc 30D COMBINATION 7 q8 PART NO 3828W5A02661 4359575 MODELS GH9115XE MH9115XE ...

Page 2: ...ng with the temperature probe 36 Using AUTO ROAST 39 Auto roast chart 40 Using AUTO START 41 Using SENSOR COOK 43 Using PIZZA REHEAT 44 Using REHEAT 45 Using POPCORN 46 Using ADD MINUTE 47 Adding or subtracting cook time 47 Convection Cooking 48 How convection cooking works 48 Convection baking without preheating 49 Convection baking with preheating 50 Convection broiling 52 Convenience foods cook...

Page 3: ...ur appli ance The card helps us notify you about any new information on your appliance Please record your model s information Whenever you call to request service for Model Number your appliance you need to know your complete model number and serial number Serial Number You can find this information on the model Purchase Date and serial number plate see diagram in the Dealer Name Microwave oven fe...

Page 4: ...crowave energy Do not use corrosive chemicals or vapors l Read all instructions before using the in the microwave oven This type of oven microwave oven is specifically designed to heat cook or l Read and follow the specific PRE dry food It is not designed for industrial or CAUTIONS TO AVOID POSSIBLE laboratory use EXPOSURE TO EXCESSIVE As with any appliance close supervision MICROWAVE ENERGY found...

Page 5: ...isk of fire in the oven cavity Do not overcook food Carefully attend the microwave oven if paper plastic or other combustible materials are placed inside the oven to facilitate cooking Remove wire twist ties from paper or plastic bags before placing bag in oven Do not use the cavity for storage pur poses Do not leave paper products cooking utensils or food in the cavity when not in use Do not moun...

Page 6: ...cks b Do not place any object between the oven front face and the door or allow soil or cleaner residue to accumulate on sealing surfaces c Do not operate the oven if it is damaged It is particularly important that the oven door close properly and that there is no damage to the 1 Door bent 2 Hinges and latches broken or loosened 3 Door seals and sealing surfaces d The oven should not be adjusted o...

Page 7: ...e for the electric current The microwave oven is equipped with a cord having a grounding wire with a grounding plug The plug must be plugged into an outlet that is properly installed and grounded WARNING Improper use of the grounding can result in a risk of electric shock Consult a qualified electrician or service man if the grounding instructions are not completely understood or if doubt exists a...

Page 8: ...ch as gasoline near the microwave oven Doing so can result in death explosion fire or burns How your microwave oven works Microwave ovens are safe Microwave energy is not hot It causes food to make its own heat and it s this heat that cooks the food Microwaves are like TV waves or light waves You cannot see them but you can see what they do A magnetron in the microwave oven produces microwaves The...

Page 9: ...ooking This is one of the reasons for letting some foods for example roasts or baked potatoes stand for a while after cooking or for stirring some foods during the cooking time The microwaves disturb water molecules in the food As the molecules bounce around bumping into each other heat is made like rubbing your hands together This is the heat that does the cooking NOTE Do not deep fry in the oven...

Page 10: ...food is evenly cooked Radio interference Using your microwave oven may cause interference to your radio TV or similar equipment When there is interference you can reduce it or remove it by l Cleaning the door and sealing surfaces of the oven l Adjusting the receiving antenna of the radio or television l Moving the receiver away from the microwave oven l Plugging the microwave oven into a different...

Page 11: ...eheat a whole egg inside the shell Steam buildup in whole eggs may cause them to burst and burn you and possibly damage the oven Slice hard boiled eggs before heating In rare cases poached eggs have been known to explode Cover poached eggs and allow a standing time of one minute before cutting into them For best results stir any liquid several times before heating or reheating Liquids heated in ce...

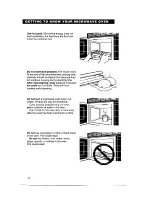
Page 12: ...g wrap potatoes in foil and set aside for 5 minutes They will finish cooking while standing Do not start a microwave oven when it is empty Product life may be shortened If you practice programming the oven put a container of water in the oven It is normal for the oven door to look wavy after the oven has been running for a while Do not use newspaper or other printed paper in the oven Fire could re...

Page 13: ...ctrical connection If your electric power line or outlet voltage is less than 110 volts cooking times may be longer Have a qualified electrician check your electrical system Circuit breaker or fuse box 13 ...

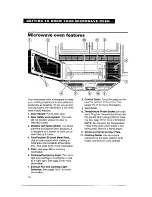
Page 14: ...page 22 for more information 5 Filter See page 68 for cleaning information 6 CooktoplCountertop Light Turn on to light your cooktop or countertop or use as a night light See page 20 for more information 7 Exhaust Fan and Cooktop Light Switches See pages 18 21 for more information 14 8 Control Panel Touch the pads on this panel to perform all functions See pages 15 l 7 for more information 9 Vent G...

Page 15: ...u time of day cooking time settings and cooking functions selected 2 COOK TIME Touch this pad followed by Number Pads to set a cooking time See pages 26 28 and 29 for more information 3 COOK POWER Touch this pad after the cook time has been set followed by a Number Pad to set the amount of micro wave energy released to cook the food The higher the number the higher the microwave power or cooking s...

Page 16: ...pending on the amount of humidity it detects from the food See page 43 for more information 12 AUTO ROAST Touch this pad to roast with the Temperature Probe See page 39 for more information 16 13 14 15 16 17 18 19 20 21 22 23 24 25 CONVECTION BAKE Touch this pad to bake with convection heat See pages 49 52 and pages 55 56 for more information CONVECTION BROIL Touch this pad to broil with convectio...

Page 17: ...nals l Touch and hold Number Pad 1 for 4 seconds to disable programming tones To turn signals back on Touch and hold Number Pad 1 for 4 seconds NOTE Three tones followed by two tones will sound when audible signals are turned on or off Interrupting cooking You can stop the oven during a cycle by opening the door The oven stops heating and the fan stops but the light stays on To restart cooking clo...

Page 18: ...atically turn on at the LOW setting to protect the OR oven It may stay on up to an hour to cool the oven When this occurs the OFF pad will not turn the fan off 2 Turn off fan when desired TOUCH To set fan to run for a specific time 1 Stat t fan TOUCH 2 Choose timer NOTE If both the fan and light are operating and the TIMER SET pad is touched twice both the fan and light will be controlled by the t...

Page 19: ...ture has been selected If both the timed fan and light feature have been selected an H Hood will be displayed At end of time the current time of day will show and no tones will sound To check the stop time The set time will be displayed for 3 seconds TOUCH YOU SEE m m OR I T s EFR I TOUCH I I TIMER SET To cancel timer NOTE Canceling the timer will cause the fan to shut off however canceling the fa...

Page 20: ...HT NIGHT LIGHT OFF 1 Turn on light TOUCH El LIGHT OR 2 Turn off light when desired TOUCH I OFF To set light to be on for a specific time 1 Turn on light TOUCH OR 2 Choose timer NOTE If both the fan and light are operating and the TIMER SET pad is touched twice both the fan and light will be controlled by the timer TOUCH YOU SEE 20 ...

Page 21: ...imed light feature has been selected If both the timed light and fan feature have been gg I selected an H Hood will be displayed OR At end of time the current time of day will show and no tones will sound l l TIMER SET To check the stop time TOUCH The set time will be displayed for 3 seconds l l TIMER SET To cancel timer NOTE Canceling the timer will cause the light to shut off however canceling t...

Page 22: ...e walls of the oven Bottom position Insert rack securely on bottom of oven when using taller containers Burn Hazard Use oven mitts to remove items from microwave Do not touch areas near oven vent openings during use Failure to follow these instructions can result in burns NOTES l Do not store the metal rack in the oven Arcing and damage to the oven could result if someone accidentally starts the o...

Page 23: ...e If a time of day is not set 888 88 will show on the Display until you touch CLOCK To set time NOTES l You can only set the clock if the oven is not cooking food l If you touch in an incorrect time and touch CLOCK three tones will sound Enter the correct time l If you touch OFF CANCEL while setting the clock the Display will show the last time of day set or if no time of day has been set 1 Choose...

Page 24: ...YOU SEE 2 Enter time to be counted down Example for 1 minute 30 seconds NOTE If you enter more than four digits 3 tones will sound Touch START ENTER to count down the 3 digit time you have entered or touch TIMER OFF to clear the Display To start over touch TIMER SET and re enter desired time TOUCH YOU SEE L Ll 3 Start countdown L NOTE If you do not do this step within 3 seconds of doing Step 2 STA...

Page 25: ...At end of countdown YOU SEE one tone will sound To cancel Minute Timer During countdown After countdown TOUCH YOU SEE El F 25 ...

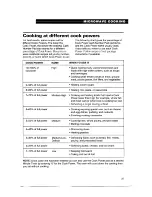
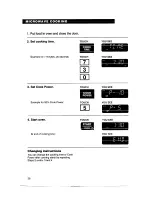
Page 26: ... carefully Cooking at high cook power 1 Put food in oven and close the door 2 Set cooking time Example for 1 minute 30 seconds TOUCH TOUCH YOU SEE 3 Start oven At end of cooking time TOUCH YOU SEE YOU SEE mmI Changing instructions You can change the cooking time after cooking starts by repeating Steps 2 and 3 26 ...

Page 27: ... Heating cream soups 8 80 of full power l Heating rice pasta or casseroles 7 70 of full power Medium High l Cooking and heating foods that need a Cook Power lower than high for example whole fish and meat loaf or when food is cooking too fast l Reheating a single serving of food 6 60 of full power l Cooking requiring special care such as cheese and egg dishes pudding and custards l Finishing cooki...

Page 28: ...inutes 30 seconds TOUCH YOU SEE 3 Set Cook Power TOUCH YOU SEE Example for 50 Cook Power TOUCH YOU SEE 4 Start oven TOUCH YOU SEE At end of cooking time YOU SEE Changing instructions You can change the cooking time or Cook Power after cooking starts by repeating Steps 2 and or 3 and 4 28 ...

Page 29: ... be set to change from one to another automatically for up to two cycles 1 Put food in oven and close the door 2 Set cooking time for first cycle TOUCH YOU SEE Example for 7 minutes 30 seconds YOU SEE 3 Set Cook Power for first cycle TOUCH YOU SEE Example for 50 Cook Power YOU SEE 4 Repeat Steps 2 and 3 to set cooking time and Cook Power for the second cycle continued on next page 29 ...

Page 30: ... Meat Poultry and Fish All you do is touch the Command Pad assigned to the desired category and enter the weight of the items being defrosted Your microwave oven does the rest NOTES l See the Auto defrost chart for defrosting directions for each food l To defrost items not listed in Auto defrost chart use 30 Cook Power Refer to a reliable cookbook for defrosting information Refer to the following ...

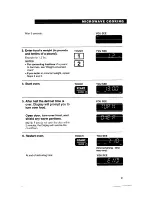
Page 31: ... you enter an incorrect weight repeat Steps 2 and 3 4 Start oven TOUCH YOU SEE 5 After half the defrost time is over Display will prompt you to turn over food Open door turn over food and shield any warm portions NOTE If you do not open the door within 2 minutes the Display will resume the countdown YOU SEE 6 Restart oven YOU SEE time remaining time may vary At end of defrosting time YOU SEE ...

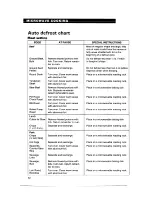
Page 32: ...Separate remainder Return remainder to oven Pot Roast Turn over Cover warm areas Place on a microwavable roasting rack Chuck Roast with aluminum foil Rib Roast Turn over Cover warm areas Place on a microwavable roasting rack with aluminum foil Rolled Rump Turn over Cover warm areas Place on a microwavable roasting rack Roast with aluminum foil Lamb Cubes for Stew Remove thawed portions with Place ...

Page 33: ...wavable baking dish Carefully separate fillets under cold water Place in a microwavable baking dish Run cold water over to finish defrosting Place in a microwavable baking dish Cover head and tail with foil do not let foil touch sides of microwave oven Finish defrosting by immersing in cold water Place in a microwavable baking dish Place in a microwavable baking dish Place in a microwavable baking...

Page 34: ... a refrigerator freezer that does not maintain a tempera ture of 0 F or below always program a lower food weight for a shorter defrosting time to prevent cooking the food l If the food is kept outside the freezer for up to 20 minutes enter a lower food weight l If the food is kept outside the freezer for more than 20 minutes and for defrosting ready made food defrost by time and power and let stan...

Page 35: ... a dinner plate should be covered during WARM HOLD l Do not use more than one complete WARM HOLD cycle about 1 hour 40 minutes The quality of some foods will suffer with extended time l Pastry items pies turnovers etc should be uncovered during WARM HOLD 1 Put hot cooked food in oven and close the door 2 Choose setting TOUCH YOU SEE To make WARM HOLD auto matically follow another cycle l While you...

Page 36: ...e your cookbook for helpful information on problem or removing the probe touch cooking different types of food START ENTER to clear the Display 1 Insert probe into food Insert at least 15of the Temperature Probe into the food See Temperature probe cooking tips in this section 2 Place food in oven and plug probe into socket on oven wall Make sure the probe does not touch any part of the oven interi...

Page 37: ... and PROBE When food reaches the desired temperature YOU SEE YOU SEE To change final food tempera ture after oven has started 1 Touch PROBE TEMP You will see the current set temperature 2 Re enter desired temperature 3 Touch START ENTER NOTE If you do not touch START ENTER within 1 minute after entering the new temperature the oven will resume heating to the first temperature you set You can ensur...

Page 38: ...aw veg etables and cream sauces in casseroles l Dry casseroles do not work well l Thaw frozen casseroles and meats in the microwave oven before inserting the probe l If you are cooking more than one indi vidual serving at the same time such as mugs of soup check the probe setting in several of the items all the mugs may not heat at the same rate l Dry meat loaf mixtures do not work well l Check po...

Page 39: ... result in burns Using AUTO ROAST AUTO ROAST lets you roast food with the Temperature Probe without needing to enter a final food temperature The probe will turn off the oven when it senses the preprogrammed final food temperature for the food category you chose 1 Perform Steps 1 2 and 3 under Cooking with the temperature probe 2 Choose food category Keep touching AUTO ROAST until the desired food...

Page 40: ...minutes Put tip of probe in center of largest muscle but not touching fat or bone Shield top of roast with alumi num foil sauce or vegetables Cover roast with foil after cooking and let stand a few minutes Put tip of probe in center of largest muscle but not touching fat or bone Shield top of roast with alumi num foil sauce or vegetables Cover roast with foil after cooking and let stand a few minu...

Page 41: ...ANCEL and start over l You can use AUTO START with high power or lower power cooking tempera ture probe cooking and WARM HOLD l Do not use foods containing baking powder or yeast when using AUTO START They will not rise properly Food Poisoning Hazard Do not let food sit in oven more than one hour before or after cooking Doing so can result in death food poisoning or sickness 1 Put food in oven and...

Page 42: ...OU SEE 30 seconds El ml lol 6 Complete entry Example when time of day is 12 o clock TOUCH YOU SEE time of day The oven will start cooking at the set time NOTE If the door is opened before the start time is reached the Display will show DOOR and OPEN until the door is closed You must touch START ENTER to resume AUTO START At end of cooking time 42 YOU SEE mlmu ...

Page 43: ... ENTER Your microwave oven does the rest 1 Put food in oven and close the door Refer to the following chart to choose a category CATEGORY TOUCH SENSOR COOK Frozen Entree once 10 20 oz Casserole twice 1 4 cups at refrig erated temperature Rice X 2 cups three times Baked Potato l 4 four times Fresh Vegetables five times l 4 cups Frozen Vegetables six times l 4 cups Canned Vegetables seven times l 4 ...

Page 44: ...ed by the pizza and the amount of humidity detected tells the oven how long to heat your pizza 1 Place pizza on a paper towel and close the door 2 Choose PIZZA REHEAT TOUCH YOU SEE When oven detects a certain amount of humidity from the pizza heating time is displayed Example YOU SEE this time will vary At end of heating time YOU SEE 44 ...

Page 45: ...Reheating chart for reheat ing with cooking time and Cook Power Refer to the following chart to choose a category REHEAT 8 or 16 oz at refrig erated temperature Soup Sauce l 4 cups at room temperature twice 1 Place food in oven and close the door 2 Touch REHEAT to choose food category once for Plate twice for Soup Sauce three times for Casserole Example for Plate TOUCH YOU SEE once After 3 seconds...

Page 46: ...n popper follow manufacturer s instructions Cooking performance may vary with brand and fat content Try several brands to decide which gives best popping results For best results use fresh bags of popcorn 1 Place bag in oven and close the door Fire Hazard Do not repop unpopped kernels Do not reuse popcorn bags Doing so can result in death fire or burns 2 Choose POPCORN TOUCH YOU SEE and After CORN...

Page 47: ...fter cooking is over the oven will cook at 100 Cook Power l You cannot use ADD MINUTE with POPCORN AUTO ROAST REHEAT PIZZA REHEAT SENSOR COOK or AUTO DEFROST l You cannot use ADD MINUTE to start the oven if any program other than the Minute Timer is on the Display 1 Make sure food is in the oven 2 Choose ADD MINUTE Example for cooking for 1 minute Adding or subtracting cook time If a preset cook t...

Page 48: ...ooking times from the convection oven cooking directions See examples in your cookbook and in the charts in this section l When baking cakes cookies breads rolls or other baked foods most recipes call for preheating Preheat the empty oven just as you do a regular oven You can start heavier dense foods such as meats casseroles and poultry without preheating l All heatproof cookware or metal utensil...

Page 49: ...onvection combination cycle Convection baking without preheating meats casseroles and poultry 1 Put food in oven and close the door 2 Choose setting Oven will automatically cook at 350 F TOUCH YOU SEE CONVECTION 3 Set baking temperature TOUCH YOU SEE optional You can enter a temperature between 150 F and 450 F Example for 325 F NOTE To clear the temperature you entered touch CONVECTION BAKE before...

Page 50: ...OUCH YOU SEE YOU SEE 5 Start oven TOUCH NOTE You can see the cooking tem perature anytime during cooking by touching CONVECTION BAKE Cooking temperature will show for 3 seconds time will count down At end of cooking time YOU SEE Convection baking with preheating 1 Choose setting TOUCH YOU SEE CONVECTION 2 Set preheat cooking temperature 50 ...

Page 51: ...E YOU SEE m 4 Start oven TOUCH YOU SEE When the oven temperature reaches 15O F the temperature will be displayed The displayed temperature will change each time temperature goes up by five degrees NOTES If you open the door during preheating preheating will stop To resume pre heating after you open the door close the door and touch START ENTER When the oven reaches the set preheat temperature two ...

Page 52: ...ng cooking by touching CONVECTION BAKE The cooking temperature will show for 3 seconds At end of cooking time time for cook cycle will count down YOU SEE Convection broiling 1 Choose setting TOUCH YOU SEE CONVECTION 2 Set cooking cycle cooking time TOUCH YOU SEE You can enter a time up to 199 minutes 99 seconds Example for 20 minutes 52 ...

Page 53: ...ch START ENTER l When the oven reaches the set preheat temperature two tones will sound and the oven will automatically hold that temperature for 30 minutes The Display will show the set temperature 4 After preheating open the door put food in oven and close the door NOTE You can see the cooking temperature anytime during cooking by touching CONVECTION BAKE The cooking temperature will show for 3 ...

Page 54: ... time and cook cookware When cooking or baking these longer only if needed Use oven mitts to convenience foods follow package insert or remove items from the oven CONVECTION PECIAL INSTRUCTIONS 14 l 6 minutes Cook directly on Bi Level Metal Rack for crisper crust ke in g inch square pan Bi Level Metal Rack ke in metal or ovenproof n on Bi Level Metal Rack CONVECTION Bake one layer at a time on Lev...

Page 55: ... food l For correct probe temperatures for different foods see the Temperature probe convection cooking chart 1 Insert probe into food Insert at least of the Temperature Probe into the food See Temperature probe cooking tips in the Microwave Cooking section 2 Place food in oven and plug probe into socket on oven wall Make sure the probe does not touch any part of the oven interior including the ra...

Page 56: ...to change the cooking tem perature follow the example below If you want to cook at 35O F go to Step 7 YOU SEE CONVECTION Example for 325 F TOUCH YOU SEE 7 Start oven When food temperature reaches 9O F the Display will show the actual tempera ture of the food as it increases to the desired temperature TOUCH YOU SEE When food reaches desired temperature YOU SEE 56 ...

Page 57: ...F Rare 120 F Med 130 F Rare 120 F Med 130 F Well 140 F Med 130 F Well 140 F Rare 145 F Med 155 F Well 165 F 150 F SPECIAL NOTES Preheat Let stand 5 l 0 min Cook in microwave proof and heatproof dish with Bi Level Metal Rack Let stand 10 min after cooking covered Cook in microwave proof and heatproof dish Let stand 10 min after cooking covered Cook in covered microwaveproof and heatproof casserole ...

Page 58: ...Bi Level 3 3X Ibs Metal Rack Let stand 10 min after cooking covered ark ork Loin Roast boneless 4 5 Ibs 350 F 5 7 min per lb 6 8 min 165 F Cook in microwave Turn over per lb proof and heatproof baking dish Let stand 10 min after cooking covered Pork Loin center cut 4 5 Ibs 350 F 5 7 min per lb 6 8 min 165 F Cook in microwave Turn over per lb proof and heatproof baking dish Let stand 10 min after c...

Page 59: ...baking some bakeware may cause arcing when it comes in contact with the oven walls or metal accessory racks Arcing is a discharge of electricity that occurs when microwaves come in contact with metal If arcing occurs place a heatproof dish between the pan and the Bi Level Metal Rack If arcing occurs with other bakeware stop using them for combination cooking Combination microwave convection Someti...

Page 60: ...OMBINATION BAKE when baking or COMBINATION 121 ROAST when roasting before entering a cooking time You can then re enter the 151 cooking temperature if desired 4 Set cooking time One second after entering cook temperature YOU SEE You can enter a time up to 199 minutes 99 seconds Example for 20 minutes TOUCH YOU SEE 5 Start oven TOUCH YOU SEE NOTE You can see the cooking tem perature anytime during ...

Page 61: ...ng and 300 F for m a A combination roasting If you want to change the preheat cooking temperature follow the example below If you want to preheat cook at the default temperature go to Step 3 Example for 325 F TOUCH YOU SEE 3 Set cooking cycle cooking time One second after entering cook temperature You can enter a time up to 199 minutes 99 seconds Example for 20 minutes YOlJ SEE TOUCH YOU SEE 12110...

Page 62: ...s the set preheat temperature two tones will sound and the oven will automatically hold that temperature for 30 minutes The Display will show the set temperature TOUCH YOU SEE display shows oven is preheating 5 After preheating open the door put food in oven and close the door NOTE You can see the cooking tem perature anytime during cooking by touching COMBINATION BAKE when baking or COMBINATION R...

Page 63: ...r helpful information on cooking different types of food turn on l For correct probe temperatures for dif ferent foods see the Temperature probe combination cooking chart in this section 1 Insert probe into food Insert at least of the Temperature Probe into the food See Temperature probe cooking tips in the Microwave Cooking section 2 Place food in oven and plug probe into socket on oven wall Make...

Page 64: ...If you want to change the cooking temperature follow the example below If you want to cook at the default temperature go to Step 7 Example for 325 F TOUCH YOU SEE TOUCH 131 El YOU SEE 7 Start oven TOUCH YDU SEE When food temperature reaches 15O F the Display will show the actual tempera ture of the food as it increases to the desired temperature When food reaches desired temperature Y OU SEE 64 ...

Page 65: ... 10 min Rare 120 F Cook in microwave Roast with Fat side down per lb Med 130 F proof and heatproof bone 5 Ibs Turn over Well 140 F dish Let stand 10 min after cooking covered Beef Pot 350 F 7 min per lb 8 10 min Med 130 F Cook in covered Roast Turn over per lb Well 140 F microwave proof and boneless heatproof casserole 3 Ibs or cooking bag Lamb Lamb Leg or 350 F 4 min per lb 5 7 min Rare 145 F Coo...

Page 66: ...Ibs 325 F 4 5 min per lb 4 6 min 155 F Cook in microwave Turn over per lb proof and heatproof dish with Bi Level Metal Rack Let stand 10 min after cooking covered Pork Pork Loin Roast boneless 4 5 Ibs 350 F 5 7 min per lb 6 8 min 165 F Cook in microwave Turn over per lb proof and heatproof baking dish Let stand 10 min after cooking covered Pork Loin center cut 4 5 Ibs 350 F 5 7 min per lb 6 8 min ...

Page 67: ...or exterior surfaces and control panel Use a soft cloth with spray glass cleaner Apply spray glass cleaner to soft cloth do not spray directly on oven NOTE Abrasive cleansers steel wool pads gritty wash cloths some paper towels etc can damage the control panel and the interior and exterior oven surfaces Cleaning the bi level metal rack l Wash by hand with a mild detergent and a soft or nylon scrub...

Page 68: ...ak grease filters in hot water and a mild detergent Scrub and swish to remove embedded dirt and grease Rinse well and shake to dry Do not clean filters with ammonia corrosive cleaning agents such as lye based oven cleaners or place them in a dishwasher The filters will turn black or could be damaged Before removing filters l Unplug power cord or turn off power supply Grease filters 3 To replace gr...

Page 69: ...ance Center at 1 800 253 I 301 1 2 3 If you need to remove an existing charcoal filter remove the vent cover mounting screws Tip the cover forward then lift out to remove Lift the back of the charcoal filter Slide the filter straight out 4 Slide a new charcoal filter into place The filter should rest at the angle shown 4 5 Slide the bottom of the vent cover into place Push the top until it snaps i...

Page 70: ...b Failure to follow the above could result in fire or electrical shock The cooktop light 1 Turn off power at the main power supply 2 Remove the bulb cover mounting screws 3 We recommend replacing bulb s with candelabra base 30 watt bulb s available from your authorized Whirlpool service company Part No 4158432 4 Turn the power back on at the main power supply 70 ...

Page 71: ...rews 3 Tip the cover forward then lift out to remove 4 Remove bulb holder mounting screw 5 Lift up the bulb holder 6 We recommend replacing the bulb with a candelabra base 30 watt bulb available from your authorized Whirlpool service company Part No 4158432 7 Replace the bulb holder and mounting screw 8 Slide the top of the vent cover into place Push the bottom until it snaps into place Replace th...

Page 72: ...0 4 6 servings Refrigerated 13 l 6 min at 50 Soup Cream Cover Stir after half 1 cup Refrigerated 3 4 min at 50 the time 1 can 10 02 Room temp 5 7 min at 50 Soup Clear Cover Stir after half 1 cup Refrigerated 2 3X min at 100 the time 1 can 103 4oz Room temp 4 5X min at 100 Pizza Place on paper towel 1 slice Room temp 15 25 set at 100 1 slice Refrigerated 30 40 set at 100 2 slices Room temp 30 40 se...

Page 73: ...3 19 min 1 Ibs Chicken 100 6 9 min lb Pieces Internal temperature should be 185 F after standing Turkey 100 5 min Breast then 70 8 l 2 min lb Internal temperature should be 185 F after standing Fish Fillets 100 1 lb Scallops and 100 Shrimp 1 lb 5 6 min 3Y2 5 min FOOD POWER TIME Applesauce 100 7 l 0 min 4 servings Baked 100 4 6 min AtvIes 4 Chocolate melt 1 square 50 l 2 min Eggs 100 Scrambled 2 1 ...

Page 74: ...haped pieces of food cook more evenly than irregularly shaped foods l With unevenly shaped foods the thinner parts will cook faster than the thicker areas Place the thinner parts of chicken wings and legs in the center of the dish 74 Stirring turning foods l Stirring and turning foods distributes heat quickly to the center of the dish and avoids overcooking at the outer edges of the food Covering ...

Page 75: ...be longer because microwaves will only penetrate the top of the food If you use aluminum containers without package instructions follow these guidelines l Place container in a glass bowl and add some water so that it covers the bottom of the container not more than X inch high This ensures even heating of the container bottom l Always remove the lid to avoid damage to the oven l Use only undamaged...

Page 76: ...r microwave convection oven For your safety and to prevent damage to cookware and your oven choose appropriate cookware and materials for each cooking method The list below is a general guide to help you select the correct cookware and materials Microwave Safe Plasticware 76 ...

Page 77: ...e oven is operating when the magnetron tube cycles on Why does the dish become hot when I As the food becomes hoi it will conduct the microwave food in it I thought that this heat to the dish Be prepared to use hot should not happen pads to remove food after cooking What does standing time mean Standing time means that food should be removed from the oven and covered for additional time to allow i...

Page 78: ...t with the proper voltage technician to wire unit into a live circuit with the proper voltage See Installa tion Instructions A household fuse has blown or Replace household fuse or reset circuit a circuit breaker has tripped breaker The electric company has Check electric company for a power experienced a power failure failure The microwave You are using the oven as a Touch TIMER OFF to cancel the...

Page 79: ...cooking time luring convec and proper rack position ion and combi tation cooking Foods are not prepared and Make sure foods are properly pre ready to place in the oven pared and ready to place in oven This increases heat loss from the door being open smoke is This is normal just as in oming from conventional broiling lack of oven furing broiling The microwave Probe is not pushed far Insert at leas...

Page 80: ...e after warranty service anywhere in the United States To locate the authorized Whirlpool service company in your area call our Consumer Assistance Center telephone number see Step 2 or look in your tele phone directory Yellow Pages under APPLIANCE HOUSEHOLD WASHING MACHINES 8 MAJOR SERVICE REPAIR DRYERS SERVICE REPAIR 4 If you are not satisfied with how the problem was solved l Contact the Major ...

Page 81: ...ed by accident misuse fire flood acts of God or use of products not approved by Whirlpool E Any labor costs during limited warranty F Repairs to parts or systems caused by unauthorized modifications made to the appliance 396 WHIRLPOOL CORPORATION SHALL NOT BE LIABLE FOR INCIDENTAL OR CONSE QUENTIAL DAMAGES Some states do not allow the exclusion or limitation of incidental or consequential damages ...

Reviews: