18
3.
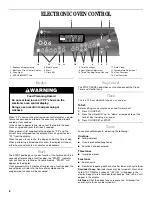
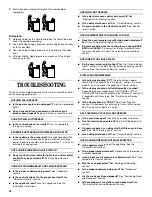
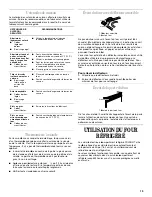
Push door down and pull straight out to remove door
completely.
To Replace:
1.
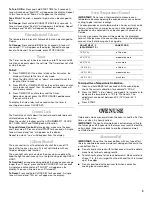
Hold oven door by the handle and place the top of the door
under the cooktop overhang.
2.
Use front of leg to apply pressure to slide hinges into the slots
as far as possible.
3.
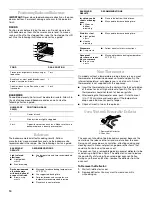
Use side of leg to apply pressure to the bottom of the door
front.
4.
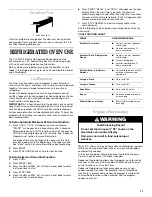
Lift door slightly. Apply pressure and push until the hinges
have gone in fully.
TROUBLESHOOTING
Try the solutions suggested here first in order to avoid the cost of
an unnecessary service call.
NOTHING WILL OPERATE
■
Is the power supply cord unplugged?
Plug into a grounded
outlet.
■
Has a household fuse been blown or has the circuit
breaker been tripped?
Replace the fuse or reset the circuit.
COOKTOP WILL NOT OPERATE
■
Is the control knob set correctly?
Push in knob before
turning to a setting.
EXCESSIVE HEAT AROUND COOKWARE ON COOKTOP
■
Is the cookware the proper size?
Use cookware about the
same size as the surface cooking area, element or surface
burner. Cookware should not extend more than 1 in. (2.5 cm)
outside the cooking area.
HOT SURFACE INDICATOR LIGHT STAYS ON
■
Does the Hot Surface indicator light stay on after control
knob(s) have been turned off?
See “Cooktop Controls”
section.
COOKTOP COOKING RESULTS NOT WHAT EXPECTED
■
Is the proper cookware being used?
See “Cookware”
section.
■
Is the control knob set to the proper heat level?
See
“Cooktop Controls” section.
■
Is the appliance level?
Level the appliance. See the
Installation Instructions.
OVEN WILL NOT OPERATE
■
Is the electronic oven control set correctly?
See
“Electronic Oven Control” section.
■
Has a delay start been set?
See “Timed Cooking” section.
■
On some models, is the Control Lock set?
See “Control
Lock” section.
OVEN TEMPERATURE TOO HIGH OR TOO LOW
■
Does the oven temperature calibration need adjustment?
See “Oven Temperature Control” section.
■
On some models, does the cooling fan run during BAKE,
BROIL or CLEAN?
It is normal for the fan to automatically
run when the oven is in use. This helps cool the electronic
control.
OVEN INDICATOR LIGHTS FLASH
■
Do the oven indicator lights flash?
See the “Oven Indicator
Lights” section. If the indicator light(s) keeps flashing, call for
service. See “Assistance or Service” section.
DISPLAY SHOWS MESSAGES
■
Is the display showing “PF”?
There has been a power
failure. Clear the display. See “Display(s)” section. On some
models, reset the clock, if needed. See “Clock” section.
■
Is the display showing a letter followed by a number?
Depending on your model, press OFF/CANCEL, OFF or
CANCEL/OFF to clear the display. See “Display(s)” section. If
it reappears, call for service. See “Assistance or Service”
section.
■
Is the display flashing “COOL”?
See “Cool Function”
section. If it reappears or continues to flash, call for service.
See “Assistance or Service” section.
SELF-CLEANING CYCLE WILL NOT OPERATE
■
Is the oven door open?
Close the oven door all the way.
■
Has the function been entered?
See “Self-Cleaning Cycle”
section.
■
On some models, has a delay start Self-Clean cycle been
set?
See “Self-Cleaning Cycle” section.
■
Has a delay start been set?
See “Timed Cooking” section.
OVEN COOKING RESULTS NOT WHAT EXPECTED
■
Is the appliance level?
Level the appliance. See the
Installation Instructions.
■
Is the proper temperature set?
Double-check the recipe in
a reliable cookbook.
■
Is the proper oven temperature calibration set?
See “Oven
Temperature Control” section.
■
Was the oven preheated?
See “Baking and Roasting”
section.
■
Is the proper bakeware being used?
See “Bakeware”
section.
■
Are the racks positioned properly?
See “Positioning Racks
and Bakeware” section.
■
Is there proper air circulation around bakeware?
See
“Positioning Racks and Bakeware” section.
4"
4" (10 cm)

