background image

14

numbered from the bottom (1) to the top (4). Do not use position 
5. For diagram, see the “Positioning Racks and Bakeware” 
section.

Convection Cooking

(on some models)

In a convection oven, the fan-circulated hot air continually 
distributes heat more evenly than the natural movement of air in a 
standard thermal oven. This movement of hot air maintains a 
consistent temperature throughout the oven, cooking foods more 
evenly, crisping surfaces while sealing in moisture and yielding 
crustier breads.

Most foods can be cooked by lowering cooking temperatures 
25°F to 50°F (14°C to 28°C) and cooking time can be shortened 
by as much as 30 percent, especially for large turkeys and roasts.

It is important not to cover foods so that surface areas remain 
exposed to the circulating air, allowing browning and crisping.

Keep heat loss to a minimum by opening the oven door only 
when necessary.

Choose cookie sheets without sides and roasting pans with 
lower sides to allow air to move freely around the food.

Test baked goods for doneness a few minutes before the 
minimum cooking time with an alternative method such as a 
toothpick.

Use a meat thermometer or the temperature probe to 
determine the doneness of meats and poultry. Check the 
temperature of pork and poultry in 2 or 3 places.

Convection Bake

(on some models)

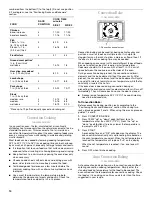
                     1. Convection bake element

Convection baking can be used for baking delicate cakes and 
pastries, as well as foods on multiple racks. It is helpful to 
stagger items on the racks to allow a more even flow of heat. If 
the oven is full, extra cooking time may be needed.

When cooking an oven meal with several different types of foods, 
be sure to select recipes that require similar temperatures. 
Cookware should sit in the oven with at least 1 in. (2.5 cm) of 
space between the cookware and the sides of the oven.

During convection baking preheat, the convection and broil 
elements and the bake element all heat the oven cavity. After 
preheat, the convection element and the bake element will cycle 
on and off in intervals to maintain oven temperature, while the fan 
constantly circulates the hot air.

If the oven door is opened during convection baking or 
preheating, the broil and convection element and fan will turn off 
immediately. They will come back on once the door is closed.

Reduce recipe temperature 25°F (14°C). The cook time may 
need to be reduced also.

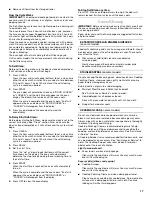
To Convection Bake:

Before convection baking, position racks according to the 
“Positioning Racks and Bakeware” section. When using two 
racks, place on guides 2 and 4. When using three racks, place on 
guides 1, 3 and 5.

1. Press CONVECTION BAKE.

2. Press TEMP “up” or “down” pads (buttons) to set a 

temperature other than 350°F (175°C). Press the “up” or 
“down” pads (buttons) to raise or lower the temperature in  
increments of 5°F or 5°C.

3. Press START.

A preheating time and “PrE” will appear on the display. The 
oven control automatically sets a preheating time based on 
the oven temperature you select. When the set temperature is 
reached, the temperature will replace “PrE” on the display.

When the set temperature is reached, if on, one tone will 
sound.

4. Press OFF when finished cooking.

Auto Convection Baking 

(on some models)

Auto convection baking allows you to convection cook without 
entering convection cooking temperatures. Simply enter the 
standard cooking temperature for the food to be cooked. The 
oven will reduce the temperature for convection cooking. Check 
the food as it is cooking since it may cook faster than the time 
suggested in your recipe.

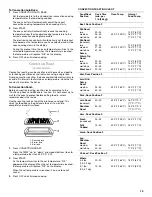
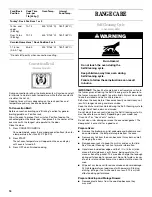
FOOD

RACK 
POSITION

COOK TIME
minutes

SIDE 1       SIDE 2

Chicken
bone-in pieces
boneless breasts

3
4

17-20
11-16

17-20
11-16

Fish
Fillets 

¹₄

¹₂

 in.

(.6-1.25 cm) thick
Steaks 

³₄

- 1 in.

(2-2.5 cm) thick

4

4

8-10

16-18

4-5

8-9

Frankfurters

4

5-7

3-4

Ground meat patties*

³₄

 in. (2 cm) thick

well done

4

13-14

7-8

Ham slice, precooked

¹₂ 

in. (1.25 cm) thick

4

8-10

4-5

Lamb chops
1 in. (2.5 cm) thick

4

14-17

8-9

Pork chops
1 in. (2.5 cm) thick

4

20-22

10-11

Steak
1 in. (2.5 cm) thick
medium rare
medium
well done

4
4
4

14-15
15-16
18-19

7-8
8-9
9-10

*Place up to 12 patties, equally spaced, on broiler grid.

1

Summary of Contents for GY395LXGB0

Page 1: ... 253 1301 In Canada call for assistance 1 800 461 5681 for installation and service call 1 800 807 6777 or visit our website at www whirlpool com or www whirlpool com canada Table of Contents 2 9752912B To the installer please leave this instruction book with the unit To the consumer please read and keep this book for future reference ...

Page 2: ...ock 10 Oven Temperature Control 10 OVEN USE 11 Aluminum Foil 11 Positioning Racks and Bakeware 11 Bakeware 11 Oven Vents 12 Oven Light 12 Bake 12 Timed Cooking 13 Broil 13 Convection Cooking 14 Convection Bake 14 Auto Convection Baking 14 Convection Roast 15 Convection Broil 16 RANGE CARE 16 Self Cleaning Cycle 16 General Cleaning 17 Control Panel Glass 18 Oven Light 18 Cooktop Light Replacement 1...

Page 3: ...ssages in this manual and on your appliance Always read and obey all safety messages This is the safety alert symbol This symbol alerts you to potential hazards that can kill or hurt you and others All safety messages will follow the safety alert symbol and either the word DANGER or WARNING These words mean Tip Over Hazard A child or adult can tip the range and be killed Connect anti tip bracket t...

Page 4: ...e the cooktop and surfaces facing the cooktop IMPORTANT SAFETY INSTRUCTIONS Use Proper Pan Size The range is equipped with one or more surface units of different size Select utensils having flat bottoms large enough to cover the surface unit heating element The use of under sized utensils will expose a portion of the heating element to direct contact and may result in ignition of clothing Proper r...

Page 5: ...f the appliance may become hot enough to cause burns among these surfaces are oven vent openings and surfaces near these openings oven doors and windows of oven doors IMPORTANT SAFETY INSTRUCTIONS SAVE THESE INSTRUCTIONS For self cleaning ranges Do Not Clean Door Gasket The door gasket is essential for a good seal Care should be taken not to rub damage or move the gasket Do Not Use Oven Cleaners N...

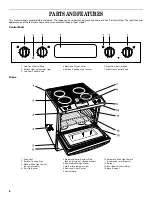
Page 6: ...3 Left Rear Control Knob 4 Electronic Oven Control 5 Surface Cooking Area Locator 6 Right Rear Control Knob 7 Right Front Control Knob 1 Oven Vent 2 Surface Cooking Area 3 Manual Oven Light Switch on some models 4 Anti Tip Bracket 5 Model and Serial Number Plate behind left side of storage drawer 6 Removable Storage Drawer 7 Hot Surface Indicator Light 8 Electronic Oven Control 9 Control Panel 10 ...

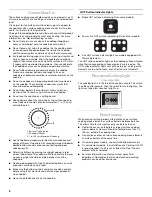
Page 7: ... the recommended maximum time to maintain food quality Do not use it to heat cold foods The Warming Element can be used alone or when any of the other surface cooking areas are being used The Warming Element area will not glow red when cycling on However its indicator light will glow as long as the Warming Element area is too hot to touch Use only cookware and dishes recommended for oven and cookt...

Page 8: ...n heating and poor cooking results Determine flatness by placing the straight edge of a ruler across the bottom of the cookware While you rotate the ruler no space or light should be visible between it and the cookware Cookware designed with slightly indented bottoms or small expansion channels can be used Make sure the bottoms of pots and pans are clean and dry before using them Residue and water...

Page 9: ...f 1 to 59 minutes the display will count down in seconds For settings 1 hour or over the display will count down hours and minutes When using COOK TIME the display will show hours and minutes When using STOP TIME the display will show minutes and seconds Start After setting a function you must press the START button to start the function If you do not press the START button within 5 seconds START ...

Page 10: ...med function will be canceled When the set time ends end of cycle tones will sound then if on reminder tones will sound every minute 4 Press TIMER OFF anytime to cancel the Timer Remember do not press the OFF pad button because the oven will turn off To display the time of day when the timer is counting down press CLOCK ControlLock The Control Lock shuts down the control panel pads buttons to prev...

Page 11: ...circulate Allow 2 in 5 cm of space around bakeware and oven walls Use the following chart as a guide Bakeware The bakeware material affects cooking results Follow manufacturer s recommendations and use the bakeware size recommended in the recipe Use the following chart as a guide FOOD RACK POSITION Frozen pies large roasts turkeys angel food cakes 1 or 2 Bundt cakes most quick breads yeast breads ...

Page 12: ...re section When roasting it is not necessary to wait for the oven to preheat before putting food in unless recommended in the recipe 1 Press BAKE Press the TEMP up or down arrow pads buttons to enter a temperature other than 350 F 175 C Press the up or down pads buttons to raise or lower the temperature in increments of 5 F or 5 C 2 Press START A preheat time will count down and PrE will appear on...

Page 13: ...top position Use only the broiler pan and grid provided with the range It is designed to drain juices and help prevent spatter and smoke For proper draining do not cover the grid with foil The bottom of the pan may be lined with aluminum foil for easier cleaning Trim excess fat to reduce spattering Slit the remaining fat on the edges to prevent curling Pull out oven rack to stop position before tu...

Page 14: ...ter preheat the convection element and the bake element will cycle on and off in intervals to maintain oven temperature while the fan constantly circulates the hot air If the oven door is opened during convection baking or preheating the broil and convection element and fan will turn off immediately They will come back on once the door is closed Reduce recipe temperature 25 F 14 C The cook time ma...

Page 15: ...n and grid This holds the food above the grid and allows air to circulate completely around all surfaces 1 Roasting rack 2 Broiler grid 3 Broil pan 1 Press CONVECTION ROAST Press the TEMP up or down arrow pads buttons to enter a temperature other than 350 F 175 C 2 Press START As the temperature rises to the set temperature PrE appears on the display When the set temperature is reached the tempera...

Page 16: ... be able to move freely Depending on your model see Oven Vent or Oven Vents section Do not clean rub damage or move the oven door gasket The door gasket is essential for a good seal Prepare Oven Remove the broiler pan grid cookware and bakeware and on some models the temperature probe from the oven Remove any foil from the oven because it may burn or melt damaging the oven Remove oven racks to kee...

Page 17: ...art time is reached the oven will automatically turn on When the cycle is complete and the oven cools End will appear on the oven display and DOOR LOCKED or LOCKED will disappear from the display 5 Press OFF to clear the oven display To Stop Self Clean any time Press OFF If the oven temperature is too high the door will remain locked It will not unlock until the oven cools GeneralCleaning IMPORTAN...

Page 18: ...hould be cleaned when oven cools At high temperatures foods react with porcelain and staining etching pitting or faint white spots can result Self Cleaning cycle See Self Cleaning Cycle first OVEN AND ROASTING RACKS Self Cleaning cycle See Self Cleaning Cycle first Remove racks or they will discolor and become harder to slide If this happens a light coating of vegetable oil applied to the rack gui...

Page 19: ...Door For normal range use it is not suggested to remove the oven door However if removal is necessary make sure the oven is off and cool then follow these instructions The oven door is heavy To Remove 1 Fully open the oven door 2 Unscrew clips with a 2 square or Phillips screwdriver 3 Close oven door to the stop position open about 4 in 10 cm 4 Lift door slightly and pull out and back until hinges...

Page 20: ...is helps cool the electronic control Display shows messages Is the display showing PF There has been a power failure Clear the display See Display s section On some models reset the clock if needed See Clock section Is the display showing a letter followed by a number Depending on your model press OFF CANCEL OFF or CANCEL OFF to clear the display See Display s section If it reappears call for serv...

Page 21: ...mpanies Whirlpool designated service technicians are trained to fulfill the product warranty and provide after warranty service anywhere in the United States To locate the Whirlpool designated service company in your area you can also look in your telephone directory Yellow Pages For further assistance If you need further assistance you can write to Whirlpool Corporation with any questions or conc...

Page 22: ...22 Notes ...

Page 23: ...23 Notes ...

Page 24: ...his warranty gives you specific legal rights and you may also have other rights which may vary from state to state or province to province Outside the 50 United States and Canada this warranty does not apply Contact your authorized Whirlpool dealer to determine if another warranty applies If you need service first see the Troubleshooting section of this book After checking Troubleshooting addition...

Page 25: ...posez le 1 800 461 5681 pour installation ou service le 1 800 807 6777 ou visitez notre site web à www whirlpool com canada Table des matières 2 9752912FB Pour l installateur laisser ce manuel d instructions avec l appareil Pour le consommateur lire ce manuel et le conserver pour consultation ultérieure ...

Page 26: ...mande de température du four 11 UTILISATION DU FOUR 11 Papier d aluminium 11 Positionnement des grilles et des ustensiles de cuisson 11 Ustensiles de cuisson 12 Évents du four 12 Lampe du four 13 Cuisson au four 13 Cuisson minutée 13 Cuisson au gril 14 Cuisson par convection 15 Cuisson au four par convection 15 Autocuisson au four par convection 16 Rôtissage par convection 16 Cuisson au gril par c...

Page 27: ...e sécurité suivront le symbole d alerte de sécurité et le mot DANGER ou AVERTISSEMENT Ces mots signifient DANGER AVERTISSEMENT Assurez vous de toujours lire tous les messages de sécurité et de vous y conformer à vous et à d autres Voici le symbole d alerte de sécurité vous ne suivez pas immédiatement les instructions blessure et ce Risque de basculement Un enfant ou une personne adulte peut faire ...

Page 28: ...tissu épais IMPORTANTES INSTRUCTIONS DE SÉCURITÉ NE PAS TOUCHER LES ÉLÉMENTS DE SURFACE OU L ESPACE PRÈS DES ÉLÉMENTS Les éléments de surface peuvent être chauds même lorsqu ils ont une teinte foncée Les endroits près des éléments de surface peuvent devenir assez chauds pour causer des brûlures Pendant et après l utilisation ne pas toucher les éléments chauffants et ne pas laisser les vêtements ou...

Page 29: ...ES INTÉRIEURES DU FOUR Les éléments chauffants peuvent être chauds même s ils ont une teinte foncée Les surfaces intérieures d un four deviennent assez chaudes pour causer des brûlures Pendant et après l utilisation ne pas IMPORTANTES INSTRUCTIONS DE SÉCURITÉ toucher ou laisser des vêtements ou autres matériaux inflammables venir en contact avec les éléments chauds ou les surfaces intérieures chau...

Page 30: ...ronique du four 5 Repère de zone de cuisson à la surface 6 Bouton de commande arrière droit 7 Bouton de commande avant droit 1 Évent du four 2 Zone de cuisson à la surface 3 Interrupteur manuel de lampe du four sur certains modèles 4 Bride antibasculement 5 Plaque signalétique des numéros de modèle et de série derrière le côté gauche du tiroir de rangement 6 Tiroir de rangement amovible 7 Témoin l...

Page 31: ...haud les aliments cuits Une heure est la durée maximale recommandée pour maintenir la qualité des aliments Ne pas l utiliser pour chauffer des aliments froids L élément de réchauffage peut être utilisé seul ou lorsque toute autre zone de cuisson à la surface est utilisée L élément de réchauffage ne sera pas rouge lorsqu il s allume Toutefois son témoin lumineux s illuminera tant que la zone de l é...

Page 32: ...e cuisson Ne pas faire cuire sur la table de cuisson du maïs soufflé dans des récipients préemballés en aluminium Cela pourrait laisser des marques d aluminium qui ne peuvent être complètement enlevées Ne pas laisser des objets qui pourraient fondre comme du plastique ou du papier aluminium toucher une partie quelconque de la table de cuisson Ne pas utiliser la table de cuisson comme planche à déc...

Page 33: ...ond plat des parois droites un couvercle qui ferme bien et le matériau doit être d épaisseur moyenne à forte Les finis rugueux peuvent égratigner la table de cuisson L aluminium et le cuivre peuvent être utilisés comme fond ou base d un ustensile de cuisson Toutefois lorsqu ils sont utilisés comme base ils peuvent laisser des marques permanentes sur la surface de cuisson ou les grilles Le matériau...

Page 34: ...rrectement ou la fin d un programme Annulation de tous les signaux sonores sauf la fin d un compte à rebours et les signaux d erreur 1 Appuyer sur le bouton STOP TIME heure d arrêt pendant 5 secondes 2 Un bref signal se fait entendre lorsque les signaux sonores ont été changés Pour réactiver les signaux répéter l étape 1 3 OFF arrêt s affiche pendant 3 secondes lorsque les signaux sonores ont été ...

Page 35: ...r augmenter ou diminuer la température en tranches de 10ºF 6ºC L ajustement peut être réglé entre 30ºF 18ºC et 30ºF 18ºC 3 Appuyer sur START mise en marche Pour afficher les températures en ºC plutôt qu en ºF Appuyer sur le bouton BROIL gril pendant 5 secondes Un bref signal sonore se fait entendre et l affichage de la température passe à ºC Répéter pour retourner à ºF UTILISATION DUFOUR Les odeur...

Page 36: ... DE CUISSON RÉSULTATS RECOMMANDATIONS Aluminium légèrement coloré Croûtes légèrement dorées Brunissage égal Utiliser la température et la durée recommandées dans la recette Aluminium foncé et autres ustensiles de cuisson avec fini foncé terne et ou antiadhésif Croûtes brunes croustillantes Peut nécessiter de réduire les températures de cuisson de 25 F 15 C Utiliser la durée de cuisson suggérée Pou...

Page 37: ...onction de la température du four choisie Lorsque la température réelle du four est atteinte la température réglée remplace PrE sur l afficheur Lorsque la température réglée est atteinte un seul signal sonore se fait entendre si activé 3 Appuyer sur OFF arrêt lorsque la cuisson est terminée La température peut être changée en tout temps après avoir appuyé sur START mise en marche Préchauffage Les ...

Page 38: ...r Retirer la grille jusqu à la butée d arrêt avant de tourner ou d enlever les aliments Utiliser des pinces pour tourner les aliments afin d éviter la perte de jus Il est possible qu il ne soit pas nécessaire de tourner les coupes très minces de poisson volaille ou viande Après la cuisson au gril sortir la lèchefrite du four en même temps que l aliment Ce qui reste au fond de la lèchefrite cuira s...

Page 39: ...ypes différents d aliments veiller à choisir des recettes nécessitant des températures semblables Prévoir un espace d au moins 1 po 2 5 cm entre l ustensile de cuisson et les parois du four Lors du préchauffage pour la cuisson au four par convection les éléments de convection et du gril et l élément de cuisson au four chauffent tous la cavité du four Après le préchauffage l élément de convection e...

Page 40: ...aire rôtir les viandes et la volaille ou pour faire cuire des pains à levure et des quatre quarts sur une seule grille Durant le rôtissage par convection les éléments de cuisson au four et de gril s allument et s éteignent par intermittence pour maintenir la température du four et le ventilateur fait circuler constamment l air chaud Rôtissage par convection Avant le rôtissage par convection placer...

Page 41: ...nsible aux émanations qui surviennent durant le programme d autonettoyage L exposition aux émanations peut entraîner la mort de certains oiseaux Toujours déplacer les oiseaux dans une autre pièce fermée et bien aérée Procéder à l autonettoyage du four avant qu il ne devienne très sale Les saletés intenses nécessitent un nettoyage plus long et dégagent plus de fumée Veiller à ce que la cuisine soit...

Page 42: ...toyage s assurer que la porte est complètement fermée sinon elle ne se verrouillera pas et le programme ne commencera pas 1 Appuyer sur CLEAN nettoyage Appuyer sur les touches boutons des heures et minutes pour établir une durée de nettoyage autre que 3 h 30 minutes On peut choisir une durée entre 2 et 4 heures Les 30 dernières minutes du programme d autonettoyage sont une période de refroidisseme...

Page 43: ...ter la crème sur la surface avec un essuie tout ou un linge doux humide Continuer de frotter jusqu à ce que la pellicule blanche disparaisse Souillure épaisse rayures foncées piqûres et décoloration Crème à polir pour table de cuisson ou produit de nettoyage non abrasif Frotter le produit dans la souillure avec un essuie tout ou un linge doux humide Continuer de frotter jusqu à ce que la pellicule...

Page 44: ...ommage aux composants électroniques se trouvant derrière la vitre ne pas les nettoyer Retrait de la vitre 1 Retirer les boutons de commande en les tirant droit vers soi 2 Dégager les pinces 3 Retirer la vitre en la tirant légèrement vers le haut et vers l avant Lampedufour surcertainsmodèles La lampe du four contient une ampoule d appareils ménagers standard de 40 watts Elle s allume lorsqu on ouv...

Page 45: ... un tournevis Phillips ou d un tournevis à tête carrée nº 2 3 Fermer la porte du four à la position d arrêt ouvrir d environ 4 po 10 cm 4 Soulever légèrement la porte et la tirer des charnières jusqu à la position du taquet 5 Pousser la porte vers le bas et tirer tout droit pour enlever complètement la porte Pour réinstaller la porte 1 Tenir la porte du four par la poignée et placer le dessus de l...
Page 46: ...mise en marche différée a t elle été réglée Voir la section Cuisson minutée Sur certains modèles le verrouillage des commandes est il réglé Voir la section Verrouillage des commandes La température du four est trop élevée ou trop basse Le calibrage de la température du four a t il besoin d être ajusté Voir la section Commande de la température du four Sur les modèles coulissants le ventilateur de ...

Page 47: ...ce désigné le plus proche de Whirlpool AuxÉtats Unis Téléphoner au Centre d interaction avec la clientèle de Whirlpool Corporation sans frais d interurbain au 1 800 253 1301 Nos consultants sont prêts à vous aider pour les questions suivantes Caractéristiques et spécifications sur toute notre gamme d appareils électroménagers Renseignements d installation Procédés d utilisation et d entretien Vent...

Page 48: ...dommages secondaires ou indirects de sorte que cette exclusion ou limitation peut ne pas être applicable dans votre cas Cette garantie vous confère des droits juridiques spécifiques et vous pouvez également jouir d autres droits qui peuvent varier d une province à l autre À l extérieur du Canada cette garantie ne s applique pas Contacter votre marchand Whirlpool autorisé pour déterminer si une aut...

Reviews: