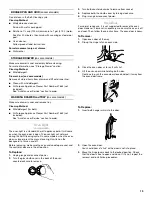
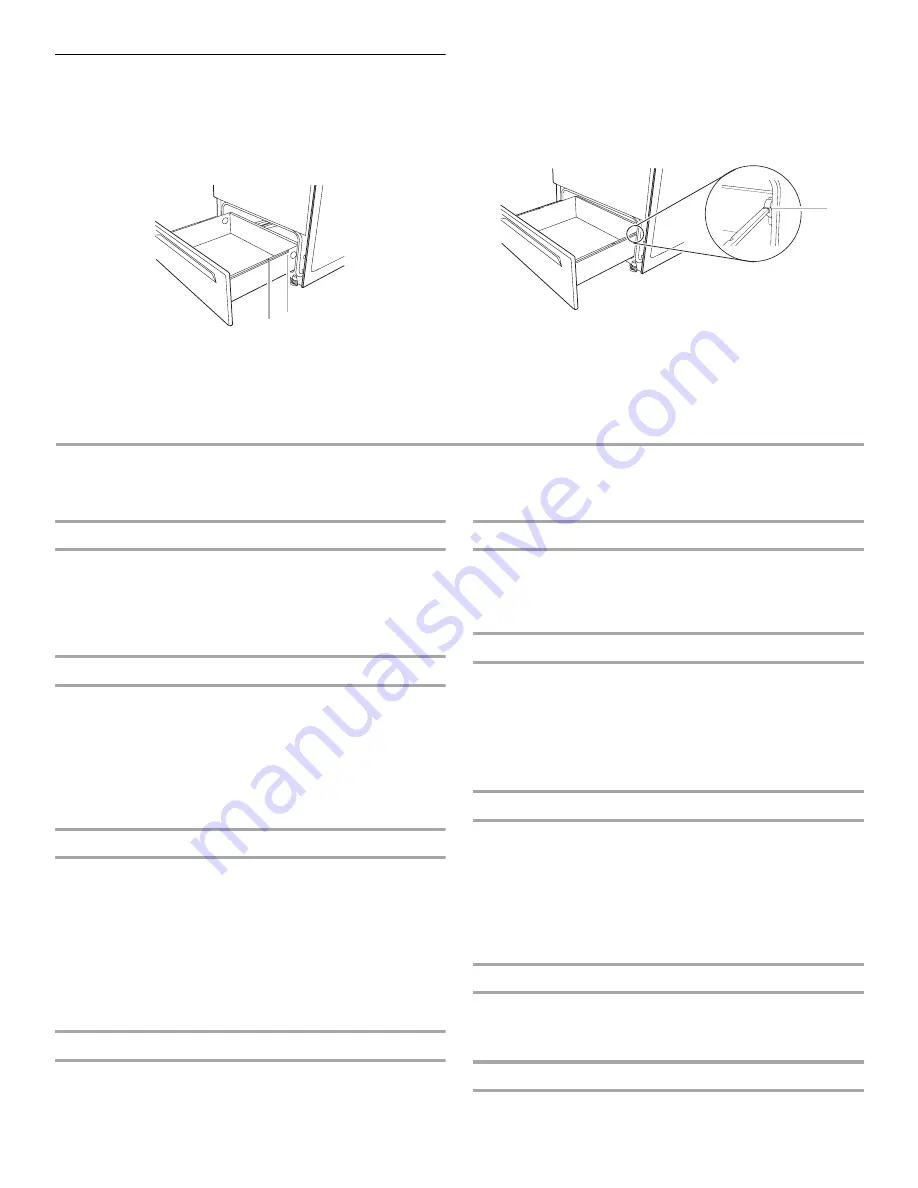
background image

14

Storage Drawer

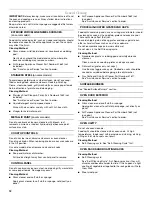
The storage drawer can be removed. Before removing, make sure 
drawer is cool and empty.

To Remove:

1. Pull the storage drawer straight back past the drawer stop 

notch and the end of the side rails.

2. Lift up the back of the drawer and pull the drawer out.
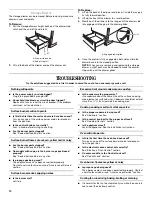
To Replace:

1. Lift up the back of the drawer and place it inside the range in 

its fully forward position.

2. Lift up the front of the drawer to a level position.

3. Slowly push the drawer into the range until the drawer side 

rails engage with the gap in the drawer glides.

4. Once the drawer is fully engaged on both sides, slide the 

drawer back into the closed position. 

NOTE: When you are removing and replacing the storage 
drawer, a slight push may be needed to move the drawer 
stop notch past the drawer glides.

TROUBLESHOOTING

Try the solutions suggested here first in order to avoid the cost of an unnecessary service call.

Nothing will operate

Is the power supply cord unplugged?
Plug into a grounded 3 prong outlet.

Household fuse blown or circuit breaker tripped?
Replace the fuse or reset the circuit breaker. If the problem 
continues, call an electrician.

Surface burners will not operate

Is this the first time the surface burners have been used?    
Turn on any one of the surface burner knobs to release air 
from the gas lines.

Is the control knob set correctly?
Push in knob before turning to a setting.

Are the burner ports clogged?
See “Sealed Surface Burners” section.

Surface burner flames are uneven, yellow and/or noisy

Are the burner ports clogged? 
See “Sealed Surface Burners” section.

On models with caps, are the burner caps positioned 
properly?
See “Sealed Surface Burners” section.

Is propane gas being used?
The appliance may have been converted improperly.    
Contact a service technician or see “Assistance or Service” 
section.

Surface burner makes popping noises

Is the burner wet?
Let it dry.

Excessive heat around cookware on cooktop

Is the cookware the proper size?
Use cookware about the same size as the surface cooking 
area, element or surface burner. Cookware should not extend 
more than ½" (1.3 cm) outside the cooking area.

Cooktop cooking results not what expected

Is the proper cookware being used?
See “Cookware” section.

Is the control knob set to the proper heat level?
See “Cooktop Controls” section.

Is the appliance level?
Level the appliance. See the Installation Instructions.

Oven will not operate

Is this the first time the oven has been used?
Turn on any one of the surface burner knobs to release air 
from the gas lines.

Is the electronic oven control set correctly?
See “Electronic Oven Control” section.

On some models, is the Control Lock set?
See “Control Lock” section.

Oven burner flames are yellow or noisy

Is propane gas being used?
The appliance may have been converted improperly. Contact 
a service technician or see “Assistance or Service” section.

Cooling fan runs during baking, broiling or cleaning

It is normal for the fan to automatically run while the oven is in 
use to cool the electronic control.

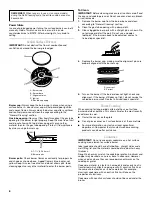
A. Drawer stop notch
B. End of side rail

A

B

A. Engage drawer glide.

A

Summary of Contents for INglis IGS325RQ2

Page 1: ... features operation performance parts accessories or service call 1 800 253 1301 Table of Contents 2 W10017540 To the installer Please leave this instruction book with the unit To the consumer Please read and keep this book for future reference ...

Page 2: ...OTING 14 ASSISTANCE OR SERVICE 15 WARRANTY 16 RANGE SAFETY You can be killed or seriously injured if you don t immediately You can be killed or seriously injured if you don t follow All safety messages will tell you what the potential hazard is tell you how to reduce the chance of injury and tell you what can happen if the instructions are not followed Your safety and the safety of others are very...

Page 3: ...a Safe Drinking Water and Toxic Enforcement Act requires the Governor of California to publish a list of substances known to the State of California to cause cancer birth defects or other reproductive harm and requires businesses to warn of potential exposure to such substances WARNING This product contains a chemical known to the State of California to cause cancer birth defects or other reproduc...

Page 4: ...s could be seriously injured Proper Installation The range when installed must be electrically grounded in accordance with local codes or in the absence of local codes with the National Electrical Code ANSI NFPA70 Be sure the range is properly installed and grounded by a qualified technician This range is equipped with a three prong grounding plug for your protection against shock hazard and shoul...

Page 5: ...ft front surface burner D Surface burner grate E Anti tip bracket F Door stop clip G Model and serial number plate behind left side of storage drawer H Storage drawer I Electronic oven control J Right rear surface burner K Right front surface burner L Cooktop control panel M Door gasket N Self clean latch O Gas regulator M A C D B E F G H N O L I J K WARNING Fire Hazard Do not let the burner flame...

Page 6: ...ner needs to be adjusted contact a trained repair specialist 4 Replace the burner cap making sure the alignment pins are properly aligned with the burner cap 5 Turn on the burner If the burner does not light check cap alignment If the burner still does not light do not service the sealed burner yourself Contact a trained repair specialist HomeCanning When canning for long periods alternate the use...

Page 7: ...continue to operate after an oven function has been canceled depending on oven temperature Clock This is a 12 hour clock and does not show a m or p m To Set Before setting make sure the oven and Timer are off 1 Press CLOCK 2 Press the TEMP TIME up or down arrow pad to set the time of day 3 Press START ENTER or CLOCK Tones Tones are audible signals indicating the following One tone Valid pad press ...

Page 8: ...our previous oven so the temperature calibration can be adjusted A minus sign means the oven will be cooler by the displayed amount The absence of a sign means the oven will be warmer by the displayed amount Use the following chart as a guide To Adjust Oven Temperature Calibration 1 Press and hold BAKE for 5 seconds until the oven display shows the current calibration for example 00 2 Press the TE...

Page 9: ...g results Do not set plastics paper or other items that could melt or burn near the oven vent BakingandRoasting IMPORTANT Do not place food or cookware directly on the oven door or the oven bottom Before baking and roasting position racks according to the Positioning Racks and Bakeware section To Bake or Roast 1 Touch BAKE Touch TEMP up or down arrow pads to set a temperature other than 350 F 177 ...

Page 10: ... according to the Broiling Chart It is not necessary to preheat the oven before putting food in unless recommended in the recipe Position food on grid in the broiler pan then place it in the center of the oven rack Close the door To Broil 1 Press CUSTOM BROIL 2 Press START ENTER 3 Press OFF CANCEL when finished To Custom Broil 1 Press CUSTOM BROIL 2 Press TEMP TIME up or down arrow pad to change t...

Page 11: ... edge and the 1 3 8 cm area around the inside oven cavity frame being certain not to move or bend the gasket This area does not get hot enough during self cleaning to remove soil Do not let water cleaner etc enter slots on door frame Use a damp cloth to clean this area Wipe out any loose soil to reduce smoke and avoid damage At high temperatures foods react with porcelain Staining etching pitting ...

Page 12: ...o not use abrasive cleaners steel wool pads gritty washcloths or some paper towels Damage may occur Cleaning Method Glass cleaner and soft cloth or sponge Apply glass cleaner to soft cloth or sponge not directly on panel All Purpose Appliance Cleaner Part Number 31662 not included See Assistance or Service section to order PORCELAIN COATED GRATES AND CAPS Food spills containing acids such as vineg...

Page 13: ...open The oven light will not work during the Self Cleaning cycle On some models when the oven door is closed press the manual oven light switch on the backguard to turn on and off Before replacing make sure the oven and cooktop are cool and the control knobs are in the off position To Replace 1 Unplug range or disconnect power 2 Turn the glass bulb cover in the back of the oven counterclockwise to...

Page 14: ...Burners section Surface burner flames are uneven yellow and or noisy Are the burner ports clogged See Sealed Surface Burners section On models with caps are the burner caps positioned properly See Sealed Surface Burners section Is propane gas being used The appliance may have been converted improperly Contact a service technician or see Assistance or Service section Surface burner makes popping no...

Page 15: ...sistance or service please check Troubleshooting It may save you the cost of a service call If you still need help follow the instructions below When calling please know the purchase date and the complete model and serial number of your appliance This information will help us to better respond to your request If you need replacement parts If you need to order replacement parts we recommend that yo...

Page 16: ... WARRANTY SHALL BE PRODUCT REPAIR AS PROVIDED HEREIN IMPLIED WARRANTIES INCLUDING WARRANTIES OF MERCHANTABILITY OR FITNESS FOR A PARTICULAR PURPOSE ARE LIMITED TO ONE YEAR OR THE SHORTEST PERIOD ALLOWED BY LAW WHIRLPOOL SHALL NOT BE LIABLE FOR INCIDENTAL OR CONSEQUENTIAL DAMAGES SOME STATES AND PROVINCES DO NOT ALLOW THE EXCLUSION OR LIMITATION OF INCIDENTAL OR CONSEQUENTIAL DAMAGES OR LIMITATIONS...

Reviews: