background image

3

3. Attach the brackets to the back of the laundry tower using the 

screws (provided). Align the brackets so that the latch is 
pointing up.

4. Attach the console to the laundry tower. Align the locators on 

the console with the brackets and push down until the latches 
snap into place and the magnets on the bottom of the console 
attach to the top panel.
NOTE: Once installed, the console can be removed only by 
removing the 2 console screws.

Install the Laundry Tower

1. Situate the laundry tower near its final location. Open the 

drawers to remove any contents stored inside.

2. To determine how far to extend the leveling feet, measure the 

height of the washer and/or dryer you are installing the laundry 
tower next to or between.    


NOTE: Refer to the laundry tower dimensions in “Location 
Requirements.”

3. Place a piece of cardboard on the floor and, using two or more 

people, lay the laundry tower on its side. 

4. Turn all four feet out to the dimension determined in Step 2.
5. Using two or more people, return the laundry tower to the 

upright position.

6. Check the laundry tower height and levelness and adjust the 

feet as needed.

7. Once the laundry tower is at the appropriate height and is 

level, use a 

⁹⁄₁₆

" (14 mm) open-end wrench to securely tighten 

all four locknuts against the laundry tower.     


8. Using two or more people, slide the laundry tower into its final 

location and confirm height and levelness.

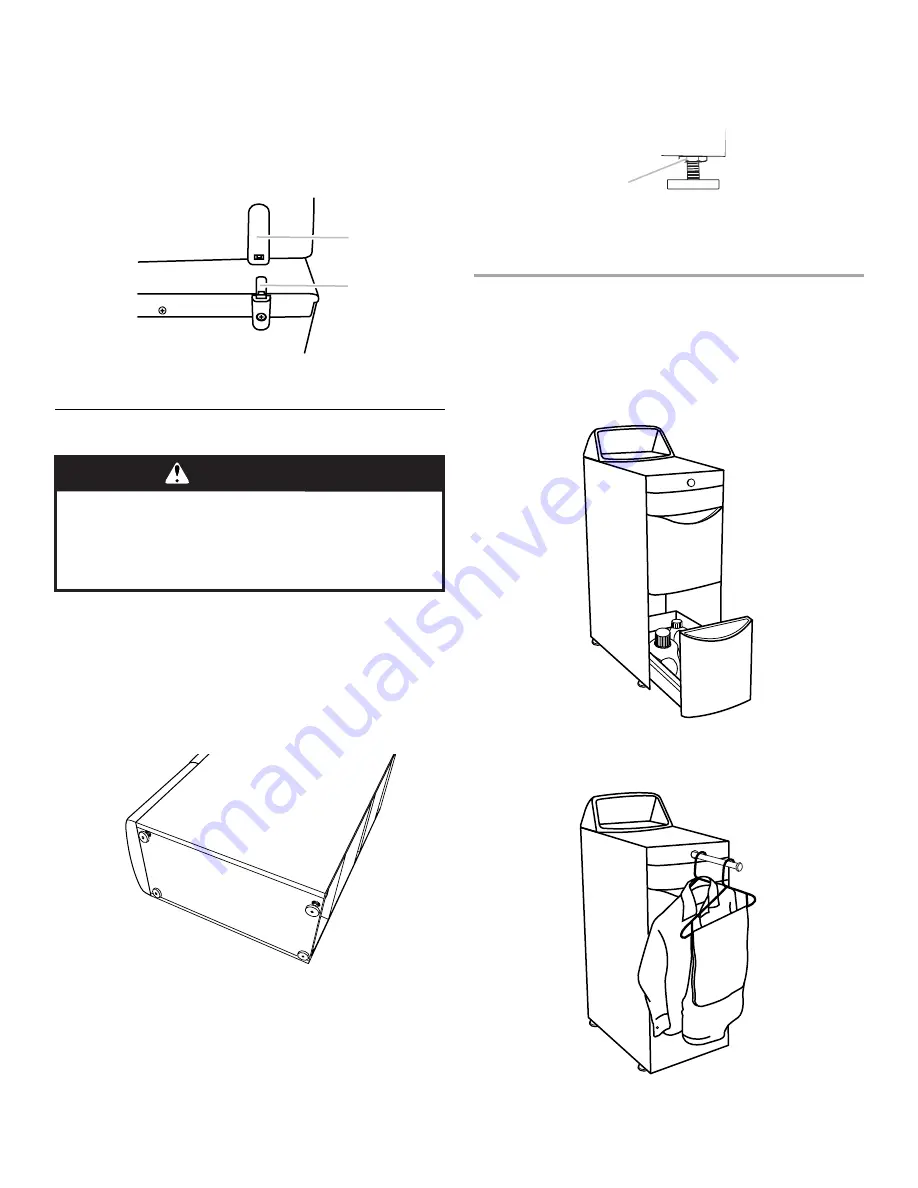
LAUNDRY TOWER USE

Your laundry tower has several uses.

The top drawer and console provide storage and organization 
for small items.

The bottom drawers provide convenient storage space for 
large items such as detergent bottles.

The retractable hanging rod may be used to hang several 
clothing items. To open or close the hanging rod, push it in 
until you hear it click.

A. Locator
B. Latch

A

B

WARNING

Excessive Weight Hazard

Use two or more people to move and install 
laundry tower.

Failure to do so can result in back or other injury.

A. Locknut

A

Summary of Contents for Laundry Tower

Page 1: ...ION 9 Outillage et pièces 9 Exigences d emplacement 9 INSTRUCTIONS D INSTALLATION 10 Installation de la console facultatif 10 Installation de l organisateur de buanderie 10 UTILISATION DE L ORGANISATEUR DE BUANDERIE 11 ENTRETIEN DE L ORGANISATEUR DE BUANDERIE 11 GARANTIE 12 You can be killed or seriously injured if you don t immediately You can be killed or seriously injured if you don t follow Al...

Page 2: ...veling feet Includes drawer front Adjust the leveling feet to match the height of your washer and dryer INSTALLATION INSTRUCTIONS InstalltheConsole optional The console is an optional feature of your laundry tower It allows you to match the style of your laundry tower to that of a top loading washer and it provides additional storage space 1 Situate the laundry tower near its final location Open t...

Page 3: ...lay the laundry tower on its side 4 Turn all four feet out to the dimension determined in Step 2 5 Using two or more people return the laundry tower to the upright position 6 Check the laundry tower height and levelness and adjust the feet as needed 7 Once the laundry tower is at the appropriate height and is level use a 14 mm open end wrench to securely tighten all four locknuts against the laund...

Page 4: ... inaccessible location or is not installed in accordance with published installation instructions DISCLAIMER OF IMPLIED WARRANTIES LIMITATION OF REMEDIES CUSTOMER S SOLE AND EXCLUSIVE REMEDY UNDER THIS LIMITED WARRANTY SHALL BE PRODUCT REPAIR AS PROVIDED HEREIN IMPLIED WARRANTIES INCLUDING WARRANTIES OF MERCHANTABILITY OR FITNESS FOR A PARTICULAR PURPOSE ARE LIMITED TO ONE YEAR OR THE SHORTEST PER...

Page 5: ...iveladoras para hacer coincidir la altura de la lavadora y de la secadora Si no sigue las instrucciones de inmediato usted puede morir o sufrir una lesión grave Si no sigue las instrucciones usted puede morir o sufrir una lesión grave Todos los mensajes de seguridad le dirán el peligro potencial le dirán cómo reducir las posibilidades de sufrir una lesión y lo que puede suceder si no se siguen las...

Page 6: ...lo que esté guardado dentro 2 Para determinar cuánto tendrá que extender las patas niveladoras mida la altura de la lavadora y o secadora al lado o entre las cuales va a colocar el organizador de lavandería NOTA Tome como referencia las dimensiones del organizador de lavandería en Requisitos de ubicación 3 Coloque un pedazo de cartón en el piso y con la ayuda de dos o más personas coloque el organ...

Page 7: ...gante puede usarse para colgar varias prendas Para abrir o cerrar la barra colgante empújela hasta que escuche un ruido seco CUIDADODELORGANIZADORDE LAVANDERÍA Para limpiar el interior y el exterior Use un paño suave y húmedo o una esponja para limpiar cualquier derrame De vez en cuando limpie las superficies de su organizador de lavandería para ayudar a que se vea como nuevo Use jabón suave y agu...

Page 8: ... Y EXCLUSIVO RECURSO DEL CLIENTE SEGÚN LOS TÉRMINOS DE ESTA GARANTÍA LIMITADA SERÁ EL DE REPARAR EL PRODUCTO SEGÚN SE ESTIPULA EN LA PRESENTE LAS GARANTÍAS IMPLÍCITAS INCLUYENDO LAS GARANTÍAS DE COMERCIABILIDAD O DE CAPACIDAD PARA UN PROPÓSITO PARTICULAR SERÁN LIMITADAS A UN AÑO O AL PERÍODO MÁS CORTO PERMITIDO POR LEY WHIRLPOOL NO SE RESPONSABILIZARÁ POR DAÑOS INCIDENTALES O CONSECUENTES ALGUNOS ...

Page 9: ...llement afin de faire correspondre la hauteur de la laveuse et de la sécheuse Risque possible de décès ou de blessure grave si vous ne suivez pas immédiatement les instructions Risque possible de décès ou de blessure grave si vous ne suivez pas les instructions Tous les messages de sécurité vous diront quel est le danger potentiel et vous disent comment réduire le risque de blessure et ce qui peut...

Page 10: ...ssaire pour les pieds de réglage de l aplomb mesurer la hauteur de la laveuse et ou de la sécheuse à proximité desquelles ou entre lesquelles vous désirez installer l organisateur de buanderie REMARQUE Consulter les dimensions de l organisateur de buanderie à la section Exigences d emplacement 3 Placer une pièce de carton sur le plancher et à l aide de deux personnes ou plus placer l organisateur ...

Page 11: ...uspendre plusieurs vêtements Pour déployer ou rétracter la barre de suspension l enfoncer jusqu au déclic ENTRETIEN DE L ORGANISATEUR DE BUANDERIE Nettoyage de l intérieur et de l extérieur Utiliser une éponge ou un chiffon doux humide pour essuyer les renversements Essuyer occasionnellement les surfaces de l organisateur de buanderie pour aider à maintenir son apparence d appareil neuf Utiliser u...

Page 12: ... USAGE PARTICULIER SONT LIMITÉES À UN AN OU À LA PLUS COURTE PÉRIODE AUTORISÉE PAR LA LOI WHIRLPOOL N ASSUME AUCUNE RESPONSABILITÉ POUR LES DOMMAGES FORTUITS OU INDIRECTS CERTAINES JURIDICTIONS NE PERMETTENT PAS L EXCLUSION OU LA LIMITATION DES DOMMAGES FORTUITS OU INDIRECTS OU LES LIMITATIONS DE LA DURÉE DES GARANTIES IMPLICITES DE QUALITÉ MARCHANDE OU D APTITUDE À UN USAGE PARTICULIER DE SORTE Q...

Reviews: