background image

10

Drying Rack (optional purchase)

You can order a drying rack by calling 1-800-442-9991 or by 
contacting the dealer from whom you purchased your dryer. The 
rack is useful for machine drying items you would not necessarily 
want to tumble dry (for example, sweaters). 

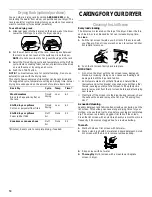
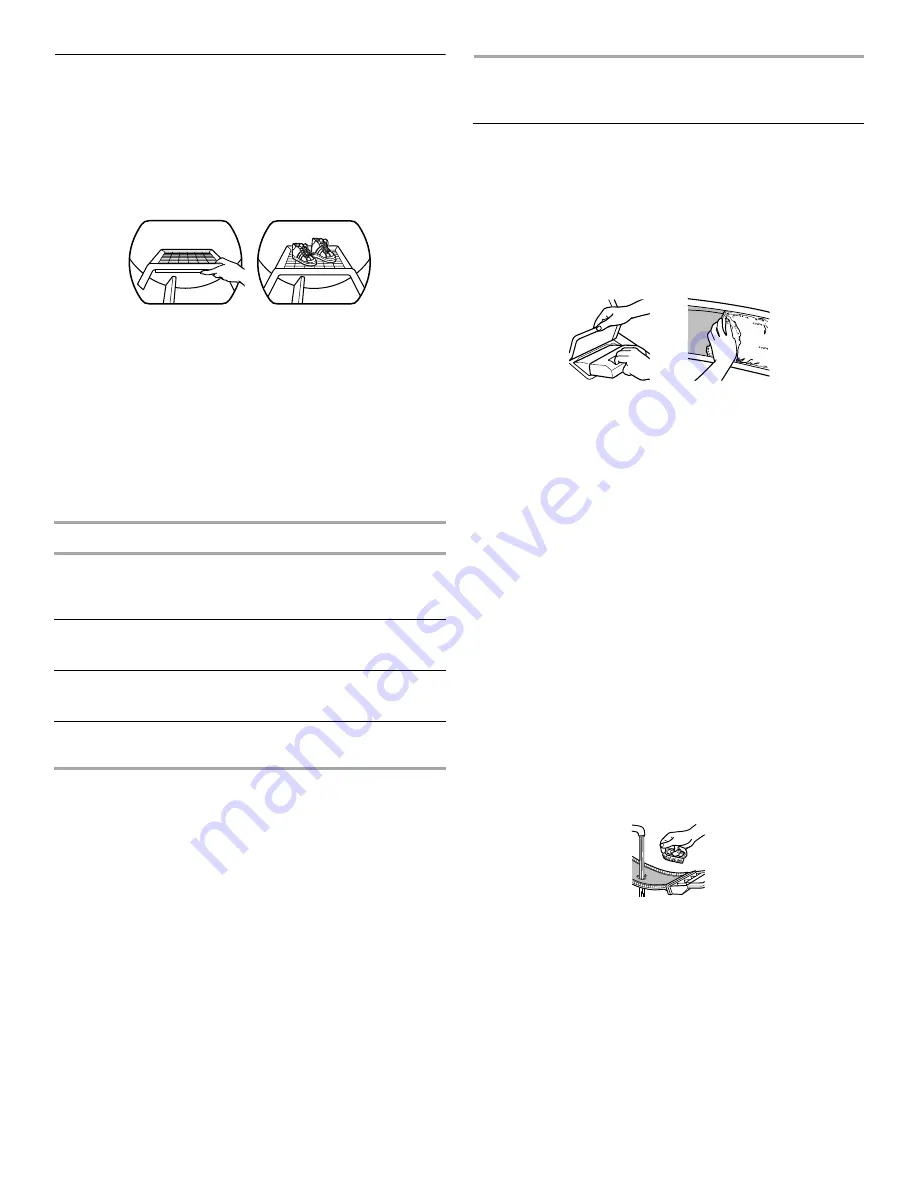
To use the drying rack

1. Slide rear pegs into the dimples on the back wall of the dryer. 

Lower the front legs to rest on the dryer opening.

2. Put the wet items on top of the rack. Leave space between 

the items so air can reach all the surfaces. Close the door.

NOTE: Do not allow items to hang over the edge of the rack.

3. Select the Timed Drying cycle and temperature or the Fluff Air 

cycle. Items containing foam, rubber, or plastic must be dried 
on a clothesline or by using an air cycle. 

4. Push the START button.

NOTE: You must remove rack for normal tumbling. Do not use 
automatic cycles with the drying rack.

This chart shows examples of items that can be rack dried and 
the suggested cycle, temperature setting and drying time. Actual 
drying time will depend on the amount of moisture items hold. 

*(Minutes). Reset cycle to complete drying, if needed. 

CARING FOR YOUR DRYER

Cleaning the Lint Screen

Every load cleaning

The lint screen is located on the top of the dryer. Clean it before 
each load. A screen blocked by lint can increase drying time.

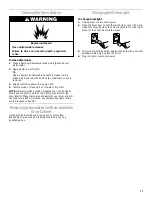
To clean

1. Pull the lint screen towards you. Roll lint off the screen with 

your fingers. Do not rinse or wash screen to remove lint. Wet 
lint is hard to remove.

2. Push the lint screen firmly back into place.

IMPORTANT:

Do not run the dryer with the lint screen loose, damaged, 
blocked, or missing. Doing so can cause overheating and 
damage to both the dryer and fabrics.

Some towels made of synthetic fibers and natural fibers 
(polyester and cotton blends) may shed more lint than other 
towels, causing your dryer’s lint screen to fill up faster. Be 
sure to remove lint from the lint screen before and after drying 
new towels.

If lint falls off the screen into the dryer during removal, check 
the exhaust hood and remove the lint. See “Checking Your 
Vent.”

As needed cleaning

Laundry detergent and fabric softener residue can build up on the 
lint screen. This buildup can cause longer drying times for your 
clothes, or cause the dryer to stop before your load is completely 
dry. The screen is probably clogged if lint falls off the screen. 

Clean the lint screen with a nylon brush every six months or more 
frequently if it becomes clogged due to a residue buildup.

To wash

1. Wet both sides of lint screen with hot water.

2. Wet a nylon brush with hot water and liquid detergent. Scrub 

lint screen with the brush to remove residue buildup.

3. Rinse screen with hot water.

4. Thoroughly dry lint screen with a clean towel. Replace 

screen in dryer.

Rack Dry

Cycle

Temp

Time*

Wool Sweaters

Block to shape and lay flat on 
the rack

Timed 
Drying

Low

60

Stuffed toys or pillows

Cotton or polyester fiber filled

Timed 
Drying

Low

60

Stuffed toys or pillows

Foam rubber filled

Fluff 
Air

None

90

Sneakers or canvas shoes

Fluff 
Air

None

90

Summary of Contents for LEQ9557KQ0

Page 1: ...ECTRICAND GAS DRYERS Use CareGuide For questions about features operation performance parts accessories or service call 1 800 253 1301 or visit our website at www whirlpool com Table of Contents 2 8527926 ...

Page 2: ...ng Clothes 8 Drying Cycle and Temperature Tips 8 Cycle Descriptions 8 Additional Features 9 Drying Rack optional purchase 10 CARING FOR YOUR DRYER 10 Cleaning the Lint Screen 10 Cleaning the Dryer Interior 11 Removing Accumulated Lint from Inside the Dryer Cabinet 11 Changing the Drum Light 11 TROUBLESHOOTING 12 ASSISTANCE OR SERVICE 13 WARRANTY 16 ...

Page 3: ...All safety messages will follow the safety alert symbol and either the word DANGER or WARNING These words mean WARNING For your safety the information in this manual must be followed to minimize the risk of fire or explosion or to prevent property damage personal injury or death Do not store or use gasoline or other flammable vapors and liquids in the vicinity of this or any other appliance WHAT T...

Page 4: ...e the door to the drying compart ment Do not reach into the dryer if the drum is moving Do not repair or replace any part of the dryer or attempt any servicing unless specifically recom mended in this Use and Care Guide or in published user repair instructions that you understand and have the skills to carry out Do not use fabric softeners or products to eliminate static unless recommended by the ...

Page 5: ...nt screen 5 Exhaust grill 6 Wide opening door Additional features your dryer may have End of Cycle Signal selector WRINKLE SHIELD PLUS selector ACCUDRY electronic sensor Automatic Dry sensor Drum light Optional purchase Drying rack Large side swing door Super wide swing door 2 3 4 5 6 1 ...

Page 6: ...ng times 3 The exhaust vent can be routed up down left right or straight out the back of the dryer Space requirements are listed in your Installation Instructions 4 Use the straightest path possible when routing the exhaust vent Use the fewest number of elbows and turns Allow room when using elbows or making turns Bend vent gradually to avoid kinking 5 Use duct tape to seal all joints Do not use s...

Page 7: ...d of Cycle Signal can be adjusted Turn the selector to the desired volume OR The End of Cycle Signal is part of the START button Turn the START button to ON or OFF 5 Select the desired option See Additional Features 6 Push the START button StoppingandRestarting You can stop your dryer any time during a cycle To stop your dryer Open the dryer door or turn the Cycle Control knob to OFF NOTE The Cycl...

Page 8: ...knob Automatic cycle s Use your Automatic cycle to dry most loads Your dryer uses either the electronic ACCUDRY system or the Automatic Dry control The control senses the moisture level in the load and shuts off when the load reaches the selected dryness On some models Automatic Dry High Heat and Low Heat Select the temperature by moving the Cycle Control knob to High Heat for bigger or heavier lo...

Page 9: ...WRINKLE SHIELD setting periodically tumbles the load without heat for up to 45 minutes WRINKLE SHIELD optional Turn the WRINKLE SHIELD setting to On to periodically tumble the load without heat up to 45 minutes after the cycle ends WRINKLE SHIELD PLUS 30 90 Minute The WRINKLE SHIELD PLUS setting lets you choose 30 or 90 minutes of periodic unheated tumble after the cycle ends Heavy Dry Select this...

Page 10: ... wash screen to remove lint Wet lint is hard to remove 2 Push the lint screen firmly back into place IMPORTANT Do not run the dryer with the lint screen loose damaged blocked or missing Doing so can cause overheating and damage to both the dryer and fabrics Some towels made of synthetic fibers and natural fibers polyester and cotton blends may shed more lint than other towels causing your dryer s ...

Page 11: ... and will not stain future loads of clothes Dry unstable dye items inside out to prevent dye transfer RemovingAccumulatedLintfromInsidethe DryerCabinet Lint should be removed every two years or more often depending on dryer usage Cleaning should be done by a qualified person ChangingtheDrumLight To change drum light 1 Unplug dryer or disconnect power 2 Open the dryer door Locate the light bulb cov...

Page 12: ...ar fuse used Use a time delay fuse Is the dryer door firmly closed Was the START button firmly pressed Is a cycle selected Unusual sounds Has the dryer had a period of non use If the dryer hasn t been used for a while there may be a thumping sound during the first few minutes of operation Is it a gas dryer The gas valve clicking is a normal operating sound Lint on load Is the lint screen clogged C...

Page 13: ... recommend that you only use FSP factory specified parts These parts will fit right and work right because they are made with the same precision used to build every new WHIRLPOOL appliance To locate FSP replacement parts in your area call our Customer Interaction Center or your nearest designated service center For assistance and service Call the Whirlpool Customer Interaction Center toll free 1 8...

Page 14: ... not allow the exclusion or limitation of incidental or consequential damages so this exclusion or limitation may not apply to you This warranty gives you specific legal rights and you may also have other rights which vary from state to state Outside the 50 United States this warranty does not apply Contact your authorized Whirlpool dealer to determine if another warranty applies If you need servi...

Reviews: