background image

Summary of Contents for MH6110XB

Page 1: ... Hood Combination 8 Using Your Micro wave Oven 20 Caring for Your Microwave Hood Combination 36 Cooking Guide 40 Questions and Answers 44 If You Need Assistance or Service 45 Warranty 48 1 800 253 I 301 Call us with qusrtiono or comments MICROWAVE HOOD COMBINATION MODEL MH61lqXB pZ ...

Page 2: ...ere is a brief explanation of the use of the warning symbol IThis symbol will help alert you to such dangers as personal injury burns fire and electrical shock I Our Consumer Assistance Center number l 800 253 1301 is toll free 24 hours a day If you ever have a question concerning your appliance s operation or if you need service first see If You Need Assistance or Service on page 45 lf you need f...

Page 3: ...llation Instructions l Do not immerse cord or plug in water l Some products such as whole eggs in l Keep cord away from heated surfaces the shell and sealed containers for l Do not let cord hang over edge of table or counter example closed glass jars could explode and should not be heated in l This appliance is suitable for use above this oven both gas and electric cooking equipment l Do not heat ...

Page 4: ...eave paper products cooking utensils or food in the cavity when not in use l Because of the automatic exhaust fan feature the following cautions must be observed Do not leave the area when using your cooktop at a high setting Accidental fires from boilovers or spattering on the surface unit could spread especially if the exhaust fan is operating Do not allow grease and soil to build up in the grea...

Page 5: ...prong receptacle near the appliance SAVE THESE INSTRUCTIONS PRECAUTIONS TOAVOID POSSIBLE EXPOSURE TOEXCESSIVE MICROWAVE ENERGY Do not attempt to operate this oven with the door open since open door operation can resutt in harmful exposure to micro wave energy It is important not to defeat or tamper with the safety interlocks Do not place any object between the oven front face and the door or allow...

Page 6: ...ral times before heating or reheating Liquids heated in certain containers especially cylindrical containers may become over heated The liquid may splash out with a loud noise during or after heating or when adding ingredients coffee etc resulting in harm to the oven and possible personal injury Never lean on the door or allow a child to swing on it when the door is open Injury could result Use ho...

Page 7: ...o melt paraffin wax in the oven Paraffin wax will not melt in a microwave oven because it allows microwaves to pass through it General information Do not use newspaper or other printed paper in the oven Fire could result Do not dry flowers fruit herbs wood paper gourds or clothes in the oven Fire could result If your electrical power line or outlet voltage is less than 110 volts cooking times may ...

Page 8: ...ing the bi level cooking rack 17 Using the exhaust fan 14 Setting the clock 18 Using the Minute Timer 19 How microwave cooking works Microwave ovens are safe Microwave energy is not hot It causes food to make its own heat and it s this heat that cooks the food Microwaves are like TV waves or light waves You cannot see them but you can see what they do Magnetron Mlxing antenna Oven cavity A magnetr...

Page 9: ... time The microwaves disturb water molecules in the food As the molecules bounce around bumping into each other heat is made like rubbing your hands together This is the heat that does the cookina Radio intetierence Operation of the microwave oven may cause interference to your radio TV or similar equipment When there is interfer ence it may be reduced or eliminated by taking the following measure...

Page 10: ... page 17 for more information 5 Filter See page 37 for cleaning informa tion 6 CooktopZountertop Light Turn on to light your cooktop or countertop or turn on as a night light See page 15 for more information b 6 7 Exhaust Fan and Cooktop Light Switches See pages 14 l 7 for more information 8 Control Panel Touch the pads on this panel to perform all functions See pages 1l 1 3 for more information 9...

Page 11: ...k and indicators to tell you time of day cooking time settings and cooking functions selected 2 COOK TIME Touch thii pad followed by Number Pads to set a cooking time See pages 21 23 and 24 for more informa tion 3 COOK POWER Touch this pad followed by a Number Pad to set the amount of microwave energy released to cook the food The higher the number the higher the microwave power or cooking speed S...

Page 12: ...categories 10 CLOCK Touch this pad to enter the correct time of day See page 18 for more information 11 TIMER SET Touch this pad to set the Minute Timer See page 19 for more information 12 TIMER OFF Touch this pad to cancel the Minute Timer See page 19 for more information 13 START ENTER Touch this pad to start a function If you open the door after the oven begins to cook retouch START ENTER See p...

Page 13: ...he oven stops heating and the fan stops but the light stays on To restart cooking close the door and TOUCH L l m If you do not want to continue cooking l Close the door and the light goes off from oven OR l Three tones sound if you have made an incorrect entry To disable audible signals l Touch and hold Number Pad 1 for 4 seconds to disable programming tone and End of Cooking and End of Cycle sign...

Page 14: ... protect the oven OR It may stay on up to an hour to cool the oven When this occurs the Fan OFF Pad will not turn the fan off 2 Turn off fan when desired TOUCH El OFF To set fan to run for a specific time 1 Start fan 2 Choose timer NOTE If both the fan and light are operating and the TIMER SET Pad is touched twice both the fan and light will be controlled by the timer The Display will alternate be...

Page 15: ... cancel timer NOTE Canceling the timer will cause the fan to shut off however canceling the fan will not cancel the timer TOUCH Using the cooktop countertop light The three pads on the bottom right of the control panel control the cooktop wunter top light 1 Choose light TOUCH 15 ...

Page 16: ...NOTE If both the fan and light are operating and the TIMER SET Pad is touched twice both the fan and light will be controlled by the timer The Display will alternate between FAN and LIGHT one time before TIME is displayed twice within 3 seconds YOU SEE 3 Set time Example for 20 minutes TOUCH YOU SEE El lol El lol 16 ...

Page 17: ...Use hot pads when removing rack from oven after cooking to prevent burns Rack could be hot NOTES Firat position First posftion Insert the rack securely into the rack supports on the side walls of the oven Second poakion l Do not store the metal rack in the oven Arcing and damage to the oven could result if someone accidentally starts the oven l Do not operate the oven with the metal rack stored on...

Page 18: ...ime of day is not set 838 38 will show on the Display until you touch CLOCK NOTES l You can only set the clock if the oven is not cooking food l If you touch in an incorrect time and touch CLOCK three tones will sound Enter the correct time l If you touch OFF CANCEL while setting the clock the Display will show the last time of day set or Y if no time of day has been set To set time 1 Choose setti...

Page 19: ... time to be counted down Example for 1 minute 30 seconds TOUCH NOTE If you enter more than 4 digits three tones will sound Touch START III ENTER to count down the 3digit time you have entered or touch OFF CAN CEL to clear the Display To start over El touch TIMER SET and reenter desired time lol 3 Start countdown NOTE If you do not do this step within three seconds of doing Step 2 START will be dis...

Page 20: ... rating method rates this oven at 850 watts you may use a reliable cookbook and recipes developed for microwave ovens previously rated at 700 600 watts l ALWAYS cook food for the minimum recommended cooking time If necessary touch ADD MINUTE while the oven is operating or after it has completed the cooking cycle see page 34 for more information Then check for doneness to avoid overcooking the food...

Page 21: ...Put food in oven and close the door 2 Set cooking time Example for 1 minute 30 seconds TOUCH YOU SEE 3 Start oven At end of ccokina time YOU SEE Changing instructions You can change the cooking time any time by repeating Step 2 21 ...

Page 22: ...ower power 9 90 of full power Heating large quantities of liquids such as water or soup stock 8 80 of full power 7 70 of full power MED HIGH Reheating soups or casseroles Cooking and heating vegetables fish meat etc when you need a Cook Power lower than HIGH or when food is cooking too fast 6 60 of full power Cooking requiring special care such as for high protein sauces cheese and egg dishes and ...

Page 23: ...me Example for 7 minutes 30 seconds TOUCH YOU SEE 3 Set Cook Power Example for 50 Cook Power TOUCH YOU SEE El 4 Start oven At end of cooking time Changing instructions You can change the cooking time or Cook Power any time by repeating Steps 2 and or 3 23 ...

Page 24: ...en can be set to change from one to another automatically for up to two cycles 1 Put food in oven and close the door 2 Set cooking time for first cycle Example for 7 minutes 30 seconds 3 Set Cook Power for first cycle Example for 50 Cook Power TOUCH l e Em TOUCH TOUCH l e m 0 l TOUCH YOU SEE 4 Repeat Steps 2 and 3 to set cooking time and Cook Power for each additional cycle 24 ...

Page 25: ...ber Pad assigned to the desired common microwave prepared foods category and enter the number of items or without needing to program times and Cook servings being heated Your microwave Powers AUTO COOK has preset times oven does the rest and Cook Powers for five major food categories Casseroles Baked Potatoes Baked Goods Fresh Canned Vegetables and Frozen Vegetables All you do is touch NOTE See Mi...

Page 26: ... frame behind the door for food catego ries available Example for Category 1 casserole TOUCH 4 Enter quantity servings Example for 2 servings TOUCH NOTE If the quantity you entered is not correct you can change it by touching El AUTO COOK again and starting over 5 Start oven TOUCH YOU SEE a mlIIB At end of cooking time 26 ...

Page 27: ...fish All you do is touch the Command Pad assigned to the desired category and enter the weight of the items being defrosted Your microwave oven does the rest NOTES l See the Auto defrost chart on page 29 for defrosting directions for each food l To defrost items not listed in Auto defrost chart on pages 29 and 30 use 30 Cook Power Refer to a reliable cookbook for defrosting information 1 Put froze...

Page 28: ...ect weight El touch AUTO DEFROST again and enter the correct weight 5 Start oven TOUCH YOU SEE 6 After half thecook time is over Display will prompt you to turn over food while oven continues to defrost Open door turn over food and shield any warm portions NOTE If you do not open the door within two minutes the Display will resume the countdown 7 Restart oven TOUCH YOU SEE At end of defrosting tim...

Page 29: ...as with Place on a microwavable roasting rack Chuck Roast aluminum foil Rib Roast Turn over Cover warm areas with Place on a microwavable roasting rack aluminum foil Rolled Rump Turn over Cover warm areas with Place on a microwavable roasting rack Roast aluminum foil Lamb Cubes for Stew Remove thawed portions with Place in a microwavable baking dish Chops fork Return remainder to oven 1 inch thick...

Page 30: ...lace in a microwavable baking dish Carefully separate fillets under cold water Place in a microwavable baking dish Run cold water over to finish defrosting Place in a microwavable baking dish Cover head and tail with foil do not let foil touch sides of microwave oven Finish defrosting by immersing in cold water Place in a microwavable baking dish Place in a microwavable baking dish Place in a micr...

Page 31: ...gerator freezer that does not maintain a tempera ture of 0 F or below always program a lower food weight for a shorter defrosting time to prevent cooking the food l If the food is kept outalde the freezer for up to 20 minutes enter a lower food weight l If the food is kept outsMe the freezer for more than 20 minutes and for defrosting ready made food defrost by time and power and let stand after d...

Page 32: ...e meals kept warm on a dinner plate should be covered during WARM HOLD l Do not use more than one complete WARM HOLD cycle about 1 hour 40 minutes The quality of some foods will suffer with extended time 1 Put hot cooked food in oven and close the door 2 Choose setting TOUCH YOU SEE 3 Start oven TOUCH YOU SEE To make WARM HOLD auto matically follow another cycle l While you are touching in cooking...

Page 33: ...y to repop unpopped kernels and do not reuse popcorn bags Fire could result l If you remove the rack right after pop ping popcorn use oven mitts It will be very hot and could burn you Cl Cooking performance may vary with brand Try several brands to decide which gives best popping results For best results use fresh bags of popcorn NOTE lf you want to change the popping time after choosing POPCORN s...

Page 34: ...e touch ADD MINUTE repeat edly during cooking l You can enter ADD MINUTE only after closing the door after touching OFF CANCEL or during cooking l If you touch ADD MINUTE during cook ing the oven will cook at the currently selected Cook Power lf you touch ADD MINUTE after cooking is over the oven will cook at 100 Cook Power l You cannot use ADD MINUTE with POPCORN AUTO COOK or AUTO DEFROST l You c...

Page 35: ... can increase or decrease the cook time by 10 after choosing the function You can only increase or de crease cook time before cooking starts To increase cook time by 10 To decrease cook time by 10 To reset to the original cook time TOUCH TOUCH 1 example for auto cook YOU SEE TOUCH 35 ...

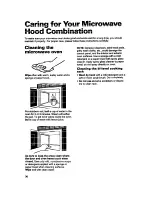
Page 36: ...E Abrasive cleansers steel wool pads gritty wash cloths etc could damage the control panel and the interior and exterior oven surfaces Use a sponge with a mikl detergent or a paper towel with spray glass cleaner Apply spray glass cleaner to paper towel do not spray directly on oven fW ning the bi level cooking l Wash by hand with a mikl detergent and a soft or nylon scrub brush Dry completely l Do...

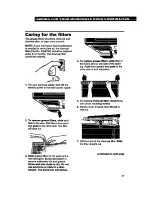
Page 37: ...ers downward and push to the other side The filter will drop out 3 Soak grease filters in hot water and a mild detergent Scrub and swish to remove embedded dirt and grease Rinse well and shake to dry Do not use ammonia or place in a dish washer The aluminum will darken 4 To replace grease filters slide filter in the frame slot on one side of the open ing Push filter upward and push to the other si...

Page 38: ... on at the main power supply 11 Do not operate the hood without the filters in place Replacing the cooktop and oven lights The cooktop light Fire and Electrical Shock Hazard Use only candelabra base bulbs 30 watt maximum Failure to do so could result in fire aTurn off power at main power supply before replacing the light bulb Failure to do so could result in electrical shock 1 Turn off power at th...

Page 39: ... the vent cover mounting screws 3 Tip the cover forward then lift out to remove 4 Remove bulb holder mounting screw 5 6 7 Lift up the bulb holder We recommend replacing the bulb with a candelabra base XI watt bulb available from your authorized Whirlpool service company Part No 4158432 Replace the bulb hokler and mounting screw 8 Slide the top of the vent cove into place Push the bottom until it s...

Page 40: ...over with wax paper Soup Cream 1 cup 1 can 10 oz Soup Clear 1 CUP 1 can 103 02 Pizza 1 slice 1 slice 2 slices 2 slices Vegetables 1 serving 2 servings Baked Potato 1 2 Refrigerated Room temp Refrigerated Room temp Room temp Refrigemted Room temp Refrigemted Refrigerated Refrigerated Refrigerated Refrigerated 3 4 min at 50 5 7 min at 50 2 3 min at 100 4 55 min at 100 15 25 set at 100 30 40 set at 1...

Page 41: ...2X min Patties 4 2nd side 2 3 min hat Loaf 166 13 19 min 1Ih Ibs Chicken 100 6 9 minlfb PbCOS Internal temperature should bs 185 F after standing Turkey 100 5min BmSt LtM 70 8 12 minllb Internal temperature shoukl bs 185 F after standing Fish Fillets 100 5 6 min 1 14 Scallop8 and 100 3X 5X min Shrimp 1 fb TABI Cook at 166 Cook Power FOOD TlME Beans Green or Yellow 1 fb Broccoli 1 lb Carrots 1 lb 6...

Page 42: ...eas Place the thinner parts of chicken wings and legs in the center of the dish Stirring turning foods l Stirring and turning foods distributes heat quickly to the center of the dish and avoids overcooking at the outer edges of the food Microwave cooking tips Covering food Cover food to l Reduce splattering l Shorten cooking times l Retain food moisture All coverings that allow microwaves to pass ...

Page 43: ...repackaged in an aluminum foil container then refer to the instructions on the package It is possible to use dispos able containers but it generally takes longer and the final result will not be as good as if food were placed in plastic or paper containers If you use aluminum containers without package instructions follow these guide lines l Place container in a glass bowl and add some water so th...

Page 44: ... on Why does the dish become hot when I As the food becomes hot it will conduct the microwave food in it I thought that this heat to the dish Be prepared to use hot should not happen pads to remove food after cooking What does standing time mean Standing time means that food shoukl be taken out of the oven and covered for additional time after cooking This process allows the cooking to finish save...

Page 45: ...ircuit voltage with the proper voltage See Installation Instructions A household fuse has blown or Replace household fuse or reset a circuit breaker has tripped circuit breaker The electrii company has Check electric company for a power experienced a power failure failure The microwave You are using the oven as a Touch TIMER OFF to cancel the oven will timer Minute Timer not run The door is not fi...

Page 46: ...a time completely counting down but the oven Is You have set the controls as Touch TIMER OFF to cancel the not cooking a minute timer Minute Timer You do not The command is not correct Reenter command hear the Pro gramming Tone The Display There has been a power Reset the clock shows 88 88 interruption 46 ...

Page 47: ...zed Whirlpool service companies Whirlpool service technicians are trained to fulfill the product warranty and provide after warranty service anywhere in the United States To locate the authorized Whirlpool service company in your area call our Consumer Assistance Center telephone number see Step 2 or look in your telephone directory Yellow Pages under 4 If you are not satisfied with how the proble...

Page 48: ... by accident misuse fire flood acts of God or use of products not approved by Whirlpool E Any labor costs during limited warranty F Repairs to parts or systems caused by unauthorized modifications made to the appliance we3 WHIRLPOOL CORPORATION SHALL NOT BE LIABLE FOR INCIDENTAL OR CONSE QUENTlAL DAMAGES Some states do not allow the exclusion or limitation of incidental or consequential damages so...

Reviews: