background image

11

Cooking in Stages

The oven can be set to cook at different cooking powers for 
various lengths of time, up to four stages, including defrost and 
Warm Hold. (Some models allow only three stages, including 
defrost.)

To Cook in Stages:

1.

Touch COOK TIME.

2.

Touch number pads to enter length of time to cook during the 
first stage.

3.

Touch COOK POWER.

4.

Touch the number pad(s) using the Cooking Power chart to 
set the cooking power for the first cycle.

“P-## TOUCH START” scrolls across the display. (## is the 
percent of cook power.)

5.

Repeat steps 1-4 for the second cycle.

6.

Touch START/ENTER.

Two tones will sound between cycles, and then the nex t cycle 
will begin counting down.

When the cycle ends, “END” will appear in the display, 4 end-
of-cycle tones will sound, and then reminder tones will sound 
every minute.

7.

Touch OFF/CANCEL or open the door to clear the display 
and/or stop reminder tones.

The cook time and cooking power of the cycling stage cannot be 
changed after touching START/ENTER without interrupting 
cooking. Only minutes may be added to current cooking stage by 
touching ADD MINUTE.

EZ-Choice™ Reheating

Times and cooking power have been preset for reheating four 
specific food types. Use the following chart as a guide.

To Use E-Z Choice Reheat:

1.

Touch REHEAT.

2.

Touch number pad from chart to select food type to be 
reheated.

3.

Touch number pads to enter quantity.

4.

Touch START/ENTER.

The display will count down the reheat time.

When the cycle ends, “END” will appear in the display, 4 end-
of-cycle tones will sound, and then reminder tones will sound 
every minute.

5.

Touch OFF/CANCEL or open the door to clear the display 
and/or stop reminder tones.

EZ-Choice Defrosting

The EZ-Choice DEFROST feature’s preset programs can be used 
or the microwave oven can be manually set to defrost.

Food should be 0°F (-18°C) or colder at defrosting for optimal 
results. How foods are stored can affect results.

Unwrap foods and remove lids (from fruit juice) before 
defrosting.

Shallow packages will defrost more quickly than deep blocks.

Separate food pieces as soon as possible during or at the 
end-of-cycle for more even defrosting.

Use small pieces of aluminum foil to shield parts of food such 
as chicken wings, leg tips and fish tails. See “Aluminum Foil 
and Metal” first.

The EZ-Choice DEFROST system has preset times and cook 
powers for three categories: Meat, Poultry and Fish. It should not 
be used for food left outside the freezer for more than 20 minutes, 
or for frozen ready-made food.

To defrost manually, use 30% cook power. Refer to a reliable 
cookbook for defrosting information.

To use EZ-Choice DEFROST:

1.

Touch DEFROST.

“MEAT TOUCH 1, POULTRY TOUCH 2, FISH TOUCH 3” 
scrolls across display.

2.

Touch the number pad 1 for Meat, 2 for Poultry or 3 for Fish.

“ENTER WEIGHT” scrolls across display.

3.

Touch the number pads to enter the weight. 

Weight can be set from 0.1 LB to 6.0 LBS.

4.

Touch START/ENTER.

The display will count down the defrost time.

During defrosting, 5 tones will sound. These tones indicate it 
is time to check, turn, rearrange, or separate food. Open 
door, turn food if necessary, close door, and touch START/
ENTER to resume defrosting.

When the cycle ends, “END” will appear in the display, 4 end-
of-cycle tones will sound, and then reminder tones will sound 
every minute.

5.

Touch OFF/CANCEL or open the door to clear the display 
and/or stop reminder tones.

FOOD

CODE

QUANTITY

Dinner Plate

1

1-2 Servings

Soup/Sauce

2

1-4 Cups

Casserole

3

1-4 Cups

Roll/Muffin

4

1-4 Pieces

Summary of Contents for MH6140XK

Page 1: ...e CareGuide In the U S A for questions about features operation performance parts accessories or service call 1 800 253 1301 or visit our website at www whirlpool com Table of Contents 2 Models MH6140XK MH6141XK 3828W5A1876 8183890 ...

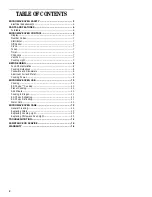
Page 2: ...Food Characteristics 8 Cooking Guidelines 8 Cookware and Dinnerware 8 Aluminum Foil and Metal 9 Cooking Power 9 MICROWAVE OVEN USE 10 Cooking 10 EZ Choice Cooking 10 Preset Cooking 10 Add Minute 10 Cooking in Stages 11 EZ Choice Reheating 11 EZ Choice Defrosting 11 Warm Hold 12 MICROWAVE OVEN CARE 12 General Cleaning 12 Replacing Filters 13 Replacing Cooktop Light 13 Replacing Microwave Oven Light...

Page 3: ... products such as whole eggs in the shell and sealed containers for example closed glass jars may explode and should not be heated in the microwave oven Use the microwave oven only for its intended use as described in this manual Do not use corrosive chemicals or vapors in the microwave oven This type of oven is specifically designed to heat cook or dry food It is not designed for industrial or la...

Page 4: ...ds Pieces can burn off the pad and touch electrical parts involving a risk of electric shock Do not use paper products when appliance is operat ed in the PAN BROWN mode Do not store any materials other than manufacturer s recommended accessories in this oven when not in use Do not cover racks or any other part of the oven with metal foil This will cause overheating of the oven Do not store anythin...

Page 5: ...e wire for the electric current The microwave oven is equipped with a cord having a grounding wire with a grounding plug The plug must be plugged into an outlet that is properly installed and grounded WARNING Improper use of the grounding plug can result in a risk of electric shock Consult a qualified electrician or serviceman if the grounding instructions are not completely understood or if doubt...

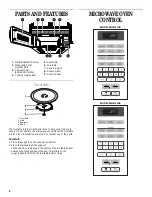
Page 6: ...le bottom between the three spokes of the hub The rollers on the support should fit inside the turntable bottom ridge MICROWAVEOVEN CONTROL MODEL MH6141XK MODEL MH6140XK 1 Metal Shielded Window 2 Model and Serial Number Plate 3 Charcoal Filter behind Vent Grille 4 Cooking Guide Label 5 Vent Grille 6 Turntable 7 Cooktop Light 8 Grease Filters 9 Control Panel 7 1 8 5 4 2 3 2 1 4 5 8 7 6 9 0 TIMER SE...

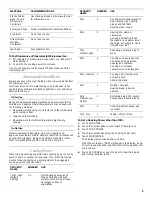
Page 7: ...Four tones End of cycle Five Tones During DEFROST cycle reminder to check turn rearrange or separate food Seven Tones End of Timer countdown Timer The Timer can be set in minutes and seconds up to 99 minutes 99 seconds and counts down the set time The Timer does not start or stop the microwave oven When the Timer is in use the microwave oven can still operate To see the time countdown for five sec...

Page 8: ...ter than other foods Heavy dense foods such as meat and potatoes require a longer cook time than the same size of a light porous food such as cake CookingGuidelines Covering Covering food helps retain moisture shorten cook time and reduce spattering Use the lid supplied with cookware If not available wax paper paper towels or plastic wrap approved for microwaves may be used Plastic wrap should be ...

Page 9: ...a length of time to cook 3 Touch COOK POWER 4 Touch the number pad using the Cooking Power chart 5 Touch START ENTER The display will count down the cook time When the cycle ends END will appear in the display 4 end of cycle tones will sound and then reminder tones will sound every minute 6 Touch OFF CANCEL or open the door to clear the display and or stop reminder tones Plastic Wraps Bags Covers ...

Page 10: ...wing chart as a guide To Use 1 Touch appropriate preset cooking pad see chart above 2 Touch number pads to enter quantity see chart above The display will count down the cook time When the cycle ends END will appear in the display 4 end of cycle tones will sound and then reminder tones will sound every minute AddMinute The Add Minute function allows the addition of cook time in one minute incremen...

Page 11: ...top reminder tones EZ ChoiceDefrosting The EZ Choice DEFROST feature s preset programs can be used or the microwave oven can be manually set to defrost Food should be 0 F 18 C or colder at defrosting for optimal results How foods are stored can affect results Unwrap foods and remove lids from fruit juice before defrosting Shallow packages will defrost more quickly than deep blocks Separate food pi...

Page 12: ...ate the microwave oven without the grease filters in place Soak grease filters in hot water and mild detergent Scrub and swish to remove embedded dirt Rinse well and shake dry Do not use ammonia or oven cleaner Do not place in dishwasher OVEN CAVITY Do not use soap filled scouring pads abrasive cleaners steel wool pads gritty wash cloths or some paper towels Damage may occur The area where the ove...

Page 13: ...place grease filters by inserting one end into the frame Swing other side up and slide to position 3 Plug in microwave oven or reconnect power ReplacingCooktopLight The cooktop light is a candelabra base 30 watt bulb See Assistance or Service section to reorder To Replace 1 Unplug microwave oven or disconnect power 2 Remove the bulb cover mounting screws 3 Replace light Close bulb cover Replace mo...

Page 14: ...ervice See Assistance or Service section Oven makes humming noise This is normal and occurs when the transformer in the magnetron cycles on Oven door looks wavy This is normal and will not affect performance Turntable will not operate Is the turntable properly in place Make sure turntable is correct side up and is sitting securely on the turntable support Is the turntable support operating properl...

Page 15: ...nly use FSP replacement parts FSP replacement parts will fit right and work right because they are made with the same precision used to build every new WHIRLPOOL appliance To locate FSP replacement parts in your area call our Customer Interaction Center telephone number or your nearest Whirlpool designated service center IntheU S A Call the Whirlpool Customer Interaction Center toll free 1 800 253...

Page 16: ...DENTAL OR CONSEQUENTIAL DAMAGES Some states do not allow the ex clusion or limitation of incidental or consequential damages so this ex clusion or limitation may not apply to you This warranty gives you specific legal rights and you may also have other rights which may vary from state to state Outside the 50 United States this warranty does not apply Contact your authorized Whirlpool dealer to det...

Reviews: