background image

5

Electrical Requirements

Observe all governing codes and ordinances. A 120 Volt, 60 Hz, 
AC only, 15- or 20-amp fused electrical supply is required. (A 
time-delay fuse or circuit breaker is recommended.) It is 
recommended that a separate circuit serving only this appliance 
be provided.

PARTS AND FEATURES

Turntable

The turntable rotates in both directions to help cook food more 
evenly. Do not operate the microwave oven without the turntable 
in place. See “Assistance or Service” to reorder any of the parts.

To Install:

1. Place the support on the oven cavity bottom.

2. Place the turntable on the support.

Fit the raised, curved lines in the center of the turntable 
bottom between the three spokes of the hub. The rollers on 
the support should fit inside the turntable bottom ridge.

The turntable can be turned off (except during an auto function). 
This is helpful when cooking with plates that are larger than the 
turntable or when cooking with two 10 in. (25 cm) plates that are 
side-by-side.

To turn off: Touch TURNTABLE ON/OFF. “OFF” will appear in the 
display. For optimal results, halfway through cooking time, turn 
plates for more even cooking.

WARNING

Electrical Shock Hazard

Plug into a grounded 3 prong outlet.

Failure to follow these instructions can result in
death, fire, or electrical shock.

Do not use an extension cord.

Do not use an adapter.

Do not remove ground prong.

GROUNDING INSTRUCTIONS

■  

For all cord connected appliances:

 The microwave oven must be grounded. In the event 
 of an electrical short circuit, grounding reduces the 
 risk of electric shock by providing an escape wire for 
 the electric current. The microwave oven is equipped 
 with a cord having a grounding wire with a grounding 
 plug. The plug must be plugged into an outlet that is 

properly installed and grounded.

WARNING: 

Improper use of the grounding plug can 

result in a risk of electric shock. Consult a qualified 
electrician or serviceman if the grounding instructions 
are not completely understood, or if doubt exists as to 
whether the microwave oven is properly grounded. 

■  

For a permanently connected appliance:

 This appliance must be connected to a grounded, 
 metallic, permanent wiring system, or an equipment 
 grounding conductor should be run with the circuit 
 conductors and connected to the equipment 
 grounding terminal or lead on the appliance.

Do not use an extension cord. If the power supply cord 
is too short, have a qualified electrician or serviceman 
install an outlet near the microwave oven.

SAVE THESE  INSTRUCTIONS

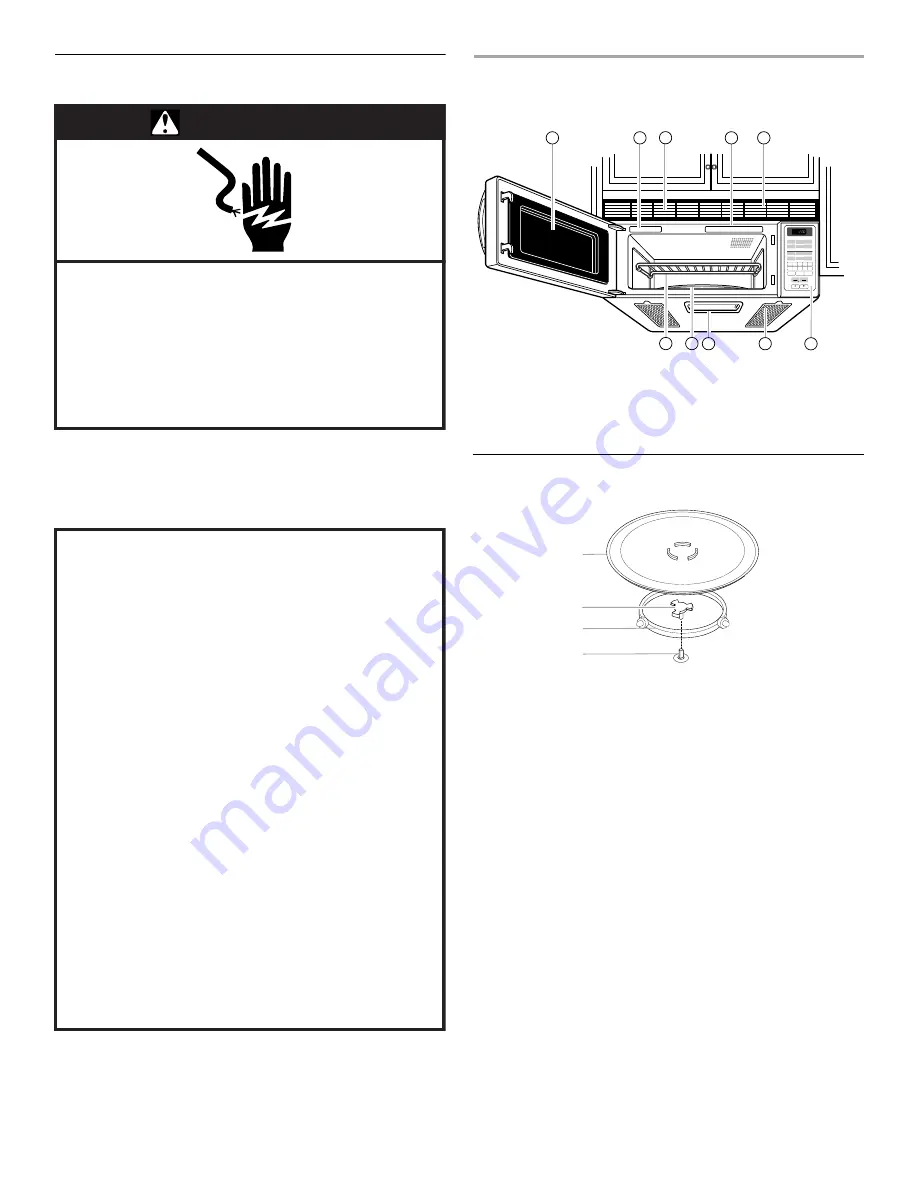
  1. Metal Shielded Window
  2. Model and Serial Number Plate
  3. Charcoal Filter (behind vent grille)
  4. Cooking Guide Label
  5. Vent Grille

  6. Cooking Rack
  7. Turntable
  8. Cooktop Light
  9. Grease Filters
10. Control Panel

1. Turntable
2. Hub
3. Support
4. Shaft

8

1

9


5

4

2

3

2

1

4

5

8

7

6

9

0

TIMER

SET

TIMER

OFF

CANCEL

OFF

ENTER

START

EZ CHOICE

COOK

BAKED
POTATO

BEVERAGE

PIZZA

ADD

MINUTE

COOK

POWER

FROZEN
ENTREE

COOK
TIME

POPCORN

CLOCK

LIGHT

ON/NIGHT/OFF

VENT FAN

HIGH/LOW/OFF

WARM
HOLD

DEFROST

REHEAT

7


6


10

3

1

2

3

4

Summary of Contents for MH6150XM

Page 1: ...BINATION Use CareGuide For questions about features operation performance parts accessories or service call 1 800 253 1301 or visit our website at www whirlpool com Table of Contents 2 8184817 3828W5A2777 Model MH6150XM ...

Page 2: ... Options 7 MICROWAVE OVEN USE 8 Food Characteristics 8 Cooking Guidelines 8 Cookware and Dinnerware 8 Aluminum Foil and Metal 9 Cooking Power 9 Cooking 10 EZ Choice Cooking 10 Preset Cooking 10 Add Minute 10 Cooking in Stages 11 EZ Choice Reheating 11 EZ Choice Defrosting 11 Warm Hold 12 MICROWAVE OVEN CARE 12 General Cleaning 12 Replacing Filters 13 Replacing Cooktop Light 13 Replacing Microwave ...

Page 3: ...s Some products such as whole eggs in the shell and sealed containers for example closed glass jars may explode and should not be heated in the microwave oven Use the microwave oven only for its intended use as described in this manual Do not use corrosive chemicals or vapors in the microwave oven This type of oven is specifically designed to heat cook or dry food It is not designed for industrial...

Page 4: ...urn off the pad and touch electrical parts involving a risk of electric shock Do not use paper products when appliance is operat ed in the PAN BROWN mode on models with this feature Do not store any materials other than manufacturer s recommended accessories in this oven when not in use Do not cover racks or any other part of the oven with metal foil This will cause overheating of the oven Do not ...

Page 5: ...d connected appliances The microwave oven must be grounded In the event of an electrical short circuit grounding reduces the risk of electric shock by providing an escape wire for the electric current The microwave oven is equipped with a cord having a grounding wire with a grounding plug The plug must be plugged into an outlet that is properly installed and grounded WARNING Improper use of the gr...

Page 6: ...s of the oven Do not place popcorn bags on rack The rack is designed specifically for this oven Do not use it in any other oven Do not cook food directly on the rack Always use a microwave safe container Use the rack only when cooking on two levels Do not store it in the oven Damage to the oven could result if someone accidentally turns on the oven MICROWAVE OVEN CONTROL Display When power is firs...

Page 7: ...can still operate To see the time countdown for 5 seconds when the microwave oven is in use touch TIMER SET To Set 1 Touch TIMER SET 2 Touch the number pads to set the length of time 3 Touch START ENTER When the set time ends End will appear on the display and 7 tones will sound 4 Touch TIMER OFF anytime to cancel the Timer Remember touching OFF CANCEL will turn the microwave oven off The time can...

Page 8: ...foods will heat faster than refrigerated foods and refrigerated foods will heat faster than frozen foods Composition and Density Foods high in fat and sugar will reach a higher temperature and heat faster than other foods Heavy dense foods such as meat and potatoes require a longer cook time than the same size of a light porous food such as cake CookingGuidelines Covering Covering food helps retai...

Page 9: ... cooking power of specific foods Ceramic Glass Glass Acceptable for use China Earthenware Follow manufacturer s recommendations Melamine Follow manufacturer s recommendations Paper Towels Dinnerware Napkins Use non recycled and those approved by the manufacturer for microwave oven use Plastic Wraps Bags Covers Dinnerware Containers Use those approved by the manufacturer for microwave oven use Pott...

Page 10: ...ycle ends End will appear in the display 4 end of cycle tones will sound and then reminder tones will sound every minute PresetCooking Times and cooking power have been preset for five microwavable foods Use the following chart as a guide To Use 1 Touch appropriate preset cooking pad see chart above 2 Touch number pads to enter quantity see chart above The display will count down the cook time Whe...

Page 11: ...reminder tones EZ Choice Defrosting The EZ Choice Defrost feature s preset programs can be used or the microwave oven can be manually set to defrost Food should be 0 F 18 C or colder at defrosting for optimal results How foods are stored can affect results Unwrap foods and remove lids from fruit juice before defrosting Shallow packages will defrost more quickly than deep blocks Separate food piece...

Page 12: ...ithout the grease filters in place Soak grease filters in hot water and mild detergent Scrub and swish to remove embedded dirt Rinse well and shake dry Do not use ammonia or oven cleaner Do not place in dishwasher OVEN CAVITY Do not use soap filled scouring pads abrasive cleaners steel wool pads gritty washcloths or some paper towels Damage may occur The area where the oven door and frame touch wh...

Page 13: ...se filters by inserting one end into the frame Swing other side up and slide into position 3 Plug in microwave oven or reconnect power ReplacingCooktopLight The cooktop light is a candelabra base 30 watt bulb See Assistance or Service section to reorder To Replace 1 Unplug microwave oven or disconnect power 2 Remove the bulb cover mounting screws 3 Replace light Close bulb cover Replace mounting s...

Page 14: ...ce section Do not operate the oven without turntable and turntable support working properly Turntable rotates both directions This is normal and depends on motor rotation at beginning of cycle Display shows messages Is the display showing There has been a power failure or the clock time has been turned off See Display section to clear display See Clock section to reset the clock or to turn it on I...

Page 15: ...cifications on our full line of appliances Installation information Use and maintenance procedures Accessory and repair parts sales Specialized customer assistance Spanish speaking hearing impaired limited vision etc Referrals to local dealers repair parts distributors and service companies Whirlpool designated service technicians are trained to fulfill the product warranty and provide after warra...

Page 16: ...NTAL OR CONSEQUENTIAL DAMAGES Some states do not allow the exclusion or limitation of incidental or consequential damages so this exclusion or limitation may not apply to you This warranty gives you specific legal rights and you may also have other rights which may vary from state to state Outside the 50 United States this warranty does not apply Contact your authorized Whirlpool dealer to determi...

Reviews: