background image

EN

CLEANING AND MAINTENANCE

Make sure that the oven has 

cooled down before carrying 

out any maintenance or 

cleaning.
Do not use steam cleaners.

Do not use wire wool, abrasive 

scourers or abrasive/corrosive 

cleaning agents, as these could 

damage the surfaces of the 

appliance.

Wear protective gloves.
The oven must be disconnected 

from the mains before carrying 

out any kind of maintenance 

work.

EXTERIOR SURFACES

• Clean the surfaces with a damp microfibre cloth.

If they are very dirty, add a few drops of pH-

neutral detergent. Finish off with a dry cloth.

• Do not use corrosive or abrasive detergents. If

any of these products inadvertently comes into

contact with the surfaces of the appliance, clean

immediately with a damp microfibre cloth.

INTERIOR SURFACES

• After every use, leave the oven to cool and then

clean it, preferably while it is still warm, to remove

any deposits or stains caused by food residues. To

dry any condensation that has formed as a result

of cooking foods with a high water content, let the

oven to cool completely and then wipe it with a

cloth or sponge.

• Clean the glass in the door with a suitable liquid

detergent.

• The oven door can be removed to facilitate

cleaning.

ACCESSORIES

Soak the accessories in a washing-up liquid solution 

after use, handling them with oven gloves if they 

are still hot. Food residues can be removed using a 

washing-up brush or a sponge.

REPLACING THE LAMP

• Disconnect the oven from the power supply.
• Unscrew the cover from the lamp, replace the bulb

and screw the cover back on the lamp.

• Reconnect the oven to the power supply.

Please note: Only use 15-25 W/220-240 V type G9, T300°C 

halogen bulbs. The bulb used in the product is specifically 

designed for domestic appliances and is not suitable for 

general room lighting within the home (EC Regulation 

244/2009).

Light bulbs are available from our After-Sales Service.

When using halogen bulbs, do not handle them with your 

bare hands as your fingerprints could cause damage. Do 

not use the oven until the lamp cover has been refitted.

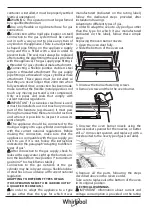
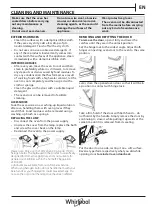
REMOVING AND REFITTING THE DOOR

To remove the door

, open it fully and lower the 

catches until they are in the unlock position.
Set the hinge lock to the widest angle. Adjust both 

hinges connecting oven door to the oven to the same 

position. 

Later, close the opened oven door so that it will be in 

a position to contact with hinge lock.

Fake a firm hold of the door with both hands – do 

not hold it by the handle. Simply remove the door by 

continuing to close it while pulling it upwards at the 

same time until it is released from its seating.

a

b

~15°

Put the door to one side, resting it on a soft surface.
Reversely perform respectively what you did while 

opening door 

to reinstall oven door back

.

Summary of Contents for MSA I 5G3F IX

Page 1: ...es Consignes d installation utilisation et sécurité Guía de salud y seguridad uso y cuidado y de instalación Guia de Saúde e Segurança Utilização e Manutenção e Instalação والتركيب والعناية االستخدام والسالمة الصحة دليل www whirlpool eu register ...

Page 2: ... parts become hot during use Care should be taken to avoid touching heating elements Children less than 8 years of age must be kept away unless continuously supervised Never leave the appliance unattended during food drying If the appliance is suitable for probe usage only use a temperature probe recommended for this oven risk of fire Keep clothes or other flammable materials awayfromtheappliance ...

Page 3: ...ct to heat produced by external sources ovens fireplaces stoves etc whichcouldraisethetemperatureofthecylinder above 50 C Should you find it difficult to turn the knobs for the burner please contact the After sales Service who can replace of the burner tap if found to be faulty The openings use for the ventilation and dispersion of heat must never be covered Carry out all cabinet cutting works bef...

Page 4: ...ent national regulations Before making the connection make sure that the appliance is compatible with the gas supply you wish to use If it is not follow the instructions indicated in the paragraph Adapting to different types of gas After connection to the gas supply check for leaks with soapy water Light up the burners and turn the knobs from max position 1 to minimum position 2 to check flame sta...

Page 5: ...POSAL OF PACKAGING MATERIALS The packaging material is 100 recyclable and is marked with the recycle symbol The various parts of the packaging must therefore be disposed of responsibly and in full compliance with local authority regulations governing waste disposal DISPOSAL OF HOUSEHOLD APPLIANCES This appliance is manufactured with recyclable or reusable materials Dispose of it in accordance with...

Page 6: ...ooking receptacles DRIP TRAY Designed to collect fat and food particles when it is positioned under the grid or as a plate such as when cooking meat chicken and fish with or without vegetables Pour a little of drinking water into the drip tray to prevent spatters of fat or oil and smoke TURNSPIT For grilling poultry and roasts INSERTING WIRE SHELVES AND OTHER ACCESSORIES Insert the wire shelf onto...

Page 7: ...at least one minute before attempting to switch the oven on again USING THE GAS GRILL Place the food to be grilled on the turnspit or on the wire shelf When placing the food directly on the wire shelf place the drip tray with some drinking water under the food Turn the thermostat and grill selection knob clockwise to the grill position and hold it pressed for a few seconds to activate the grill Th...

Page 8: ...e sound OPTIONS ALARM TONE To set the alarm tone long press button To select the desired tone press buttons or the last sound heard will be your adjusted one Press the time button to confirm BRIGHTNESS To set the brightness of display long press button To select the desired level press buttons or then press the time button to confirm Note After prolonged blackouts all functions will default to the...

Page 9: ...r use handling them with oven gloves if they are still hot Food residues can be removed using a washing up brush or a sponge REPLACING THE LAMP Disconnect the oven from the power supply Unscrew the cover from the lamp replace the bulb and screw the cover back on the lamp Reconnect the oven to the power supply Please note Only use 15 25 W 220 240 V type G9 T300 C halogen bulbs The bulb used in the ...

Page 10: ... cause Solution The oven will not switch on Power cut Disconnection from the mains electricity Check for the presence of mains electrical power and whether the oven is connected to the electricity supply Wait at least one minute then try to switch the oven on again and see if the problem persists Switch on procedure carried out incorrectly Wait at least one minute and then repeat the steps describ...

Page 11: ...x2 90 C ...

Page 12: ...5 896 865 570 595 24 576 870 min 600 35 560 min 550 min 865 min 35 30 810 590 30 12 87 max 7 ...

Page 13: ...001 x 2 ...

Page 14: ...400011392069 x 2 Whirlpool EMEA S p A Via Carlo Pisacane n 1 20016 Pero Mi Italia ...

Reviews: