background image

9

GETTING TO KNOW YOUR  MICROWAVE OVEN

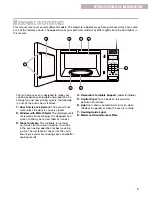
Your microwave oven is designed to make your
cooking experience enjoyable and productive. To
help get you up and running quickly, the following
is a list of the oven’s basic features:

1.

Door Safety Lock System. The oven will not
work unless the door is securely closed.

2.

Window with Metal Shield. The shield prevents
microwaves from escaping. It is designed as a
screen to allow you to view food as it cooks.

3.

Glass Turntable. This turntable turns food 
as it cooks for more even cooking. It must be 
in the oven during operation for best cooking
results. The turntable is sunken into the cavity
floor to give you more cooking space and better
cooking results.

4.

Removable Turntable Support (under turntable).

5.

Control Panel. Touch pads on this panel to
perform all functions. 

6.

Light (not shown). Automatically turns on when
the door is opened or when the oven is running.

7.

Cooking Guide Label.

8.

Model and Serial Number Plate.

M

ICROWAVE OVEN FEATURES

1

2

8

5

3

4

6

7

This manual may cover several different models. The model (or appliance) you have purchased may have some
or all of the features shown. The appearance of your particular model may differ slightly from the illustrations in
this manual.

Summary of Contents for MT1145SL

Page 1: ...the clock 12 Using the minute timer 12 Microwave Oven Use 13 Cooking at high cook power 13 Cooking at different cook powers 13 Cooking with more than one cook cycle 14 Using AUTO DEFROST 14 Defrosting tips 15 Using JET START Feature 15 Using WARM HOLD 16 Sensor Cooking 16 Using SENSOR COOK 16 Sensor cooking chart 17 Using SENSOR REHEAT 17 Sensor reheating chart 18 Using SENSOR POPCORN 18 Sensor po...

Page 2: ... number label plate see the diagram in the Getting to Know Your Microwave Oven section Please also record the purchase date of your appliance and your dealer s name address and telephone number Keep this book and the sales slip together for future reference It is important for you to save your sales receipt showing the date of purchase Proof of purchase will assure you of in warranty service OurCu...

Page 3: ... this section The microwave oven must be grounded Connect only to properly grounded outlet See GROUND ING INSTRUCTIONS found in the Installation Instructions section Install or locate the microwave oven only in accordance with the installation instructions Some products such as whole eggs and sealed containers for example closed glass jars may explode and should not be heated in the microwave oven...

Page 4: ...wave energy It is important not to defeat or tamper with the safety interlocks b Do not place any object between the oven front face and the door or allow soil or cleaner residue to accumulate on sealing surfaces c Do not operate the oven if it is damaged It is particularly important that the oven door close properly and that there is no damage to the 1 door bent 2 hinges and latches broken or loo...

Page 5: ...ack and side of the oven where the exhaust vents are lo cated Blocking the exhaust vents could cause damage to the oven and poor cooking results Make sure the microwave oven legs are in place to ensure proper airflow If vents are blocked a sensitive thermal safety device automatically turns the oven off The oven should work properly once it has cooled wWARNING Fire Hazard Do not install the oven n...

Page 6: ... grounding plug can result in a risk of electric shock Consult a qualified electrician or serviceman if the grounding instructions are not completely understood or if doubt exists as to whether the microwave oven is properly grounded Do not use an extension cord If the power supply cord is too short have a qualified electrician or serviceman install an outlet near the microwave oven For a permanen...

Page 7: ...nt steam during cooking HOW YOUR MICROWAVE OVEN WORKS Microwave energy is not hot It causes food to make its own heat and it s this heat that cooks the food Microwaves are like TV waves radio waves or light waves You cannot see them but you can see what they do A magnetron in the microwave oven produces microwaves The microwaves move into the oven where they contact food as it turns on the turntab...

Page 8: ...use a browning dish the browning dish bottom must be at least 3 16 in 5 mm above the turntable Follow the directions supplied with the browning dish Steam buildup in whole eggs may cause them to burst and damage the oven Cover poached eggs and allow a standing time Heated liquids can splash out during and after heating Use of a wooden stir stick placed in the cup or bowl during heating may help to...

Page 9: ...en cooking It must be in the oven during operation for best cooking results The turntable is sunken into the cavity floor to give you more cooking space and better cooking results 4 Removable Turntable Support under turntable 5 Control Panel Touch pads on this panel to perform all functions 6 Light not shown Automatically turns on when the door is opened or when the oven is running 7 Cooking Guide...

Page 10: ...wave oven You can use WARM HOLD by itself or to automatically follow a cooking cycle 9 Number Pads Touch number pads to control sound volume weights language scroll speed clock Demo mode on some models cooking times cook powers or quantities 10 CLOCK Touch this pad to enter the correct time of day 11 TIMER SET OFF Touch this pad to set or cancel the timer function 12 START JET START Feature Touch ...

Page 11: ...fore setting a function touch OFF CANCEL to make sure no other function is on Usingthechildlock The Child Lock locks the control panel so children cannot use the microwave when you do not want them to To lock the control panel Touch and hold OFF CANCEL until LOCKED appears on display approximately 4 seconds One tone will sound To unlock the control panel Touch and hold OFF CANCEL until UNLOCK appe...

Page 12: ... for time of day For example For 7 00 touch 7 0 0 3 Touch CLOCK USING THE MINUTE TIMER You can use your microwave oven as a kitchen timer Use the minute timer for timing up to 99 minutes 1 Touch TIMER SET OFF 2 Touch number pads for desired time For example for 10 minutes touch 1 0 0 0 3 Touch START JET START or TIMER SET OFF or allow the timer to start automatically after a short delay 4 At the e...

Page 13: ...h level stands for a different percentage of cook power Many microwave cookbook recipes tell you by number percent or name which cook power to use The following chart gives the percentage of cook power each level stands for and the cook power name usually used It also tells you when to use each cook power Follow recipe or food package instructions if available NOTE Refer to a reliable cookbook for...

Page 14: ...with more than one cook cycle will not work with SENSOR COOK or SENSOR REHEAT functions USING AUTODEFROST You can defrost food by choosing a category and setting a weight AUTO DEFROST has preset times and cook powers for 3 categories Meat Poultry and Fish 1 Touch AUTO DEFROST Once for Meat twice for Poultry three times for Fish 2 Touch number pads for desired weight from 1 to 6 0 lbs 45 g to 2 7 k...

Page 15: ...in pounds and ounces that are fractions of a pound for example 4 ounces equals 1 4 pound 113 4 g If the weight on the food package is in fractions of a pound you can use the following chart to convert the weight to decimals Use small pieces of aluminum foil to shield parts of food such as chicken wings leg tips fish tails or areas that start to get warm Make sure the foil does not touch the sides ...

Page 16: ...NSOR REHEAT and SENSOR POPCORN The simple instructions for these functions are on the following pages NOTES If you want to cook by entering a time and cook power see Microwave cooking guide in the Cooking Guide section The oven should be plugged in at least 5 minutes before sensor cooking Room temperature should not exceed 95 F 35 C Be sure the exterior of the cooking container and the interior of...

Page 17: ...ic wrap and vent When cooking is complete allow rice to stand 5 minutes or until liquid is absorbed Stir rice SERVING SIZE 1 to 4 medium about 10 to 13 oz 283 to 368 g each 1 to 4 cups 250 mL to 1 L 1 to 4 cups 250 mL to 1 L Works best if entree is 10 to 20 oz 284 to 567 g 1 2 to 2 cups 125 to 500 mL of dry rice Use medium or long grain rice Cook instant rice accord ing to directions on the packag...

Page 18: ...st one touch NOTES Pop only 1 package at a time If you are using a microwave popcorn popper follow manufacturer s instructions 1 Place the bag in the center of the turntable and close the door 2 Touch SENSOR POPCORN NOTE The sensor will determine popping time based on the size of the package DIRECTIONS Follow package directions Use a popcorn package which is made especially for microwave cooking D...

Page 19: ... can use any covering that lets microwaves pass through See Getting to Know Your Microwave Oven for materials that microwaves will pass through If you are using the Sensor function be sure to vent Releasingpressureinfoods Several foods for example baked potatoes sausages egg yolks and some fruits are tightly covered by a skin or membrane Steam can build up under the membrane during cooking causing...

Page 20: ...okingyoushouldnotdoinyourmicrowaveoven Do not do canning of foods in the oven Closed glass jars may explode resulting in damage to the oven Do not use the microwave oven to sterilize objects baby bottles etc It is difficult to keep the oven at the high temperature needed for sterilization MICROWAVE OVEN CARE To make sure your microwave oven looks good and works well for a long time you should main...

Page 21: ...ional time to allow it to finish cooking This frees the oven for other cooking Steam is normally produced during cooking The microwave oven has been designed to vent this steam out the vents Yes Pop packaged microwave popcorn following manufacturer s guidelines or use the preset SENSOR POPCORN pad Do not use regular paper bags Use the listening test by stopping the oven as soon as the popping slow...

Page 22: ...table is correct side up and is sitting securely on center shaft The support is not operating correctly Remove turntable check that the turntable support is properly in place and restart oven If turntable support does not move call a designated service technician for repair Cooking without the turntable can give you poor results The oven door is not closed completely You have set the controls as a...

Page 23: ...arts distributors Whirlpool designated service technicians are trained to fulfill the product warranty and provide after warranty service anywhere in the United States To locate the Whirlpool designated service company in your area you can also look in your telephone directory Yellow Pages ASSISTANCE OR SERVICE To avoid unnecessary service calls please check the Troubleshooting section It may save...

Page 24: ...n home service Your microwave oven must be taken to a Whirlpool designated service company except when your microwave oven is installed over an approved oven using an approved built in kit See the Built in kits section for a list of approved built in kits D Damage resulting from accident alteration misuse abuse fire flood improper installation acts of God or use of products not approved by Whirlpo...

Reviews: