background image

40

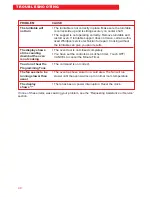
PROBLEM

The turntable will
not turn

The display shows
a time counting
down but the oven
is not cooking

You do not hear the
Programming Tone

The fan seems to be
running slower than
usual

The display
shows “:”

CAUSE

The turntable is not correctly in place. Make sure the turntable
is correct-side up and is sitting securely on center shaft.

The support is not operating correctly. Remove turntable and
restart oven. If turntable support does not move, call an autho-
rized Whirlpool service technician for repair. Cooking without
the turntable can give you poor results.

The oven door is not closed completely.

You have set the controls as a kitchen timer. Touch OFF/
CANCEL to cancel the Minute Timer.

The command is not correct.

The oven has been stored in a cold area. The fan will run
slower until the oven warms up to normal room temperature.

There has been a power interruption. Reset the clock.

If none of these items was causing your problem, see the “Requesting Assistance or Service”
section.

T R O U B L E S H O O T I N G

Summary of Contents for MT8066SE

Page 1: ...owave Oven 35 Cooking Guide 36 Questions and Answers 38 Troubleshooting 39 Requesting Assistance or Service 41 Index 47 Warranty 48 In the U S A for assistance or service call the Consumer Assistance Center 1 800 253 1301 In Canada for assistance or service see pages 42 and 43 G U I D E UseAndCare MODELS MT8066SE YMT8066SE MT8068SE YMT8068SE MICROWAVE OVEN PART NO NEW 65250501 4393202 ...

Page 2: ... features 14 Control panel features 15 Setting the clock 17 Using the minute timer 18 Using ADD MINUTE 19 Using Your Microwave Oven 20 Cooking at high cook power 20 Cooking at different cook powers 21 Cooking with more than one cook cycle 23 Using BAKED POTATOES 25 Using BEVERAGE 27 Using POPCORN 28 Using FROZEN ENTREE 29 Using DEFROST 30 Defrosting tips 31 Using REHEAT 32 Reheating tips 33 Using ...

Page 3: ...d safely Please read it carefully Also please complete and mail in the Ownership Registration Card provided with your appliance The card helps us notify you about any new information on your appliance Please record your model s information Whenever you call to request service for your appliance you need to know your complete model number and serial number You can find this information on the model...

Page 4: ...ts such as whole eggs in the shell and sealed containers for example closed glass jars may explode and should not be heated in the microwave oven Use the microwave oven only for its intended use as described in this manual Do not use corrosive chemicals or vapors in the microwave oven This type of oven is specifically designed to heat cook or dry food It is not designed for industrial or laborator...

Page 5: ...hing directly on top of the microwave oven when the micro wave oven is in operation SAVE THESE INSTRUCTIONS PRECAUTIONS TO AVOID POSSIBLE EXPOSURE TO EXCESSIVEMICROWAVEENERGY a Do not attempt to operate this oven with the door open since open door operation can result in harmful exposure to microwave energy It is important not to defeat or tamper with the safety interlocks b Do not place any objec...

Page 6: ...he oven The weight of the oven is about 40 lbs 18kg The microwave oven should be at a temperature above 50 F 10 C for proper operation NOTE You can fasten your microwave oven under a cabinet by using the proper trim kit See Microwave oven features in the Getting to Know section wWARNING Fire Hazard Do not install the oven next to or over a heat source without a UL or CSA approved trim kit Doing so...

Page 7: ...per use of the grounding can result in a risk of electric shock Consult a qualified electrician or service man if the grounding instructions are not completely understood or if doubt exists as to whether the microwave oven is properly grounded wWARNING Electrical Shock Hazard Plug into a grounded 3 prong outlet Do not remove ground prong Do not use an adapter Do not use an extension cord Failure t...

Page 8: ...nd it s this heat that cooks the food Microwaves are like TV waves or light waves You cannot see them but you can see what they do A magnetron in the microwave oven produces microwaves The microwaves move into the oven where they contact food as it turns on the turntable Getting to Know Your Microwave Oven This section discusses the concepts behind microwave cooking It also shows you the basics yo...

Page 9: ...roast The heat spreads to the center from the outer cooked areas just as in regular oven cooking This is one of the reasons for letting some foods for example roasts or baked potatoes stand for a while after cooking or for stirring some foods during the cooking time The microwaves disturb water molecules in the food As the molecules bounce around bumping into each other heat is made like rubbing y...

Page 10: ...ent When there is interference you can reduce it or remove it by Cleaning the door and sealing surfaces of the oven Adjusting the receiving antenna of the radio or television Testing your microwave oven To test the oven put about 1 cup of cold water in a glass container in the oven Close the door Make sure it latches Follow the directions in the Cooking at high cook power section to set the oven t...

Page 11: ...ty precautions Never cook or reheat a whole egg inside the shell Steam buildup in whole eggs may cause them to burst and burn you and possibly damage the oven Slice hard boiled eggs before heating In rare cases poached eggs have been known to explode Cover poached eggs and allow a standing time of one minute before cutting into them For best results stir any liquid several times before heating or ...

Page 12: ...time After microwaving wrap potatoes in foil and set aside for 5 minutes They will finish cooking while standing Do not start a microwave oven when it is empty Product life may be shortened If you practice programming the oven put a container of water in the oven It is normal for the oven door to look wavy after the oven has been running for a while Do not use newspaper or other printed paper in t...

Page 13: ...ide up in the oven Carefully place the cookware on your turntable to avoid possibly breaking it Handle your turntable with care when removing it from the oven to avoid possibly breaking it If your turntable cracks or breaks contact your Whirlpool dealer for a replacement When you use a browning dish the brown ing dish bottom must be at least 3 16 inch 5mm above the turntable Follow the directions ...

Page 14: ...ood as it cooks 4 Glass Turntable This turntable turns food as it cooks for more even cooking It must be in the oven during operation for best cooking results See pages 9 13 and 35 for more details 5 Turntable Support under turntable 6 Control Panel Touch pads on this panel to perform all functions See pages 15 and 16 for more information 7 Light Automatically turns on when door is opened or when ...

Page 15: ...ds to thaw frozen food See page 30 for more information 4 POPCORN Touch this pad to pop a snack size 1 75 oz 50g bag of popcorn You do not need to enter cooking time or cook power See page 28 for more information 5 BREAKFAST Touch this pad 1 3 times to cook breakfast foods from one of three preset categories You do not need to enter cooking time or cook power See page 33 for more information 6 VEG...

Page 16: ...ound and Err will appear on the display Touch OFF CANCEL and re enter the instructions Once you choose a function an indica tor light will flash as a prompt for the next action you need to perform If you choose a function but do not press another command pad within one minute the display returns to the time of day and you have to start over If you have entered all settings for a function but do no...

Page 17: ...1 Choose the setting 2 Enter the time of day Example for 5 30 3 Touch CLOCK SET or START ENTER CLOCK SET TOUCH YOU SEE TOUCH YOU SEE 5 3 TIMER 0 TOUCH YOU SEE CLOCK SET OR START ENTER Start indicator light flashes after 5 seconds GETTING TO KNOW YOUR MICROWAVE OVEN If you enter an incorrect time three tones will sound Err then 0 will appear on the display Re enter the correct time If you touch OFF...

Page 18: ...he minute timer to set a delayed start time Set the delayed start time with the minute timer by following Steps 1 and 2 below Then set cook time as described in the Using Your Microwave Oven section 1 Touch 0 2 Enter the time to be counted down 3 Start the countdown TOUCH YOU SEE TIMER 0 TOUCH YOU SEE 3 TIMER 0 TIMER 0 TOUCH YOU SEE Start indicator light flashes after 5 seconds START ENTER ...

Page 19: ...ke sure the food is in the oven and the door is closed 2 Touch ADD MINUTE 3 Start the oven During cooking Touch ADD MINUTE You can use ADD MINUTE when timed cooking defrosting or running any func tion with preset time for example BEVERAGE If you touch ADD MINUTE during cook ing the oven will cook at the currently selected cook power TOUCH YOU SEE ADD MINUTE example once for one minute TOUCH YOU SE...

Page 20: ...ose the door 2 Set the cooking time Example for 1 minute 30 seconds 3 Start the oven At end of cooking time Four tones will sound Two tones will sound every minute until you open the door or touch any pad The display will then return to the time of day TOUCH YOU SEE COOK TIME TOUCH YOU SEE 3 TIMER 0 1 Start indicator light flashes after 5 seconds TOUCH YOU SEE START ENTER cooking time counts down ...

Page 21: ...wer 3 30 of full power 2 20 of full power 1 10 of full power NAME High Medium High Medium Medium Low Defrost Low WHEN TO USE IT Quick heating many convenience foods and foods with high water content such as soups and beverages Cooking small tender pieces of meat ground meat poultry pieces fish fillets and vegetables Heating cream soups Heating rice pasta or casseroles Cooking and heating foods tha...

Page 22: ... touch Number pad 1 the cook power will become the second number you touched For example if you touch Number pads 1 and 4 the cook power would be 4 If you touch Number pad 0 then another number your microwave oven will ignore Number pad 0 TOUCH YOU SEE COOK TIME TOUCH YOU SEE 3 TIMER 0 7 Start indicator light flashes after 5 seconds TOUCH YOU SEE COOK POWER TOUCH YOU SEE 5 Start indicator light fl...

Page 23: ...ts some recipes call for one cook power for a certain length of time and another cook power for another length of time Your oven can be set to change from one to another automatically for up to 4 cycles 1 Put the food in the oven and close the door 2 Set the cooking time for the first cycle TOUCH YOU SEE START ENTER cooking time counts down YOU SEE TOUCH YOU SEE COOK POWER example for 50 cook powe...

Page 24: ...ower will become the second number you touched For example if you touch Number pads 1 and 4 the cook power would be 4 If you touch Number pad 0 then another number your microwave oven will ignore Number pad 0 4 Repeat Steps 2 and 3 to set the cooking time and cook power for each additional cycle TOUCH YOU SEE Start indicator light flashes after 5 seconds 3 TIMER 0 7 TOUCH YOU SEE TOUCH YOU SEE Sta...

Page 25: ...s 1 2 baking potatoes up to 8 oz 225g total weight by automatically choosing baking time and cook power Before baking remember to pierce potato with a fork several times After cooking let potato stand 5 minutes wrapped in foil 1 Put pierced potatoes on a paper towel in the oven and close the door 2 Touch BAKED POTATOES TOUCH YOU SEE START ENTER first cycle s cooking time counts down followed by co...

Page 26: ...ter pad to bake one potato or enter 2 to bake more If you do not touch any pad the Baked Potatoes function will cancel out If you touch a Number pad above 2 you will hear three tones and see Err on the display for one second followed by 1 2 with the Qty and Baked Potatoes indicator lights on If you touch the Start Enter pad before entering the number of servings the oven will automatically be set ...

Page 27: ... in the oven and close the door 2 Touch BEVERAGE 3 Start the oven At end of heating time Four tones will sound Two tones will sound every minute until you open the door or touch any pad to return the display to the time of day TOUCH YOU SEE BEVERAGE TOUCH YOU SEE START ENTER heating time counts down YOU SEE USING YOUR MICROWAVE OVEN ...

Page 28: ...larger than the snack size bags recom mended above As a larger bag expands it may interfere with the rotation of the turntable causing it to slow down or stop 1 Place the bag in the center of the turntable and close the door 2 Touch POPCORN 3 Start the oven At end of heating time Four tones will sound Two tones will sound every minute until you open the door or touch any pad to return the display ...

Page 29: ...Follow manufacturer s guidelines for preparation of the frozen entree 1 Place the frozen entree on the turntable and close the door 2 Touch FROZEN ENTREE 3 Start the oven At end of cooking time Four tones will sound Two tones will sound every minute until you open the door or touch any pad to return the display to the time of day TOUCH YOU SEE Start indicator light flashes after 5 seconds TOUCH YO...

Page 30: ...an one cycle 3 Enter the defrosting time 4 Start the oven At end of defrosting time Four tones will sound Two tones will sound every minute until you open the door or touch any pad to return the display to the time of day TOUCH YOU SEE DEFROST TOUCH YOU SEE 9 TIMER 0 TIMER 0 TOUCH YOU SEE START ENTER Start indicator light flashes after 5 seconds defrosting time counts down YOU SEE NOTE Refer to a ...

Page 31: ...varies according to how solidly the food is frozen The shape of the package alters the defrosting time Shallow rectangular packets defrost more quickly than a deep block Separate pieces as they begin to defrost Separated pieces defrost more easily You can use small pieces of aluminum foil to shield foods like chicken wings leg tips and fish tails but the foil must not touch the side of the oven Fo...

Page 32: ...ouch any pad within 1 minute REHEAT will be canceled If you touch a Number pad higher than the maximum allowed for your food setting three tones will sound and the display will show Err for 1 second followed by a prompt telling you which quantities you can choose from If you touch the Start Enter pad before entering a quantity your oven will auto matically be set to reheat a quantity of 1 If you t...

Page 33: ...ou to choose a quantity You have 3 seconds to enter a quantity or to touch the Start Enter pad to heat one item If you do not do either the display will ask you if you want to heat one item You then have 1 minute to touch the Start Enter pad or change the quantity and touch the Start Enter pad If you do not touch any pad within 1 minute BREAKFAST will be canceled If you touch a Number pad higher t...

Page 34: ...y pad within 1 minute VEGETABLES will be canceled If you touch a Number pad higher than the maximum allowed for your vegetable setting three tones will sound and the display will show Err for 1 second followed by a prompt telling you which quantities you can choose from If you touch the Start Enter pad before entering a quantity your oven will auto matically be set to heat a quantity of 1 If you t...

Page 35: ...king This is normal For stubborn soil boil a cup of water in the oven for 2 or 3 minutes Steam will soften the soil To get rid of odors inside the oven boil a cup of water with lemon juice or vinegar For exterior surfaces and control panel Use a soft cloth with spray glass cleaner Apply the spray glass cleaner to the soft cloth do not spray directly on the oven NOTE Abrasive cleansers steel wool p...

Page 36: ...er parts will cook faster than the thicker areas Place the thinner parts of chicken wings and legs in the center of the dish Stirring turning foods Stirring and turning foods distributes heat quickly to the center of the dish and avoids overcooking at the outer edges of the food Covering food Cover food to Reduce splattering Shorten cooking times Retain food moisture All coverings that allow micro...

Page 37: ...etrate the top of the food If you use aluminum containers without package instructions follow these guidelines Place container in a glass bowl and add some water so that it covers the bottom of the container not more than 1 4 inch 6mm high This ensures even heating of the container bottom Always remove the lid to avoid damage to the oven Use only undamaged containers Do not use containers taller t...

Page 38: ...or shielding use small flat pieces small skewers and shallow foil trays if tray is 3 4 inch 19mm deep and half filled with food to absorb microwave energy Never allow metal to touch walls or door For more information see Using aluminum foil in the Cooking Guide section Yes The turntable rotates clockwise or counterclockwise depending on the rotation of the motor when the cooking cycle begins This ...

Page 39: ...erienced a power failure CAUSE The door is not firmly closed and latched You did not touch START ENTER You did not follow directions exactly An operation that was programmed earlier is still running You have not entered numbers after touching COOK TIME The electric supply to your home or wall outlets is low or lower than normal Your electric company can tell you if the line voltage is low Your ele...

Page 40: ...restart oven If turntable support does not move call an autho rized Whirlpool service technician for repair Cooking without the turntable can give you poor results The oven door is not closed completely You have set the controls as a kitchen timer Touch OFF CANCEL to cancel the Minute Timer The command is not correct The oven has been stored in a cold area The fan will run slower until the oven wa...

Page 41: ...the product warranty and provide after warranty service anywhere in the United States To locate the authorized Whirlpool service company in your area call our Consumer Assistance Center telephone number see Step 1 or look in your telephone directory Yellow Pages under APPLIANCE HOUSEHOLD WASHING MACHINES MAJOR SERVICE REPAIR DRYERS SERVICE REPAIR See Whirlpool Appliances or See Whirlpool Appliance...

Page 42: ...nce directly you may ship it prepaid and insured Be sure to enclose your name address daytime telephone number a complete description of the problem and the proof of purchase along with the appliance The unit should be carefully packed in the original carton or alternately in a suitable heavy card board carton to prevent damage For service under warranty your repaired microwave oven will be return...

Page 43: ...xcept 807 area code Outside the Ottawa area 1 800 807 6777 MANITOBA SASKATCHEWAN 1 800 665 1683 and 807 area code in ONTARIO QUEBEC Montreal except South Shore 1 800 361 3032 South Shore Montreal 1 800 361 0950 Quebec City 1 800 463 1523 Sherbrooke 1 800 567 6966 ATLANTIC PROVINCES 1 800 565 1598 For service in areas other than those listed contact the Consumer Service Centre your local appliance ...

Page 44: ...44 NOTES ...

Page 45: ...45 NOTES ...

Page 46: ...46 NOTES ...

Page 47: ...ads 15 16 Off cancel 15 16 POPCORN 28 REHEAT 32 Start enter 15 16 VEGETABLES 34 ERROR SIGNALS 16 GROUNDING INSTRUCTIONS 7 HOW YOUR MICROWAVE OVEN WORKS 8 INSTALLATION INSTRUCTIONS 6 TOPIC PAGE INSTALLATION INSTRUCTIONS 6 PARTS AND FEATURES Cooking guide label 14 Door open button 14 Door safety lock system 14 Light 14 Magnetron 8 38 Model and serial number plate 14 Turntable 8 9 13 14 35 37 38 Vent...

Page 48: ... of products not approved by Whirlpool E Any labor costs during limited warranty F Repairs to parts or systems caused by unauthorized modifications made to the appliance 2 96 WHIRLPOOL CORPORATION SHALL NOT BE LIABLE FOR INCIDENTAL OR CONSE QUENTIAL DAMAGES Some states or provinces do not allow the exclusion or limitation of incidental or consequential damages so this exclusion or limitation may n...

Reviews: